Friday, June 20, 2014

American Girl Rectangle Hair Styling Cape and Circular Salon Cape AG001, AG002


Olivia and her family were home last weekend (she lives about 3.5 hours from us).  I asked her if I could borrow one of her AG dolls until they came again on the July 1st weekend.  She brought Kanani, Girl of the Year 2011 - 'a cheerful girl who helps others by sharing the aloha spirit'.  We brushed her long hair, using the cape to protect her clothing.  Worked awesome!
When Olivia was at the American Girl (AG) Doll store in Los Angeles (original post HERE), they told her that you should never brush your AG dolls hair without misting it with water first.  I had bought the brush at the time I bought Isabelle as I knew the importance of a proper brush on any dolls hair. I used a spray bottle that I use to keep my cats under control – not quite as pretty as the AG brand but it works.  Little girls love to brush dolls hair so that brought me the idea of making a Salon Cape/Hair Styling cape. 


So, Olivia, which one do you want – the square or round one?  I will put the other one away for Kari’s daughter, Erin.  Keep reading for the instructions on how I made them (below) if anyone is interested.

Olivia's Aunt put Kanani's hair in a bun using a sock.  You Tube it if you have never seen this done.  Too cool!

Rectangle Hair Styling Cape AG001


I had a strip of this flannel backed tablecloth so I thought I would try this Hair Styling cape by Doll Clothes Patterns. I had the 20” long but I only had 11 inches wide.


I followed her instructions on finding and marking the center point of the rectangle with a dot and drew a line from the center point to the hemline on one of the long sides. I drew a 2 inch circle around the center point to create an opening for your doll’s neck. Then cut along the line and around the circle to create the opening.  She used this for her center front opening – I want it to be my center back opening.


I used a bowl to help me make curves instead of the straight edges as she did.


I serged all the edges except the neck opening – I did not want to use trim.  I used a double fold of interfacing at each neck opening to help reinforce the velcro placement.


Sew bias tape around the neck opening, leaving a little tail at both ends.


Bury these tails under the velcro and sew velcro in place.


Bar tack the rectangle about 6” from the top fold between the shoulder and the hemline.


FRONT

BACK

SIDE VIEW

Circular Salon Cape AG002

 
I used to cut a lot of hair (human) in my day and I still cut hubby’s.  I took a look at my capes and came up with this.


I made a dot of this flannel backed tablecloth and drew a circle 8.5” away from it.

Until I had a large circle.


Fold it in half then in half again.


Draw a 1” circle at the point and cut away.


Cut to open one fold.


It should look like this.


Fold in half.  Lay a bowl on the fold you just cut open and draw a curve.


Cut it away.


Now your circle should look like this.


Repeat to finish as for the Rectangle Hair Styling Cape above except there is nothing to bar tack.
 
BACK

These can be made using raincoat fabric, a shower curtain or any water resistant fabric.

Stay tuned or better yet, sign up to my Blog so you won’t miss any of my AG posts!

Please leave a comment to let me know if you enjoyed this!

Tuesday, June 17, 2014

Recipe - Ice Cream Sandwich Cake

3K Oil had their annual Summer B’que at their cabin at the lake.  As usual, the supper was fantastic!  Then Loralee brought out this Ice Cream Sandwich Cake!  It was absolutely to die for!  I had to try making it! 


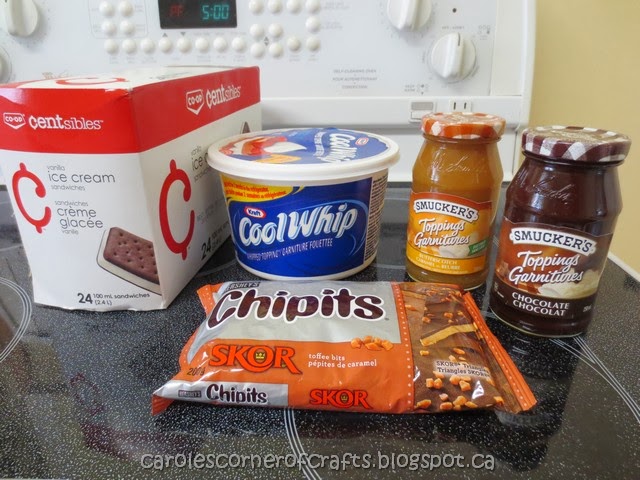
12 vanilla ice cream sandwiches, unwrapped

1 liter container Cool Whip

250ml jar Smucker’s chocolate topping, room temperature

250ml jar Smucker’s caramel topping, room temperature

1 cup Skor toffee bits


Arrange a layer of ice cream sandwiches in the bottom of a 9x13-inch dish.  I cut some so they completely covered my pan.


 Drizzle with a layer of chocolate and caramel topping .  Use the back of a spoon to blend slightly.


Cover with Skor bits.


Spread with Cool Whip and top with more Skor bits.


Because I was making this for coffee time for the men doing the reno’s at our house, I stopped there.  The recipe I found repeats another layer of ice cream sandwiches, toppings, skor bits ending with a top layer of Cool Whip and Skor Bits. I was afraid my men would think they needed a snooze if I made it that big for them!!  LOL The recipe above is the full recipe but I only used half of everything.

Cover dish with aluminum foil and freeze until set, at least 30 minutes.

This looks pretty sad to the one Loralee made but hey, my guys went back to work!


Tuesday, June 10, 2014

SU234 Graduation Owl Card

 
Another idea from Pinterest!  The card front was embossed with SU's Square Lattice Embossing Folder.  Sponged the edges of most everything then pounced the script with black ink as well.  I cut the diamond part of the grad hat about 1.25” wide by 5/8” tall and used a 1 1/4" circle punch on a ½” wide strip of card stock to get the curved bottom portion of the hat.  To make the diploma I cut a 1 1/4" wide X 1" tall piece of typing paper and just rolled it up.  Adhere it together and tie a linen thread knot around it and glue in place.

Stamps - Teeny Tiny Wishes, En Francais.

Card Stock - Black, Cherry Cobbler, White.

Ink - Black, Cherry Cobbler.

Accessories - Black grosgrain ribbon, sponge, Owl Builder punch, 1 1/4" circle punch, Square Lattice embossing folder, Word Window punch, 4” linen thread, Petals a Plenty embossing folder, Label punch, plain paper, Bird Builder punch.

Friday, June 6, 2014

MDS 157 American Girl Shopping

 
This is page 1 of 11 that I scrapped for Olivia’s American Girl shopping adventure.
Background - Card Stock\Textured Card Stock\Textured Card Stock - Regal Rose.
Embellishments - Staple & Stitching\Very Vanilla - Stitching Zigzag; Designer Kits\Downtown Grunge - embellishments\Downtown Grunge - frame3; Brads\Basic Black – brad.
Stamps - Extreme Elements\Extreme Elements - stars, Color = BASIC BLACK; Vintage Overlays\Vintage Overlays - texture 12; School Days II\School Days II - star 3; School Days II\School Days II - star 1, Color = REGAL ROSE; Jolly Bingo Bits\Jolly Bingo Bits – star; Designer Kits\You're My Sunshine\You're My Sunshine - ornate border.
Punches - Scallop Edge Punch, Fill Color = BASIC BLACK.


Tuesday, June 3, 2014

Introducing Isabelle – American Girl Doll of the Year 2014

My 9 year old granddaughter, Olivia was wondering if I could make her American Girl Dolls some clothes.  She was lucky enough to have visited the American Girl (AG) Doll store in Los Angeles when her family took a road trip in 2011.

Upon checking the net, I found lots of free patterns so I thought I would order myself a doll as it is a lot easier to fit a body as guess at it.  Since I know nothing about these dolls, I asked Olivia to suggest which doll I should buy.  She said ‘Isabelle.  She is the Girl of the Year.’  Two weeks later, Isabelle was at my door.

Now, I had visions of making cute little bonnets, fluffy dresses, lacey nighties and even diapers!  To my surprise, there is nothing ‘baby’ about this doll – she is a girl!  Just a plain girl! The frilly stuff I had in mind to make just isn’t going to suit her!  She is definitely a t-shirt, leggings type of girl!  Just a plain and simple girl.

She came in this coral t-shirt, denim type pants and gold shoes.

She was also wearing coral undies.

She had double twists in her hair but they didn’t last long once my 4 year old granddaughter arrived.

Isabelle also has a piece that attaches to her head with pink tipped highlights.

Although a beauty, she is nothing like I was expecting!

That’s ok, I will just change my clothes thinking from frills and fluff to plain.  Isabelle needs clothes too so I will get busy sewing and will return next month with something I have sewed to share with you.  I will also show you page 1 of 11 that I scrapbooked of Olivia’s visit to the American Girl (AG) Doll store this Friday so stay tuned or better yet, sign up to my Blog so you won’t miss any of my AG posts!

Tuesday, May 20, 2014

Sewing - Clothes Pin Holder

I am fortunate to have a clothes line at the house we purchased from Orpha in town.  I found this clothes pin bag full of clothes pins in Orpha’s coat closet so while the reno’s were still going on, I decided I would make it into this clothes pin bag I seen on this page called ‘Make a Clothespin Bag’.  This lady didn’t have a pattern to share so thought I would figure something out for myself.


I really liked the fabric – it reminds me of parachute fabric.  I think it would dry quickly outside if it got wet.  The first thing I did was pick this bag apart.


Press the fabric and square it.


This piece of fabric ended up being 18” wide x 45” long.  Fold with right sides together.  Mark the center of the short ends.


Lay a coat hanger with the neck of the hanger on the pin or at the center mark.  Trace the top part of the hanger onto the fabric.


Mark lines on either side of the hangers neck.  My chalk marks don’t show up very good but they are there.


Sew on the chalk lines making sure to leave a hole at the top for the hanger.  Trim.


Find something round to trace a circle.  My plates are square and a pizza pan was too big but I found this Tupperware lid that worked good – it is 10.5”.  Find the center then place the lid about 2” down from your stitching line and trace.


Cut out circle through ONE THICKNESS ONLY.


I should look like this when you are done.


I used my serger to trim the circle for the time being but when I get to the city, I will pick up some bias tape to finish it.  I think it would make a stronger finish.  Sew the side seams.  I used a scant ¼” as there wasn’t too much room left once the hanger is in there.


For a little more security, I cut 2 pieces of ribbon about 15” long, folded them in half and sewed to my side seams.


Turn right side out and insert hanger.


I tied the ribbon on to each end of the hanger.  Not sure this is necessary.  I can always cut them off if they are a nuisance.


Tuesday, May 13, 2014

SU233 Happy Birthday Owl Card

 
This idea came from another card I seen on Pinterest.  I have used a Sahara Sand card base and then Pretty in Pink DSP. I used a Top Note die in White and cut it flush with the pink.  The flowers are the Trio Flower punch and I added a rhinestone in the middle of them, the leaves are from the Sizzlets Little Leaves die.  Finished the card off with some Old Olive grosgrain ribbon and a sentiment from the Bring on the Cake set.  I cut one end of the sentiment into a flag using this method.

Cardstock – Sahara Sand, Pretty in Pink, Pretty in Pink DSP, Early Espresso, Black, White, Old Olive.

Stamps – Bring on the Cake.

Embellishments – Woodgrain EF, Bigz Top Note Die, Owl Builder punch, Sizzlets Little Leaves Die, Trio Flower punch, Old Olive grosgrain ribbon, Rhinestones, Square punch, sponge.

Ink  – Early Espresso, Old Olive.

Related Posts Plugin for WordPress, Blogger...