Showing posts with label AG Isabelle. Show all posts

Friday, July 25, 2014

American Girl Doll Tutu Tutorial AG005

 
Now the girls are outfitted!  Isabelle is going to show Kanani some of her dance moves then later, Kanani will show Isabelle some dance moves from Hawaii!  Which one do you like best Olivia??  (Original post HERE).  Very hard decision, I’d say!

American Girl  doll Tutu with ribbon waist Tutorial

I kinda followed Pixie Faire’s idea. The tulle I had was 104” wide so I rolled it until it was manageable to cut.  I cut the uneven pieces off.


I cut 4 strips at 2” wide by 104” long, trimmed off the salvage.


I wanted my tutu to be just over 4” so I cut my cardstock 8.5” long and wrapped my tulle pieces around it.

I cut the top and bottom folds.


I now have 52 strips of 2” wide tulle by 8”.


Tied my ribbon as did Pixie Faire.


Tied the ribbon to my cardstock for easier control.


Fold one 8” piece of tulle in half and slide it under the ribbon.


Put the tails through the loop and pull tight.  Slide it right next to one knot.


Repeat until you have reached the other knot and you are done.  Tie a bow with the extra ribbon under the dolls arm.


American Girl Doll Tutu (red) – Elastic Waist Tutorial


I used 9 meters of 2” strips for this red one.  I wanted my completed tutu to be about 4” long so I cut my cardstock 8” long and wrapped my tulle pieces around it.


Cut both folds.  Now you have 4” pieces at 2” wide.
 

Cut ¼” elastic 9” long.  Sew to form a circle.


I slipped my elastic over a lid to hold it.
 

Tie the netting very loosely to the elastic.


 If you tie it too tight, the elastic will ‘grow’ – I found that out!
 

Bring tails down.


Continue tying until all your pieces are used up.
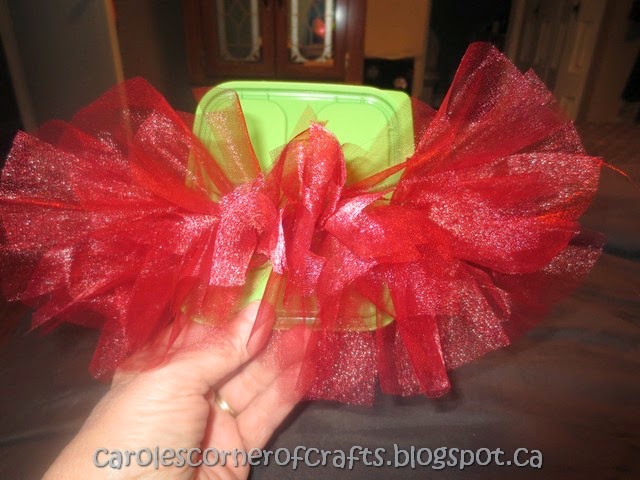
 
 
Ok Isabelle, you can go show Kanani your dance moves!
 

Friday, July 18, 2014

American Girl Doll Tights Tutorial and Top Tutorial AG005


American Girl Doll T-Shirt Tutorial
 

I understand that Isabelle is a dancer so we best get her outfitted!  Kanani would like to learn to dance too so we will make her an outfit too.  I will get to the tutu’s at a later date.  I started out using the camisole pattern by Dollar Doll Clothes.  I added ¼ “across the top and ¼” on to the fold.  I cut at what she has marked ‘fold line back’ as I did not want any casing at the back.  Again, this pattern was adjusted for 4 way stretch fabric.  I cut ribbing about 6.5” by ¾” wide for the armholes and continued it into straps.  I started at the back then tried it on the doll before attaching the straps to the back.  Then I added a strip of interfacing before adding the Velcro.


American Girl Doll Tights Tutorial


I couldn’t a ‘free’ pattern for tights so I created one!  I started out using Dollar Doll Clothes pattern for Pants/Pajamas.  I cut ½” away from the fold side as I wanted them to fit tight.  I added 2” to the length and rounded that.  I left the waistband as is.  Cut two.  You must use 4 way stretch fabric!


Sew one crotch.  Lay 9” of ¼ or 3/8” elastic on right side and serge.

Sew the other crotch seam.  Sew inside legs.  Adjust length if needed.
Now we can create some tutu's the girls at a later date so stay tuned or better yet, sign up to my Blog so you won’t miss any of my AG posts!


Tuesday, July 1, 2014

American Girl Doll Bikini Tutorial and Sandals Tutorial AG003


These girls want to hit the beach so let’s help them out!

 American Girl Doll Bikini Tutorial

Found this cute bikini by My AG Doll Craft so had to give it a try!  As you can see, Kanani is wearing the short top version and Isabelle’s is longer.  Both are super cute eh?  I did add about ¼” onto the side seams of both the top and bottoms of the pattern – thought it would be easier to take them in if needed.  I found it a lot easier to pull the bikini top on from her feet up rather than over her head so remember that Olivia and Erin!  (Original post HERE).

American Girl Doll Sandals Tutorial

After I had made a practice pair for Isabelle, I didn’t think I wanted to make any more but I did!  They are fiddly to make mainly because you get no cooperation from the girls!  LOL Spotted these sandals on Pinterest with no pattern so this is what I did.  Trace the dolls feet or an existing shoe on to cardboard. Make sure it’s slightly bigger than the doll’s foot. Trace two for each shoe and cut out.  I used glitter fun foam for the tops and plain white foam for the bottoms.

Insert bead through a 2.75" long hair elastic (left side of picture).  Lay 4” of ribbon on top and loop the elastic so that the ribbon is in between (right side of picture).

Pull the elastic tight.  Cut another piece of ribbon about 3” long.  Lay it through the back loop of the elastic (top picture).  Add just a touch of glue to the ribbon without getting any near the elastic (bottom picture).

Press ribbon in half.  Measure about ¾” from the fold and mark with a pin or chalk.  This will be approximately where it will join the back of the shoe.

Now put it on the doll’s foot. 

Wrap the ribbon tightly around the sole of the shoe.  Trust me; you get no cooperation from the doll’s!

I did not want the ribbons overlapping each other so I cut them back.  The less bulk, the better!
Now add a sole to cover the ribbons!

Next week, I’ll have a one piece bathing suit.  As we know, a girl just can’t have one bathing suit!  I will show you page 2 of 11 that I scrapbooked of Olivia’s visit to the American Girl (AG) Doll store this Friday so stay tuned or better yet, sign up to my Blog so you won’t miss any of my AG posts! 

Friday, June 27, 2014

American Girl Doll Swimsuit Cover-up Tutorial and Headband Tutorial AG003

 
It is suppose to be summer so let’s get these girls ready for the beach beginning with beach cover-ups!

American Girl Doll Swimsuit Cover-up Tutorial

Kanani and Isabelle are showing off their new cover ups!  I used a couple different patterns for this.  I used Molly’s slip for the bottom part and the t-shirt pattern by New Green Mama for the top.  I turned it around so it opened in the front, of course.  I cut 8” of 1/8” elastic and sewed it at the dolls waist.  I cut the ties 6.5” long by about 5/8” wide, folded them in half and zig zagged before adding them to the front of the cover-up.

American Girl Doll Headband Tutorial

The headbands were pretty simple.

Cut knit fabric 1.25” wide by 10” long.  Serge.


Turn right side out.

Then thread with 12” of ½” elastic.


Join the ends of the elastic.


Move the seam into the tube of fabric so it is not seen.  Sew the ends of the fabric through the elastic.

On the next AG post, we will talk about their gorgeous sandals and their bikini’s!

Friday, June 20, 2014

American Girl Rectangle Hair Styling Cape and Circular Salon Cape AG001, AG002


Olivia and her family were home last weekend (she lives about 3.5 hours from us).  I asked her if I could borrow one of her AG dolls until they came again on the July 1st weekend.  She brought Kanani, Girl of the Year 2011 - 'a cheerful girl who helps others by sharing the aloha spirit'.  We brushed her long hair, using the cape to protect her clothing.  Worked awesome!
When Olivia was at the American Girl (AG) Doll store in Los Angeles (original post HERE), they told her that you should never brush your AG dolls hair without misting it with water first.  I had bought the brush at the time I bought Isabelle as I knew the importance of a proper brush on any dolls hair. I used a spray bottle that I use to keep my cats under control – not quite as pretty as the AG brand but it works.  Little girls love to brush dolls hair so that brought me the idea of making a Salon Cape/Hair Styling cape. 


So, Olivia, which one do you want – the square or round one?  I will put the other one away for Kari’s daughter, Erin.  Keep reading for the instructions on how I made them (below) if anyone is interested.

Olivia's Aunt put Kanani's hair in a bun using a sock.  You Tube it if you have never seen this done.  Too cool!

Rectangle Hair Styling Cape AG001


I had a strip of this flannel backed tablecloth so I thought I would try this Hair Styling cape by Doll Clothes Patterns. I had the 20” long but I only had 11 inches wide.


I followed her instructions on finding and marking the center point of the rectangle with a dot and drew a line from the center point to the hemline on one of the long sides. I drew a 2 inch circle around the center point to create an opening for your doll’s neck. Then cut along the line and around the circle to create the opening.  She used this for her center front opening – I want it to be my center back opening.


I used a bowl to help me make curves instead of the straight edges as she did.


I serged all the edges except the neck opening – I did not want to use trim.  I used a double fold of interfacing at each neck opening to help reinforce the velcro placement.


Sew bias tape around the neck opening, leaving a little tail at both ends.


Bury these tails under the velcro and sew velcro in place.


Bar tack the rectangle about 6” from the top fold between the shoulder and the hemline.


FRONT

BACK

SIDE VIEW

Circular Salon Cape AG002

 
I used to cut a lot of hair (human) in my day and I still cut hubby’s.  I took a look at my capes and came up with this.


I made a dot of this flannel backed tablecloth and drew a circle 8.5” away from it.

Until I had a large circle.


Fold it in half then in half again.


Draw a 1” circle at the point and cut away.


Cut to open one fold.


It should look like this.


Fold in half.  Lay a bowl on the fold you just cut open and draw a curve.


Cut it away.


Now your circle should look like this.


Repeat to finish as for the Rectangle Hair Styling Cape above except there is nothing to bar tack.
 
BACK

These can be made using raincoat fabric, a shower curtain or any water resistant fabric.

Stay tuned or better yet, sign up to my Blog so you won’t miss any of my AG posts!

Please leave a comment to let me know if you enjoyed this!

Related Posts Plugin for WordPress, Blogger...