Tuesday, January 29, 2013

Workshop Cards W077, WO78, W079

Here are the three cards I made at Joanne’s SU Workshop for January.

 
I didn’t mark down the ‘ingredients’ I used to make them.
 
 
If you are familiar with SU! products, you will probably recognize them.
 
 
If there is something you would like to know, just email me and I will find out what we used.

Friday, January 25, 2013

MDS 098 Where Magic Lives Scrapbook Page


Paper: Strength and Hope, Baja breeze.
Stamps: Now You’re Cookin, Bunch of Backgrounds.
Embellishments: Strength and Hope, Stitching.
Punches: Square, Circle, Decorative Label, Butterfly.
Font: Harrington size 52, Simply Glamorous size 44.
Page before photo's
 
Would love if you left me a Comment! Hope you will join me for my next post or better yet, sign up to have my posts sent directly to your email. That can be done by clicking on Home and entering your email under Subscribe via email.

Tuesday, January 22, 2013

Craft - How To Make a Bow Using a Fork


A perfect and easy miniature bow every time using a dinner fork!  You will need a four-pronged dinner fork and about 5 inches of linen thread by Stampin Up. You could use less but it is easier to use a longer piece then trim it.
 
 
We want to get the kinks out of this thread.  You can do that by pulling it quickly through your curling iron, flat iron or just press it with your standard iron.


Fold the thread in half to make a loop.  With the right side of the fork facing you, put the fork in the loop and pull tight.
 
Make sure the right side of the fork is still facing you. Take the length of thread that passes around the back of the fork and pass it over the other end at the front of the fork and between the centre two tines of the fork.
 
Take the other end of the thread and pass it between the centre two tines of the fork over the top of the bow.
Pull both ends of the thread tight.
 

Turn the fork over. 
Now just tie the thread in a single knot, pulling tight.  This will hold the center piece tight.


Slip your bow from the fork.
 
 
Trim the tails a little to finish and there it is!
 
So easy!  Now you can make a pile of them so they are ready for your many other projects.


Friday, January 18, 2013

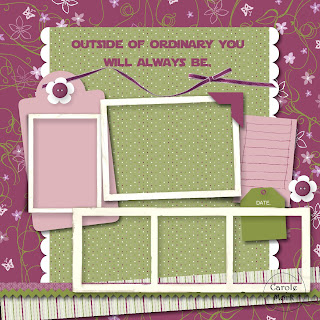
MDS 097 Outside of Ordinary Scrapbook Page

I was so sure I got this idea from one of the Blog Hopper’s but I sure cannot find it!  If I come across it, I will update this post.  I did find the sketch - posted at the bottom.
 
Paper: Cottage Wall.
Stamps: Downtown Grunge, Cheerful Treat.
Embellishments: Downtown Grunge, Eyelet, Button, Taffeta Trimmings Long Bow.
Punches: Square, Scallop Edge, Tag, Get it Done, Corner, Tasteful Trim 3.
Font: Star Jedi Rough size 32.
Page before photo's
 
Hope you will join me for my next post or better yet, sign up to have my posts sent directly to your email. That can be done by clicking on Home and entering your email under Subscribe via email.

Tuesday, January 15, 2013

Sewing - Quilting is not easy!

My oldest grandson graduated from High School.  My daughter asked her friend to make a quilt for him.  She wanted it to also be a family effort so asked her mother in law and myself if we would help out.  I understood that I would be making one block.  How hard could that be?  After all, I am a seamstress!  This is what she brought me – enough pieces to do 30 blocks!  The center block is what her friend had done as a sample for me to follow – see how perfect hers is?
 
The first thing I had to do was remove the white stitching from the points of the red and black pieces that her friend had sewn.  No big deal – I just did that while I watched my Soaps.  It took forever, but I got that done.  Then, each of those pieces had to be pressed open.  I have an awesome iron, so, again, no big deal – that also took forever as there was lots and lots of pieces.
 
Now on to sewing.  I had to sew 2 of the red and black pieces together, pressing again.  Then I had to attach these yellow squares to each end, pressing again but I love my iron so no problem!
 
It is time to put these little strips on to the center piece (tractor).  Honestly!!  What is my problem???  I cannot make these pieces line up!!  I do not quilt but I know it is important to have square blocks when you are done.  Mine are far from being square!!  I’m pretty sure my daughter gave her mother in law the easy part to do!!
 
After doing 10 blocks and not having one of them work out square, I had my daughter ask her friend if she wanted me to quit.  Her friend said YES, YES, YES, have her quit!!  Apparently, the mother in law has to hand sew bias tape around a thousand pieces to make a tractor!!  I don’t want that job neither!!  So that is my experience in quilting!!  IT IS NOT FOR ME!  As a seamstress, I thought I could sew ANYTHING!  Nope, I sure cannot sew  quilt blocks!  If  you are a seamstress, tell me .... can you sew quilt blocks???
Can't wait to see it done though!


Friday, January 11, 2013

MDS 096 Surf's Up Scrapbook Page

Another 12x12 digital scrap page using My Digital Studio software by Stampin Up.  Today, we are back in Disneyland.  Well, not me exactly, it’s my daughter and her family and one of the over 100 pages that I somehow got conned into scrapbooking for her!  Anyways, it was fun scrapbooking for her.
 
Paper: Night and Day 10, Blooms, Villa, Stripe in Real red, Crushed Curry.
Stamps: School Days 11.
Embellishments: Button, Grosgrain Ribbon and Bow, Downtown Grunge.
Punches: Square, Circle, Scallop Circle.
Font: for Surf's Up is Walt Disney size 52.
Page without photo's
 
Thanks for stopping by!  Would love if you left me a Comment!  Hope you will join me for my next post or better yet, sign up to have my posts sent directly to your email. That can be done by clicking on Home and entering your email under Subscribe via email.

Tuesday, January 8, 2013

Craft - Controlling your Bobbin Tails

Hello and Welcome to a clever Craft today.  I stumbled across this sewing tip that was posted on the Threads magazine sight.  What a great idea!  Had to do it!

 
Picked up a couple of feet of this 5⁄8-inch transparent plastic tubing in the plumbing section at Home Hardware.  The website said they used 7/8ths inch tubing but that seemed too large, so I went with 5/8ths inch instead.   I eyeballed and cut it with some kind of cutter tool that I found in Hubby’s collection.  It doesn’t have to be perfect but you want it to fit snug.  Cut a slit for a flexible opening on each ring and wrap it around each of your bobbins to hold the tails in place.
About 30 years ago, I made myself this handy dandy board for my thread and bobbins just by pounding nails in it.  Just perfect!

 
However, yes there are tails all over the place.  My grandson helped me put these pieces of tubing around each bobbin – the top ones are done but you can see the tails on the bottom few.  What a genius idea!

 
Check back on Friday for my regular MDS digital scrap page.

Friday, January 4, 2013

MDS 095 Ultrasound Scrapbook Page

Welcome to my 1st Friday Scrapbook Page for 2013.  I have posted a digital scrap page using My Digital Studio software by Stampin Up since March 2011 so if you are stuck for inspiration, try typing your words in the Search spot (top left corner) to see if I can help you out.
Also, just a reminder that it is Blog Hop Day – lots of digital inspiration there too!  Start with Erica Shaw then follow the girls!
This page was inspired from Digital Scrapbooking Albums.
 
This was a fun 12x12 page to do.  I started out with the First Edition DSP as my background then added the Torn Edges stamp to each side.  Sure gives it a ragged look eh??  I used the letter punches to type the word Ultrasound, color filled one in black and the other in the gray then laid the gray on top of the black.  I like the looks of that.
 
Paper: First Edition, Going Gray, Basic Gray, Lucky Limeade, Grad Party 5, Cherry Cobbler, Black.
Stamps: Cheerful Delight, Torn Edges.
Punch: Circle, Square, Blossom Party 3, Timeless Type Junior Letters.
Embellishments: Lucky Limeade Printed Brads.
 
Page without photo's
 
Hope you liked it.  Would love if you left me a Comment!  Hope you will join me for my next post or better yet, sign up to have my posts sent directly to your email. That can be done by clicking on Home and entering your email under Subscribe via email.

Wednesday, January 2, 2013

Workshop Card W073, W076

Here are the other two cards I made at Joanne’s SU! Workshop last December.  I didn’t mark down the ‘ingredients’ I used to make them – I will try and guess my way through them.  If there is something you would like to know, just email me and I will find out  for sure.


How delightful is this card??  Stunning, if I do say so myself!  I should of chose a better double sided paper than I did as my ornament balls are upside down!  I realized it too late!  The embossing folder was swiped with white ink.  The snowflake is a Bigz Die called Snow Flurry from the 2012 Holiday Catalogue (expired).  It is cut from silver glitter paper, just perfect for a snowflake!  The phrase is called Home for Christmas from 2008 Holiday Mini Catalogue.
 

This was a little difficult to do.  Looks like it got a little squished on the ride home too!  The embossing folder was swiped with something like the Smooch Spritz in silver – I don’t think that is what we used but something like it.  The image is white embossed.  It is from the 2012/2013 catalogue as a Hostess gift called Four Seasons.

Tuesday, January 1, 2013

Workshop Card W074, W075

Happy New Year to you all!  Here are a couple cards we made at Joanne’sSU! Workshop in December.  I didn’t mark down the ‘ingredients’ I used to make them.  If you are familiar with SU! products, you will probably recognize them.  If there is something you would like to know, just email me and I will find out what we used.


I know the reindeer is from the Joyous Celebrations stamp set found in the 2012 Holiday Catalogue.  I sanded the back embossing folder and swiped the front one with ink.
 

Ohhhh, I love this stamp!  Isn’t he just the cutest??  This set is from the 2012 Holiday Catalogue also, called Christmas Wishes.  He is mounted on the red glitter paper.  Love it!

Note: the Holiday Catalogue has expired.  I will post a couple more Workshop cards tomorrow.

Related Posts Plugin for WordPress, Blogger...