Friday, June 28, 2013

MDS 120 Cinderella Scrapbook Page

Did you know that when the Drop Shadow window in MDS opens you can change the Opacity, Blur, and Color of the Drop Shadow?  For the butterfly at the bottom of the page, I simply changed the color of the shadow from the default to blue!  Now, hold down your pointer in the display box and you can move, yes move the shadow around – I centered it so the color showed on all sides of the top butterfly.  Once you have placed the shadow where you like, click ok.  Simple, simple!

MDS Software is easy enough for beginners, but includes a variety of tools for advanced designers too. Anyone can try it FREE for 30 days! Click on the ‘Shop Now’ button at the top of my Blog and download it (item 130910) or you can order the MDS Trial Disc 10 Packs (item 132919) to get it into your hands!

Here is the ‘recipe’:

Background
     Designer Series Paper\Distressed\Baja Breeze Distressed.
Embellishments
    Buttons Pack In Color\Island Indigo - button 2.
Stamps
    Extreme Elements\Extreme Elements - splatter, Color = DAFFODIL DELIGHT
    Extreme Elements\Extreme Elements - dots, Color = BASHFUL BLUE

    French Foliage\French Foliage - splatter, Color = ISLAND INDIGO.
Punches
    Pinking Hearts Border Punch, Fill Color = DAFFODIL DELIGHT
    Extras\Butterfly shape - 1, Fill Color = WHISPER WHITE
    Extras\Butterfly shape - 2, Fill Color = WHISPER WHITE.

Page before adding photos.
 

Tuesday, June 25, 2013

Craft – Hello Kitty Goodie Bag

 
Normally I save the last Tuesday of every month to show the cards we made at Joanne's SU! Workshop.  Hubby had a Doctor's appointment in Saskatoon on the 21st which was Joanne's Workshop so I had to miss it.  Instead, I will share this Goodie Bag.  My daughter asked if I could come up with a Hello Kitty goodie bag for her 3 year olds birthday.  Kinda followed what Presently Pink did on her blog.  We couldn’t find any white paper lunch bags so I googled a Hello Kitty coloring book page so I had the whole head to follow.  We will glue it onto a brown paper lunch bag when we are done creating.  Once I had the head printed out, I glued it to construction paper to give it a little thickness for tracing.


I cut out the eyes, nose and whisker placements so I could trace directly on to my cardstock.  I knew I was getting help my Zig marker.


I bought a bottle of FolkArt black glitter, transferred it into a ‘writers’ bottle with a pointed end (this bottle was just about empty) and glittered each face before I cut it out.   Set this aside.


Used various punches by SU! for the bow parts (Regal Rose by SU!), eyes (Black) and nose (Barely Banana by SU!).  Cut whiskers about 1.25” long from black cardstock.


Outline each piece with glitter glue before cutting out then wait for the little helpers before assembling.


Let the fun begin!


Addison helped with the most part as Brynn had fallen asleep.  Once she woke up, she helped us finish.


Glue face on to a brown paper lunch bag.  They did very good!  It did help to have the pattern traced to the face.


And here she is at her 3rd birthday with her Hello Kitty cake! Forgot to grab a picture of her handing out her Hello Kitty goodie bags!


Friday, June 21, 2013

MDS 119 Keep This Memory Scrapbook Page

Another very simple 12x12 digital scrap page using My Digital Studio Software by Stampin Up!  For this page, I used the color match tool.  I picked a color from Bobi’s sweater to use on the circle, a blue from Jackie’s sweat shirt and a green from Wayne’s shirt.  Very, very simple to do!  I also used the Align tool to help me make a straight line with the chess pieces and space them evenly on my page.  These pictures were really dark – I was able to lighten them with the Photo Effects tool.  Notice that you can arrange your pictures behind and/or in front of the circle just like in manual scrapping!

My Digital Studio is an easy-to-use design software featuring thousands of Stampin’ Up!’s award-winning images, colors, and accessories. Compatible with PC and Mac operating systems, My Digital Studio allows designers of all skill levels to create their own digital projects or use hundreds of templates to make professionally designed cards, photo albums, scrapbooks, and more.  Anyone can try it FREE for 30 days! Click on the ‘Shop Now’ button at the top of my Blog for the info.
Page before adding photos.

Here is the ‘recipe’:

Background
     Designer Series Paper\_Designer Kits\Mocha Morning - designer series paper\Mocha Morning – 7.
Embellishments     Sara's Sequins – silver.

Stamps

    School Days\School Days - circle
    Game Night\Game Night - chess pieces, Color = BASIC BLACK.
Punches     Eyelet Border Punch
    1.25 Square Punch.

Tuesday, June 18, 2013

Sewing - Sleeve Cuff Pouch

 
These little cuff pouches  take only minutes to make and will keep all of your miscellaneous items organized and within easy reach.

I saved the cuffs from the shirt from my Mans Shirt into an Apron Tutorial.  I cut one cuff right up against the existing seam but on the other one; I left about .5” of a seam.  Press.
 

I used fusible web to attach them together.
 

and reinforced down the center with a zigzag stitch.
 

Do up the buttons and press to how you would like it then undo the buttons.
 

Sew the side seams and you are done!
 

Fill it with accessories from your purse or lipsticks, extra batteries, business cards, pop your phone and lip balm in it and head for the beach or whatever!  You could also sew down the center and have two small pockets if you want.


Thursday, June 13, 2013

MDS 118 Delight in the Day Scrapbook Page

 
Thought I’d play along in another MDS Monday sketch challenge.  I usually stay away from sketches with only one photo as it’s not very often that I ever only have one picture to scrap.   It just so happens that I did for this week’s MDSM17.  Joan provided the sketch and challenged anyone to play along using the challenge of attaching text to a shape.  I did flip Joan’s sketch as my sister says your pictures shouldn’t ‘drive off’ a page – they should ‘drive on’.  She is a mighty fine manual scrapbooker so I will take her word for that!  Joan has a link to a video posted on attaching text to a shape on the Blog.  So very simple to do!  I hope you will play along too!  Remember that you can download MDS (My Digital Studio) for a free 30 day trial period.  Click on the ‘Shop Now’ button at the top of my Blog for more info.  You will be hooked!

Page before adding photo.

Here is the recipe:

Background
     Designer Series Paper\_Designer Kits\Twitterpated - designer series paper\Twitterpated – 10.
Embellishments
    _Designer Kits\Delight in the Day - embellishments\Delight in the Day - border 3
    Staple & Stitching\Basic Black - Stitching Zigzag
    Mis-Stitched - embellishments\Mis-Stitched - crumb 6a
    Brads\Basic Black – brad.
Stamps
    Vintage Overlays\Vintage Overlays - texture 1, Color = BASIC BLACK 19,27,29
    _Designer Kits\Follow Your Bliss\Follow Your Bliss - chevron large, Color = BASIC BLACK 19,27,29
    _Designer Kits\Follow Your Bliss\Follow Your Bliss - chevron large, Color = BASIC BLACK 19,27,29
    _Designer Kits\Delight in the Day\Delight in the Day - delight in the day, Color = 0,0,0
    _Designer Kits\This And That Epic Day\This And That Epic Day - arrow 2, Color = 0,0,0.
Punches
    1.25 Square Punch,  Filled with: Designer Series Paper\_Designer Kits\Glimmer - designer series paper\Glimmer - red
    1.25 Square Punch,  Filled with: Designer Series Paper\_Designer Kits\One Great Year - designer series paper\One Great Year - 2
    Extras\Grad Party Ensemble - flag,  Filled with: Designer Series Paper\_Designer Kits\Strength & Hope - designer series papers\Strength & Hope - pattern 5
    1.25 Square Punch,  Filled with: Designer Series Paper\_Designer Kits\Glimmer - designer series paper\Glimmer - red
    Extras\Hello, Baby - pennant punch, Fill Color = 183,167,140
    Jewelry Tag Punch,  Filled with: Designer Series Paper\_Designer Kits\Glimmer - designer series paper\Glimmer – red.


Tuesday, June 11, 2013

Sewing - Make a Mans Shirt into an Apron


People don’t seem to wear aprons anymore but I thought it was a cute idea so had to try it.  I found it on Kristin’s blog.

Start with a man's shirt.  Cut off the sleeves and the back. Leave the side seams intact so you don’t have to re-sew the edges. Cut around the collar but leave it intact.
 

 I cut very close to the collar seam so that I wouldn't have to hem or finish those edges.
 

Use your rotary cutter and ruler to make a diagonal cut starting at neckband to under the armpit.  Mine ended up a couple of inches below the armpit but that’s ok.  Repeat for the other side.
 

Now your shirt should look like this:
 

Lay your sleeves with wrong sides together and cut 4.5” wide pieces for the ties.  I didn’t think one sleeve length would be enough so I cut 2 more partial lengths. As Kristen said, you could use ribbon if you wanted.
 

Press a .5” hem from the collar to the side seam and sew.
 

I pieced the ties together.
 

Press the seams open.
 

Press the ties together in half.
 

Open and bring each side to the fold line.
 

Re-open a press one end to give a clean finish.
 

Sew along the open edges.

Square off and topstitch the other end of the tie.
 

Attach this end to the sides of your apron.

Repeat for the other tie.

Since I left the side seams intact, I have nothing to finish there.  Awesome!

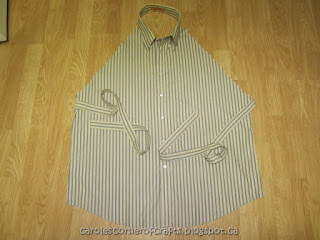
I didn’t have a ‘model’ to show off this one so here it is on the floor!
 

Friday, June 7, 2013

MDS 117 Hello Snow Scrapbook Page

 
I recently found the MDS Monday Blog – they supply the sketch and anyone can follow it.  Heidi supplied a card sketch for MDSM16 (or you can see it posted at the bottom of this post) – I simply turned it into a scrap page.  She also challenged us to use the stamp color tool.  They have a video on how simple this is to do.  I love sketches so here is what I came up with.  I know I have shared these pictures with you guys at the time this dump of snow happened, now here they are scrapped!

Page before adding photos.

Here is the ‘recipe’:

Background
     Designer Series Paper\_Designer Kits\Keep in Touch - designer series paper\Keep in Touch - 10.
Embellishments
    Taffeta Trimmings\Taffeta Trimmings - ripple sage shadow

    Basic Pearls and Rhinestones\Basic Pearls and Rhinestones - rhinestone large

    Basic Pearls and Rhinestones\Basic Pearls and Rhinestones - rhinestone small.
Stamps
    Designer Kits\Winter Wonders\Winter Wonders - hello snow
    Calendar Basics Kit\Calendar Kit - snowflake, Color = MORE MUSTARD 212,161,80
    Calendar Basics Kit\Calendar Kit - snowflake, Color = 151,138,132
    Calendar Basics Kit\Calendar Kit - snowflake, Color = SAGE SHADOW 160,186,161
    Snow\Snow - snow, Color = 151,138,132.
Punches
    1.25 Square Punch,  Filled with: Designer Series Paper\_Designer Kits\Keep in Touch - designer series paper\Keep in Touch – 4 and 2

    Scallop Edge Punch,  Filled with: Designer Series Paper\_Designer Kits\Keep in Touch - designer series paper\Keep in Touch - 2
    Extras\Grad Party Ensemble - flag,  Filled with: Designer Series Paper\_Designer Kits\Keep in Touch - designer series paper\Keep in Touch - 12
    Extras\Grad Party Ensemble - flag,  Filled with: Designer Series Paper\_Designer Kits\Keep in Touch - designer series paper\Keep in Touch - 8
    Curly Label Punch.

 
Related Posts Plugin for WordPress, Blogger...