Friday, July 29, 2011

MDS 022 Congratulations Graduate


I was sure Brilliant Blue would match these graduating triplets but when I dropped the pictures in place, Brilliant Blue was not the color!  So I changed the colors to Bashful Blue & Pacific Point, however, I already had these instructions printed on my Blog & I wasn't about to change them!
If you have just stumbled on my Blog, type ‘MDS Scrap Page’ in the Search Box (top left corner) to see what we have been doing.  I am using Windows 7 so you may need to click on HELP (across the top of the program), My Digital Studio Help if you are using a different Windows than me.   Watch for NEW Scrap Pages posted every Friday.

Background paper – color – Brilliant Blue.
Punch – square – enlarge to cover the whole page - paper fill – Designer Kits – Night and Day – 7 – change Opacity (bottom right) to 14.  Makes a neat background eh?  Found this idea on the MDS site.
Background paper – cardstock – whisper white.
Punch – eyelet border - color fill – whisper white.
Page before adding Photo boxes
Stamps – Go Graduate Plus – feet (copy & paste to make another set of feet to fit across the page) - change color – Cherry Cobbler.
Background paper – cardstock – crushed curry - Add as Page Layer.

Embellishment – grosgrain ribbon – crushed curry.

Punch – square - color fill – whisper white – resize to make a rectangle for title.
Stamps – Go Graduate Plus – congratulations - change color – Cherry Cobbler.
Punch – square - color fill – crushed curry.  Copy & paste to make another square.  Rotate & put one on each end of the white rectangle.

Punch – scallop circle - color fill – Cherry Cobbler.

Punch – circle – color fill – whisper white – match color – click on the blue background.

Insert Duplicate Page Mirrored to easily make a double page spread or just bump it forward for another layout.   Again, watch for a NEW Scrap Page posted next Friday.

My Digital Studio Catalog PDF catalog will be updated every month and is available to you on MyDigitalStudio.net  under Resources.   If you have not ordered your copy of My Digital Studio yet or if you would like to order anything from the catalogue, just click on the On Line Ordering button in my left sidebar and your order will be mailed directly to you!   Downloads will go to your computer automatically.

Friday, July 22, 2011

MDS 021 Celebrate You Scrapbook Page

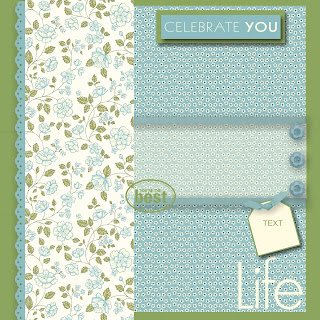
Here is a very delicate page.
If you have just stumbled on my Blog, type ‘MDS Scrap Page’ in the Search Box (top left corner of my Blog) to see what we have been doing.  I am using Windows 7 so you may need to click on HELP (across the top of the program), My Digital Studio Help if you are using a different Windows than me.   Watch for NEW Scrap Pages posted every Friday.
Background paper – color – Wild Wasabi.
Background paper - Designer Series Paper – Designer Kits – Springtime Vintage – 7 - Add as Page Layer.  Double click & resize to about 7.5x11.5 inches.  Place to the right, up to the bleed area.
Page before adding Photo boxes
Punch – square – resize to make a rectangle about 3” long by the width of the DP - color fill – very vanilla – Opacity (bottom right) to 40.  It now looks like a piece of vellum.
Embellishment – grosgrain ribbon – Baja Breeze times two – Drop Shadow – Opacity 65, Blur medium.

Punch – square – resize into a rectangle to cover ribbon ends – color fill - Wild Wasabi.  Repeat for another one.

Background paper - Designer Series Paper – Designer Kits – Springtime Vintage – 4 - Add as Page Layer.  Double click & resize to about 4”x12”.
Stamps – Torn Edges – eyelet border – rotate - change color – Baja Breeze.
To have just a little edge of the eyelet border showing, click on the Springtime Vintage 4 pattern – Arrange – Order – Bring to Front.

Embellishment – button bouquet – Baja Breeze 2, times 3– Drop Shadow – Opacity 65, Blur medium.  Click on one button.  Hold your shift key down & click on the other two – Align (in the Toolbar across the top) – right.

Stamps – Greatest Moments 11 – Life - change color – Very Vanilla.

Stamps – Greatest Moments 11 – You’re the Best - change color – Wild Wasabi.

Punch – square – resize to a rectangle - color fill – Wild Wasabi – Drop Shadow – Opacity 65, Blur medium.

Punch – square – resize to fit on top of Wild Wasabi rectangle - color fill – Baja Breeze – Drop Shadow – Opacity 65, Blur medium.

Stamps – A Little Birthday Cheer – Celebrate You - change color – Very Vanilla – resize a bit bigger.  Set on top of the Baja Breeze rectangle.  Resize the rectangles to fit the stamp.  Once you are happy with the layer, click on each rectangle & the stamp – Arrange – Group.  Now you can move it around without it coming apart.

Punch – Tag – rotate to minus 15 - color fill – Very Vanilla – mat – Wild Wasabi - Drop Shadow – Opacity 65, Blur medium.

Embellishment – grosgrain knot – Baja Breeze – rotate – Drop Shadow – Opacity 65, Blur medium.

Friday, July 15, 2011

MDS 020 Birthday Hugs & Wishes Scrapbook Page

A birthday page for my grandson!

If you have just stumbled on my Blog, type ‘MDS Scrap Page’ in the Search Box (top left corner) to see what we have been doing.  I am using Windows 7 so you may need to click on HELP (across the top of the program), My Digital Studio Help if you are using a different Windows than me.   Watch for NEW Scrap Pages posted every Friday. 
 
Background paper - Designer Series Paper – Designer Kits – Play Date – 9.

Background paper - Designer Series Paper – Designer Kits – 2 - Add as Page Layer.

Embellishment – Designer Kits – Play Date – borders – 5.

Punch – browse – Labels & Tags – Top Note - resize - color fill – Kraft - mat – Chocolate Chip.  Repeat for a smaller one.
Page before adding Photo boxes.

Punch – Tag – color fill – turquoise - mat - Chocolate Chip. 

Stamps – Hugs & Wishes – birthday - change color – Chocolate Chip. 

Embellishment – grosgrain knot – Kraft – rotate.

Embellishment – Designer Kits - Play Date – Quick Accents – class schedule.  Cover up the word ‘class schedule’ with an arrow.

Embellishment – Designer Kits - Play Date – numbers for the year.

Insert > Insert Duplicate Page Mirrored to easily make a double page spread or just bump it forward for another layout.   Again, watch for a NEW Scrap Page posted next Friday.

My Digital Studio Catalog PDF catalog will be updated every month and is available to you on MyDigitalStudio.net  under Resources.   If you have not ordered your copy of My Digital Studio yet or if you would like to order anything from the catalogue, just click on the On Line Ordering button in my left sidebar and your order will be mailed directly to you!   Downloads will go to your computer automatically.

Friday, July 8, 2011

MDS 019 1st of July Scrapbook Page

Here is page two to match our page from my July 1st post. If you just stumbled on my Blog, type ‘MDS Scrap Page 001 or 002 or 003 etc’ in the Search Box (top left corner) to see what we have done.

I am using Windows 7. You Mac or other Windows people may have some adjustments to make. All this info plus more can be found by clicking HELP (across the top of the program) > My Digital Studio Help.

Choose Insert (from the toolbar) > Add Page from the menu > Blank Page > OK or you can click on the blank page with the + (plus) sign on it from the toolbar. Just don’t forget to use the Arrange – Order button throughout this page process as you will need it.

Page before adding Photo boxes.
Background paper – Baja Breeze.
Designer Series Paper – Designer Kits – Candy Cane 3 – Add as a Page Layer.
Punch – Eyelet Border - used the Match Color to change the color to the green that is in the stripe.  This is how I did that - clicking Match Color opens the Picker tab of the Choose Color window. This tab allows you to pick a specific color that is on the current page. Move your mouse around in the page preview area at the top left of the tab. The zoom area at the top right of the tab will show a pixel by pixel view of your cursor’s position in the preview area. To select a color, move the mouse around in the page preview area and click (left mouse button) when the black crosshair is over the color you would like to select. The color will now display in the Preview area at the bottom of the window – OK.
Punch – Word Window – color filled to Whisper White – matted to size 4 in Cherry Cobbler. Copy and Pasted to make a total of four Word Window punches – resized them – rotated three of them slightly.
Stamps – Canada Day – Maple Leaf – resized to fit the Word Window punch – changed color to Cherry Cobbler. Added three larger Maple Leafs in Cheery Cobbler and used the Match Color to change the color to the green that is in the stripe for three more Maple Leafs.
Punch – Circle – color filled to Very Vanilla – resized to fit the ends of the Word Window Punch. Matted in Cherry Cobbler.
Stamps – Canada Day – Maple Leaf – resized to fit the circle punch – changed color to Cherry Cobbler.
Stamps – Canada Day – Canada Day (phrase) – changed color to Whisper White.
To make the Canada flag, I resized the square punch into a rectangle – color filled with Whisper White. Added two more square punches – color filled with Cherry Cobbler – resized to fit on the ends of my rectangle – added a Cherry Cobbler Maple Leaf.
Matted my photos in Real Red. I added various sizes of Maple Leafs in Whisper White and the green, rotating some slightly. I Shadowed everything – Opacity to 75%, Blur to Medium. You will have to Ungroup everything you have Grouped in order for it to Shadow. Click on the item – Arrange – Ungroup.

My Digital Studio Catalog PDF catalog is available to you on MyDigitalStudio.net under Resources . It will be updated every month.

Watch for NEW Scrap Pages posted here every Friday.

Monday, July 4, 2011

SU210 Joy

This is the July 'Christmas Around the World' theme card I chose to do for Sylvia’s 2011 Christmas Card ChallengeIt is a little difficult to be thinking of Christmas cards at this time of the year but I know I sure will be happy to have them done before December!
 
 
Stamps: Season of Joy.

Ink: Cherry Cobbler, Old Olive, Night of Navy.
 
Cardstock: Cherry Cobbler, Old Olive, White, Night of Navy.
 
Accessories: Cherry Cobbler marker, scallop border punch, Frost White shimmer paint mixed with water in a spray bottle, 5 petal flower punch, stylus, Daffodil Delight marker, one quarter inch hole punch, sponge, yarn, mounts, Sizzlits Buttons 5 die, Crystal Effects, Dazzling Diamonds glitter, spray bottle, Cherry Cobbler re-inker to dye the yarn.
 
 
Here is a picture tutorial of how I made the poinsettia:


Total Christmas Cards for 2011: 32

January = 1, February = 6, March = 5, April = 5, May= 6, June = 4, July = 5.

Thanks Sylvia for keeping me going!

Friday, July 1, 2011

MDS 018 Canada Day Scrapbook Page

This is page one of a double spread page for Canada Day. If you just stumbled on my Blog, type ‘MDS Scrap Page 001 or 002 or 003 etc’ in the Search Box (top left corner) to see what we have done.I am using Windows 7. You Mac or other Windows people may have some adjustments to make. All this info plus more can be found by clicking HELP (across the top of the program) > My Digital Studio Help.
Choose Insert (from the toolbar) > Add Page from the menu > Blank Page > OK OR you can click on the blank page with the + (plus) sign on it from the toolbar. Just don’t forget to use the Arrange – Order button throughout this page process as you will need it.
Page before adding Photo boxes.
Background paper - Real Red.
Designer Series Paper – Designer Kits – Candy Cane 3 – Add as a Page Layer. Rotate 90* Right. Copy and Paste to make another one.
Stamps – Schoolbook Serif Alphabet for O canada. I turned on the Grid so I could line up the letters (View - Show Grid). Changed the color to Whisper White.
Punch – Word Window – color filled to Whisper White – matted to size 4 in Cherry Cobbler. Copy and Pasted to make a total of four Word Window punches – resized them – rotated three of them slightly.
Stamps – Canada Day – Maple Leaf – resized to fit the Word Window punch – changed color to Cherry Cobbler. Added three larger Maple Leafs – used the Match Color to change the color to the green that is in the stripe.  This is how I did that - clicking Match Color opens the Picker tab of the Choose Color window. This tab allows you to pick a specific color that is on the current page. Move your mouse around in the page preview area at the top left of the tab. The zoom area at the top right of the tab will show a pixel by pixel view of your cursor’s position in the preview area. To select a color, move the mouse around in the page preview area and click (left mouse button) when the black crosshair is over the color you would like to select. The color will now display in the Preview area at the bottom of the window – OK.
Punch – Circle – color filled to Very Vanilla – resized to fit the ends of the Word Window Punch. Matted in Cherry Cobler.
Stamps – Canada Day – Maple Leaf – resized to fit the circle punch – changed color to Cherry Cobbler.
Once my photos (matted in Baja Breeze) were in place, I added various sizes of Maple Leafs in Whisper White and Very Vanilla behind them. I Shadowed everything – Opacity to 75%, Blur to Medium. You will have to Ungroup everything you have Grouped in order for it to Shadow. Click on the item – Arrange – Ungroup.

My Digital Studio Catalog PDF catalog is available to you on MyDigitalStudio.net (you will want to sign up to this site) under Resources . It will be updated every month.
Watch for NEW Scrap Pages posted here every Friday.

Related Posts Plugin for WordPress, Blogger...