Friday, May 31, 2013

MDS 116 Quiet Friends Scrapbook Page

Another quick digital page put together using My Digital Studio (MDS) Software by Stampin Up!.  My title is made using punches.  It is so easy to make your punched letters all the same size!  Simply drop your letters on your page, group them, and then grab a handle at the edge of the punch to resize all the letters at the same time!  Remember, you can download MDS for a free 30 day trial period.  Click on the Shop Now button at the top of my Blog for more info, and then play with re-sizing!
Page before adding photos.

Background: Designer Series Paper\Designer Kits\Christmas Cocoa II - pattern 9.
Stamps: Vintage Overlays - texture 1, Color = SOFT SUEDE; Day of Gratitude\Day of Gratitude - medallion, Color = SOFT SUEDE.
Punches: 1.25 Square Punch, 1.25 Circle Punch, Curly Label Punch, Alphabet & Numbers\Timeless Type Junior Letters\Timeless Type Junior Uppercase and lowercase.

Tuesday, May 28, 2013

Workshop Cards

Carolyn – this is what brads look like.  Kinda like mini paper fasteners.  Carolyn was confused in my post for Changing the Color of your Brads – she had no idea what a brad was!  Poor girl, just doesn’t get out much I guess!  She should join us at one of these Workshops!

I only got 2 cards done at the last Workshop – normally I do 3.  Don’t know if I’m getting slower or what!  Anyways, here are my creations:

W086 - Bliss

Paper: Black, White, Core-dinations in Primrose Petals.

Stamps: Bliss, Painted Poisies.

Ink: Versamark, White.

Embellishments: Black EP, Silver EP, Lacy Brocade EF, Petals a Plenty EF, silver brads, rhinestones, sponge, sanding block.

Punches: Lots of Tags sizzlit.

W087 - Farm Life

Paper: Early Expresso, White, Neutrals DSP

Stamps: Farm Life.

Ink: Black.  Also used markers in Real Red, Garden Green, Always Artichoke, So Saffron, Handsome Hunter.

Embellishments: Gingham ribbon, wire, Woodgrain embossing folder.

Punches: Scallop Trim Border and corner.

Thank you for stopping by.  Both Joanne and I are SU! demonstrators so if at any time you would like to purchase SU! products, give her a call or from my Blog, click on the Shop Now button.  Your order will be delivered right to you (you do have to give SU! a street address, not a box #).

Friday, May 24, 2013

MDS 115 On Finding Each Other Scrapbook Page

As I have said many times, I am not good at figuring out layouts.  Instead of surfing scrap page layouts this time, I surfed layouts for Blog Templates.  Lots of good ones out there!  Found this template so made it work for these wedding pictures.  I put together the flower by color matching the colors in the printed paper.  Yes, you can color match anything you want in the My Digital Studio (MDS) software by Stampin Up!.  Once I got one flower set up the way I liked it, I grouped it then copied and pasted to make another one, rotated it and viola!  You can download MDS for a free 30 day trial period.  Click on the Shop Now button at the top of my Blog for more info.  Give it a try – you have nothing to lose!
Page before adding photos.

Background: Designer Series Paper\_Designer Kits\Bella Rose - designer series paper\Bella Rose 11.
Embellishments: Staple & Stitching\Chocolate - Simple Stitches line 1;Round Buttons\Chocolate Chip - button
Stamps: Designer Kits\My Sweet Pea - stamps\My Sweet Pea - leaf, Color = WILD WASABI; Vintage Vogue - flower, Color = RIDING HOOD RED; Vintage Vogue  - small flower, Color = PINK PIROUETTE; A Word for You - congratulations, Color = PINK PIROUETTE; Seriously Awesome - rectangle frame.
Punches: 1.25 Square Punch; Borders\Tasteful Trim Shape 3, Fill Color = KIWI KISS; Full Heart Punch, Fill Color = RIDING HOOD RED; Oval Punch, Fill Color = RIDING HOOD RED.

Thanks for stopping by!  Check back next Tuesday for something other than a scrap page!

Tuesday, May 21, 2013

Craft - Changing the Color of your Brads

 
Yes, this is possible.  Let me show you how easy it is.  I like to use paper fasteners instead of brads sometimes but they only come in gold or silver.  I can change them to any color I want!

You'll need an embossing gun, Embossing powder, pliers or tweezers, Dazzling Diamonds glitter and brads or paper fasteners.
 

Pick up the brad with the pliers and heat it up with the embossing gun for about a minute.  You want it as hot as possible but do not touch it!
 

Once you have the brad hot, dip it into the embossing powder – just in and straight out – do not hold it in there.
 

The embossing powder should melt on the hot brad in about 30 seconds resulting in a smooth shiny finish. It will take about 2 minutes to fully set the embossing powder hard and for the brad to cool down.  However, it didn’t work quite like that on my paper fastener so I re-heated with my embossing gun.
 

In small circular motions and a distance of about 6” from the brad, I added a touch of heat to the areas that had not melted. The circular motion and the slight distance will still keep the brad finish smooth.
 

To make them sparkle, heat the brad again with the heat gun to heat the embossing powder slightly in a small circular motion and about 6” in distance for 5 seconds and then dip in glitter!
 

How cool is that!
 

Take a brush and gently brush off the excess glitter.
 

Now you can go ahead and purchase any kind of ‘ugly’ colored brads or paper fasteners and make them unique.
 

Friday, May 17, 2013

MDS 114 A Cute Mess Scrapbook Page

Ohhh what a cute face eh??  This is a 12x12 digital scrapbook page using My Digital Studio (MDS) software by Stampin Up.  My daughter had 10 pictures of this little munchkin’ eating.  I couldn’t decide what pictures I would scrap for her as I couldn’t resist that little face in any of them!  So, I decided I would use them all.


I made one page then had MDS do me a ‘duplicate page mirrored’!  All I had to do was switch out my pictures and tweak a bit for the second page.  How quick and easy is that!  Give it a try!  You can download MDS for a free 30 day trial period.  Click on the Shop Now button at the top of my Blog for more info.  You’ll love it!
Page before adding photos.

Paper: Rock a Bye 2, Stripe, Blooms, Patterns, Soft Flower, Small Polka Dots.

Stamps: Rock a Bye.

Embellishments: Grosgrain Ribbon, Grosgrain Bow.

Punches: Square, Circle, Scallop edge, Scallop Circle.

Font: CK Handprint.

Tuesday, May 14, 2013

Craft - How to Make a Thread Holder


For years, I used this board (below) that I pounded with nails to hold my thread and bobbins – I just about had the thread transferred to my new holder before I realized I wanted to have a picture of it and was not about to put the thread back!
 
Although my board worked, I had spotted this Thread Holder by The Creative Homemaker.  I’m not as talented as her so I recruited my hubby to do it for me.  The wooden frame was homemade to fit my space which was 22”long x 32” wide.  Hubby started with 2x4’s then he cut them in half length wise so about 1 5/8" wide.  We sanded each piece.   It could only be 22” long to fit in my space so the two outside pieces were cut to 22” and the shelves were cut in 32” lengths.
 
I had measured the height of my threads.  Hubby cut the pieces of boards those measurements.
 
He used those boards to keep the shelves straight as he air nailed them.
 
We weren’t going to add these trim boards to the sides but not every shelf fit perfectly so it worked great to hide any imperfections.
 
Now the waiting game - it spent the night in the shop waiting for the spray varnish to dry.
We had this hunk of board that would make a perfect backing for it.  Actually, I’m not really sure it needed a back but I was following what Angela had done.
 
Once hubby nailed that in place, it was time to pound nails to hold the bobbins.  We put them about 1.75” apart.  I now wish I had put them closer together since I have so many bobbins!
 
We used pop can tops for the hangers on each end of the board.
 
Hubby partially screwed a couple of screws at the bottom of both sides so it would tip back once it was on the wall.  We don’t think this ended up being necessary.
 
The pop can tops did not hold it – the thread holder was just too heavy for them.  It didn’t take hubby long to remedy it and all is well.  Here it is right handy to my sewing machine.
 
I really like the way it stores my bobbins with the spools.  Don’t forget to Control Your Bobbin Tails as in this post.


Friday, May 10, 2013

MDS 113 Photos in Punches

Do you ever wish you had the time to get out the doilies, glue, and glitter and scrap a page or make a card make for someone you love? If your schedule is packed, My Digital Studio could be your answer. It’s fast, it’s mess-free, and it’s a blast to use. Try it right now for FREE with their 30-day trial!  Click on the ‘Shop Now’ button at the top of my Blog for more info. 

Most of us rarely ever put a photo into any other shape than a rectangle or square.  And while it’s fun to fill your punches with bright colors or Designer Series Papers, did you know that you can fill any punch shape with a photo in MDS?

There is a Photos in Punches Challenge on Kimberly and Heather’s Facebook page this week.  I submitted this page. - I am waiting for Jackie to do the journaling.
Here is what you do:

1) Add the punch to your page.

2) Use the "Paper Fill" Option from the Design Center.

3) After you have selected a paper (it doesn't matter which one) double click on the punch on the page and zoom in on the paper to make sure it fills your punch.

4) From the Design Center click on ‘Fill with Photo’!   Your folder of photos comes. Choose your photo.

5) You can then zoom in on a particular area of the photo and/or move the photo within the punch window until you have it as you like it, then click "Okay".

Before putting your photos in the punch, get rid of any red eye – there is a button for that in MDS too.  I thought I could do it after, however, even tho you have replaced the paper with a photo, the program only recognizes it as a punch, not a photo.  I didn’t want to re-do the page, so these pictures have a bit of red eye!

I posted this page last March, which works for putting a photo in a punch also.  Now it has got a lot simpler - all you have to do is click on the ‘Fill with Photo’ button!

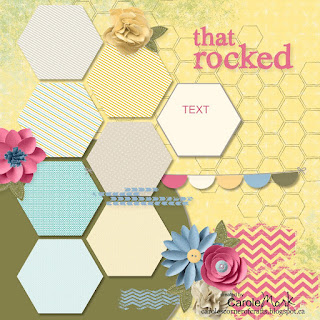
Here is the page before adding photos

Here is the Supply List:

Background
     Designer Series Paper\_Designer Kits\This And That Epic Day – 9

Embellishments
    Designer Kits\My Sweet Pea - elements\My Sweet Pea - stitched leaf
    Flowers\Bright Blooms\Bright Blooms - melon mambo 5, marina mist 6, melon mambo 3
    Flowers\Soft Blooms - embellishments\Soft Blooms - 2 so saffron, 2 very vanilla
    Round Buttons\So Saffron - button
    Buttons\Twitterpated - Baja Breeze large
Stamps
    Designer Kits\Lemonade Stand - honeycomb
    Designer Kits\Chevron - 8 grunge, 5 grunge, 1 grunge
    Little Additions - string, Color = GOING GRAY
    Designer Kits\Lemonade Stand - that rocked
Punches
    Basics\1.25 Circle Punch
    Basics\Hexagon Punch
    Basics\Half Circle Punch

Tuesday, May 7, 2013

Craft - How to Quickly Cover a Hair Clip

 
If the clip will be totally covered with a bow or anything bigger, I don’t do as much prep to them as I did for the How to Cover Spring Hair Clips.  Instead, I roughly measure out what it will take to go under the top clip, over the top and just partially around the back.  That measured about 4.75 inches.  Seal the ends with a lighter flame and begin hot gluing.


You are basically only covering the top clip.
 

Then around to the back.
 

Notice that I don’t even follow the pinch end of the clip.
 

Cover with a bow.  Quick and easy.
 

Since the bow entirely covers the clip, why do all the extra work!

Friday, May 3, 2013

MDS 112 Cheat Sheets

As well as over 2000 goodies you receive with MDS at the time of purchase, SU! supplies new digi art every Tuesday for purchasing should you want.  This Cheat Sheet is from the kit Sweet Shop that I purchased.  As you can see, there are lots of stamps, embellishments, 12 sheets of designer series paper as well as some brads.

Since there still is much chat about how to keep track of the downloads you have in MDS so as not to double order several times, I thought I would post what I do.  Printing a list of what you have would be helpful so I want to show you how I make my Cheat Sheets. They are a quick reference guide for me. I print everything out that I purchase – whether it is designer series paper (DSP), stamps, embellishments, kits etc on to 11x8.5 paper as I sure cannot see them within the program. I paper fill punches for the DSP. I zoom in and move the punch around so that it shows some of the specialty parts of the paper and sometimes I simply zoom in so it shows more of the paper. You don't get to see the whole paper but you can see the colors at least. I try and print the kits onto one piece of paper so that I can see at a glance what comes with them so I re-size things until they fit. Some kits are fairly large so they do take two sheets.

I have done this since I started with MDS so it’s just a matter of keeping up with it. I would never remember what stamps/embellishments etc are with what kits if I didn't do it this way. It works for me.

Related Posts Plugin for WordPress, Blogger...