I started
working on a pattern for this last January!
I even bought a couple patterns but I ended up taking about 6 hours to
make them from start to finish! Way too
much work! So, I started trying to come
up with something a little quicker and more affordable! After many, many, many gowns, I come up with
this pattern. It may not be exactly as
Elsa’s costume but it’s my Snow Queen gown!
For the most part, I used Shwin and Shwin free pattern but I did make
changes.
Bodice: I
used The Chloe Dress bodice. Cut 2 from
a sheer knit fabric - I used a nylon chiffon tricot in light blue. Place right sides together and sew around the
neck.
Pink, turn and
topstitch. Zig zag to hold bottoms
together. Press and set aside.
Sleeves:
The
Shwin and Shwin sleeve pattern was a bit loose so I altered it until it fit the
way I wanted. I wanted a point on my
sleeve so I simply folded the sleeve pattern in half and extended it with a
point. I also made a facing for it. Sew the facings to the bottom of the sleeves.
Pink, turn and
topstitch. Zig zag facing at the top to
hold in place. Press and set aside.
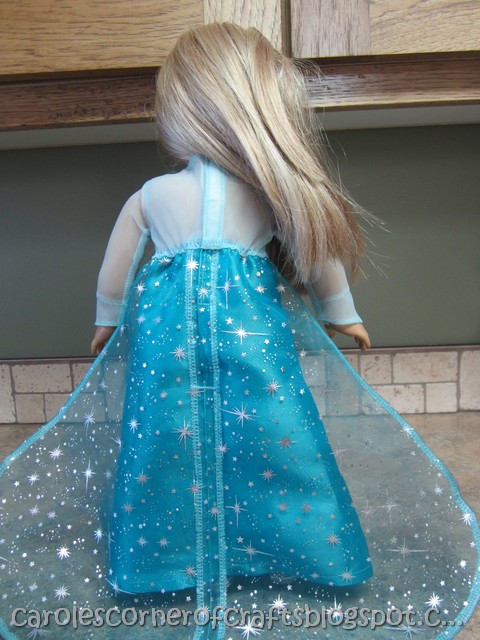
Train: I
used Ice Organza Silver Star fabric in turquoise from Fabric.com for the
train. I made my train wider at the
bottom than Shwin and Shwin’s pattern. I
also curved it to make the sewing easier.
Serge both center back seams to clean finish. Sew center back seam together with ½” seam
allowance to about 10” from the bottom.
Press open and topstitch edges.
Serge then hem
the outer edges.
Bar tack at the
10” opening. Set aside.
Bodice
Accent: I transferred the
bottom dot to the front of my accent piece by placing a piece of scotch tape to
the front and marking the dot. I got
this fabric from Jo-Ann’s fabric - it is called Ultimate Hawaii. I don’t think they sell it anymore.
I just happened
to have this pearl trim in my stash. Sew
the trim to the right side of the bodice accent piece until you reach the dot
using the zipper foot. Clip and continue
sewing to the other side. Remove tape.
Because my
thread was a good match to my fabric, I topstitched the pearl trim now. I found that it cooperates a bit better later
on. Pin right side of bodice to wrong side of
dress (Two Tone Taffeta fabric in aqua from Fabric.com) front and sew along the
top. Clip to dot and pink the edges.
Turn accent
piece to the front. Topstitch along the
top for better cooperation later.
Pin in place.
Topstitch along
the pearls again to secure to the dress front using the zipper foot.
Pin accent
piece to bodice front and sew in place along the side seams, armholes and
across the top over your previous topstitching.
Set aside.
Back Skirt:
baste wrong side of train to right side of skirt backs.
Pin and serge
to the back bodice.
Serge center
back edges to clean finish. I also
serged over about a 4” length of interfacing at the top to prevent
stretching.
Cut two pieces
of ¼” elastic each 3” long. Mark ½” from
each end for a tail to hang on to. Pin
one mark at ¼” from side seam and the other mark at ½” from the center back. Stretch and zigzag elastic over the waist
seam.
Sew center back
seam closed with ½” seam allowances about 7” from bottom. Press to one side and bartack.
Sew in the
sleeves. Pink edges to clean finish.
Serge one side
seam – avoid catching the train in the seam.
Press. Serge hem and press at
3/8”.
Serge the other
side seam being careful not to catch the train in the seam. Hem skirt.
Add about 4” of Velcro at the back.
Stay tuned for more American Girl doll tutorials or better yet, sign up
to my Blog so you won’t miss any of my AG posts!

I started
working on a pattern for this last January!
I even bought a couple patterns but I ended up taking about 6 hours to
make them from start to finish! Way too
much work! So, I started trying to come
up with something a little quicker and more affordable! After many, many, many gowns, I come up with
this pattern. It may not be exactly as
Elsa’s costume but it’s my Snow Queen gown!
For the most part, I used Shwin and Shwin free pattern but I did make
changes.
Bodice: I
used The Chloe Dress bodice. Cut 2 from
a sheer knit fabric - I used a nylon chiffon tricot in light blue. Place right sides together and sew around the
neck.
Pink, turn and
topstitch. Zig zag to hold bottoms
together. Press and set aside.
Sleeves:
The
Shwin and Shwin sleeve pattern was a bit loose so I altered it until it fit the
way I wanted. I wanted a point on my
sleeve so I simply folded the sleeve pattern in half and extended it with a
point. I also made a facing for it. Sew the facings to the bottom of the sleeves.
Pink, turn and
topstitch. Zig zag facing at the top to
hold in place. Press and set aside.
Train: I
used Ice Organza Silver Star fabric in turquoise from Fabric.com for the
train. I made my train wider at the
bottom than Shwin and Shwin’s pattern. I
also curved it to make the sewing easier.
Serge both center back seams to clean finish. Sew center back seam together with ½” seam
allowance to about 10” from the bottom.
Press open and topstitch edges.
Serge then hem
the outer edges.
Bar tack at the
10” opening. Set aside.
Bodice
Accent: I transferred the
bottom dot to the front of my accent piece by placing a piece of scotch tape to
the front and marking the dot. I got
this fabric from Jo-Ann’s fabric - it is called Ultimate Hawaii. I don’t think they sell it anymore.
I just happened
to have this pearl trim in my stash. Sew
the trim to the right side of the bodice accent piece until you reach the dot
using the zipper foot. Clip and continue
sewing to the other side. Remove tape.
Because my
thread was a good match to my fabric, I topstitched the pearl trim now. I found that it cooperates a bit better later
on. Pin right side of bodice to wrong side of
dress (Two Tone Taffeta fabric in aqua from Fabric.com) front and sew along the
top. Clip to dot and pink the edges.
Turn accent
piece to the front. Topstitch along the
top for better cooperation later.
Pin in place.
Topstitch along
the pearls again to secure to the dress front using the zipper foot.
Pin accent
piece to bodice front and sew in place along the side seams, armholes and
across the top over your previous topstitching.
Set aside.
Back Skirt:
baste wrong side of train to right side of skirt backs.
Pin and serge
to the back bodice.
Serge center
back edges to clean finish. I also
serged over about a 4” length of interfacing at the top to prevent
stretching.
Cut two pieces
of ¼” elastic each 3” long. Mark ½” from
each end for a tail to hang on to. Pin
one mark at ¼” from side seam and the other mark at ½” from the center back. Stretch and zigzag elastic over the waist
seam.
Sew center back
seam closed with ½” seam allowances about 7” from bottom. Press to one side and bartack.
Sew in the
sleeves. Pink edges to clean finish.
Serge one side
seam – avoid catching the train in the seam.
Press. Serge hem and press at
3/8”.
Serge the other
side seam being careful not to catch the train in the seam. Hem skirt.
Add about 4” of Velcro at the back.
Stay tuned for more American Girl doll tutorials or better yet, sign up
to my Blog so you won’t miss any of my AG posts!