Look at me go! Actually
got a kit done within a month! Might be
hope for me yet!
|
March 2018 is Paper Pumpkin’s 5th anniversary, and along with
celebrating five amazing years of creating and sharing together, they also
wanted to find a way to say thank you to their friends with an amazing March
kit which includes a fantastic, FREE gift—a pack of beautiful wood
embellishments. Once I finished my
cards, I laid them out and added the wooden pieces. They aren’t really my favorite thing! I broke quite a few of the bigger ones
trying to take them off the base!
|
These are the extras I used. All other items were supplied in the March
2018 May Good Things Grow Paper Pumpkin kit.
Most of my inspiration came from Pinterest, of course!
 |
| Card 1 of 9 alternative. |
I took the envelope apart and used it for the
background. Not that it really shows,
but I lightly sanded the front of the panel before distressing.
Cardstock: Blackberry Bliss, Daffodil Delight,
Blushing Bride, Lemon Lime Twist.
Ink: Blackberry Bliss, Soft Suede.
Extras: sanding block, distressing tool, Stitched
Shapes framelits, sponge, gold glitter glue, flower shaping tool. Embossing
folder, punch
 |
| Card 2 of 9 alternative. |
I took the other envelope apart and used it for a
background too.
Cardstock: white, Basic Grey.
Ink: Basic Grey.
Extras:
distressing tool, sponge, wide oval punch, vintage lace.
 |
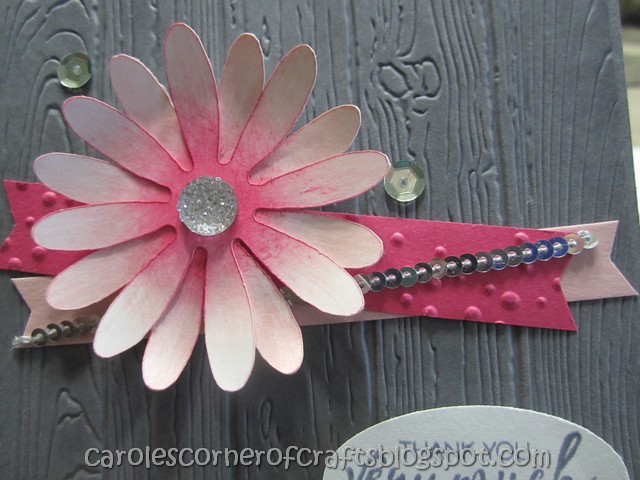
| Card 3 of 9 alternative. |
Cardstock: Blackberry Bliss, Very Vanilla.
Ink: Blackberry Bliss.
Extras: Honeycomb embossing folder, gold glitter
glue, flower shaping tool.
 |
| Card 4 of 9 alternative. |
 |
| Card 4 open. |
I loved how Ginger from the Paper Pumpkin Fan
Club Facebook page made use of the envelope reinforcement closure things so had
to put my spin on her idea! Happy
Birthday is revealed when the string is undone.
Cardstock: White, Daffodil Delight, Blushing
Bride, Lemon Lime Twist, Blackberry Bliss, Dazzling Diamonds glimmer paper.
Ink: Blackberry Bliss, Soft Suede.
Extras: flower shaping tool, Happy Birthday
thinlit, 5/16” circle punch.
 |
| Card 5 of 9 alternative. |
Here is a card using the envelope flap.
Cardstock: Blushing Bride, Lemon Lime Twist.
Ink: Blackberry Bliss, Soft Suede.
Extras: flower shaping tool, Trio flowers punch,
rhinestones, doily
 |
| Card 6 of 9 alternative. |
And the flap from the Lemon Lime envelope.
Stamp: En Francais.
Cardstock: Blackberry Bliss, Lemon Lime Twist.
Ink: Blackberry Bliss, Soft Suede.
Extras: Trio flowers punch, Stitched Shapes framelits,
sponge, flower shaping tool, Basket weave Embossing folder.
 |
| Card 7 of 9 alternative. |
Cut the large flower piece in half and added extra
flowers and leaves. I trimmed the Fresh
Fig note card down for the background, ran it through the Brick wall embossing
folder then sanded it.
Stamp: Flourishing Phrases.
Cardstock: Blackberry Bliss, Daffodil Delight, Pink
Pirouette, Very Vanilla, Crumb Cake, Lemon Lime Twist.
Ink: Blackberry Bliss, Soft Suede.
Extras: sanding block, flower shaping tool,
Brick wall Embossing folder.
 |
| Card 8 of 9 alternative. |
Here is what I did with the other half of the
large flower piece. I split the green stripe to make it 5” long then covered
the split with the ribbon that came in the kit. Added an extra flower and a couple
of leaves.
Stamp: Bunch of Blossoms.
Cardstock: Blushing Bride, Lemon Lime Twist,
Soft Suede.
Ink: Blackberry Bliss, Soft Suede.
Extras: sponge, doily, flower shaping tool.
Embossing folder, punch
 |
| Card 9 of 9 alternative. |
Brenda from the Paper Pumpkin Fan
Club Facebook page used the reinforcements as part of her card base to do the
Inlaid Embossing Technique. I only ended
up with one card as there was only 8 reinforcements in the kit. I used up my scrap pieces to make the bottom
panel.
Cardstock: Blackberry Bliss, Daffodil Delight,
Blushing Bride.
Ink: Blackberry Bliss.
Extras: flower shaping tool, Delicate Dots
embossing folder, scallop edge border punch, doily, stapler, Trio Flower punch.
It is intended to make 8 note
cards and envelopes. I
ended up with 32 cards, 4 of each alternative design plus one more using the
Fresh Fig reinforcements!
Each kit contains: May Good
Things Grow stamp set, Early Espresso ink spot, 8 card bases, 8 card panels, 8
envelopes, 4 die-cut element sheets, 1 laser-cut element sheet, 1 sticker strip
sheet, 4-1/2 yds. purple ribbon, 16 yds. white linen thread, 16 antique brass
brads, 12 pink pearls (in 2 sizes), 12 purple pearls (in 2 sizes), 4 purple
pearls, 275 dimensionals, and 100 adhesive dots.
Coordinating SU! colors: Crumb Cake, Early
Espresso, Flirty Flamingo, Fresh Fig, Powder Pink, Soft Suede, Daffodil
Delight, Lemon Lime Twist.

Look at me go! Actually
got a kit done within a month! Might be
hope for me yet!
|
March 2018 is Paper Pumpkin’s 5th anniversary, and along with
celebrating five amazing years of creating and sharing together, they also
wanted to find a way to say thank you to their friends with an amazing March
kit which includes a fantastic, FREE gift—a pack of beautiful wood
embellishments. Once I finished my
cards, I laid them out and added the wooden pieces. They aren’t really my favorite thing! I broke quite a few of the bigger ones
trying to take them off the base!
|
These are the extras I used. All other items were supplied in the March
2018 May Good Things Grow Paper Pumpkin kit.
Most of my inspiration came from Pinterest, of course!
|
| Card 1 of 9 alternative. |
I took the envelope apart and used it for the
background. Not that it really shows,
but I lightly sanded the front of the panel before distressing.
Cardstock: Blackberry Bliss, Daffodil Delight,
Blushing Bride, Lemon Lime Twist.
Ink: Blackberry Bliss, Soft Suede.
Extras: sanding block, distressing tool, Stitched
Shapes framelits, sponge, gold glitter glue, flower shaping tool. Embossing
folder, punch
|
| Card 2 of 9 alternative. |
I took the other envelope apart and used it for a
background too.
Cardstock: white, Basic Grey.
Ink: Basic Grey.
Extras:
distressing tool, sponge, wide oval punch, vintage lace.
|
| Card 3 of 9 alternative. |
Cardstock: Blackberry Bliss, Very Vanilla.
Ink: Blackberry Bliss.
Extras: Honeycomb embossing folder, gold glitter
glue, flower shaping tool.
|
| Card 4 of 9 alternative. |
|
| Card 4 open. |
I loved how Ginger from the Paper Pumpkin Fan
Club Facebook page made use of the envelope reinforcement closure things so had
to put my spin on her idea! Happy
Birthday is revealed when the string is undone.
Cardstock: White, Daffodil Delight, Blushing
Bride, Lemon Lime Twist, Blackberry Bliss, Dazzling Diamonds glimmer paper.
Ink: Blackberry Bliss, Soft Suede.
Extras: flower shaping tool, Happy Birthday
thinlit, 5/16” circle punch.
|
| Card 5 of 9 alternative. |
Here is a card using the envelope flap.
Cardstock: Blushing Bride, Lemon Lime Twist.
Ink: Blackberry Bliss, Soft Suede.
Extras: flower shaping tool, Trio flowers punch,
rhinestones, doily
|
| Card 6 of 9 alternative. |
And the flap from the Lemon Lime envelope.
Stamp: En Francais.
Cardstock: Blackberry Bliss, Lemon Lime Twist.
Ink: Blackberry Bliss, Soft Suede.
Extras: Trio flowers punch, Stitched Shapes framelits,
sponge, flower shaping tool, Basket weave Embossing folder.
|
| Card 7 of 9 alternative. |
Cut the large flower piece in half and added extra
flowers and leaves. I trimmed the Fresh
Fig note card down for the background, ran it through the Brick wall embossing
folder then sanded it.
Stamp: Flourishing Phrases.
Cardstock: Blackberry Bliss, Daffodil Delight, Pink
Pirouette, Very Vanilla, Crumb Cake, Lemon Lime Twist.
Ink: Blackberry Bliss, Soft Suede.
Extras: sanding block, flower shaping tool,
Brick wall Embossing folder.
|
| Card 8 of 9 alternative. |
Here is what I did with the other half of the
large flower piece. I split the green stripe to make it 5” long then covered
the split with the ribbon that came in the kit. Added an extra flower and a couple
of leaves.
Stamp: Bunch of Blossoms.
Cardstock: Blushing Bride, Lemon Lime Twist,
Soft Suede.
Ink: Blackberry Bliss, Soft Suede.
Extras: sponge, doily, flower shaping tool.
Embossing folder, punch
|
| Card 9 of 9 alternative. |
Brenda from the Paper Pumpkin Fan
Club Facebook page used the reinforcements as part of her card base to do the
Inlaid Embossing Technique. I only ended
up with one card as there was only 8 reinforcements in the kit. I used up my scrap pieces to make the bottom
panel.
Cardstock: Blackberry Bliss, Daffodil Delight,
Blushing Bride.
Ink: Blackberry Bliss.
Extras: flower shaping tool, Delicate Dots
embossing folder, scallop edge border punch, doily, stapler, Trio Flower punch.
It is intended to make 8 note
cards and envelopes. I
ended up with 32 cards, 4 of each alternative design plus one more using the
Fresh Fig reinforcements!
Each kit contains: May Good
Things Grow stamp set, Early Espresso ink spot, 8 card bases, 8 card panels, 8
envelopes, 4 die-cut element sheets, 1 laser-cut element sheet, 1 sticker strip
sheet, 4-1/2 yds. purple ribbon, 16 yds. white linen thread, 16 antique brass
brads, 12 pink pearls (in 2 sizes), 12 purple pearls (in 2 sizes), 4 purple
pearls, 275 dimensionals, and 100 adhesive dots.
Coordinating SU! colors: Crumb Cake, Early
Espresso, Flirty Flamingo, Fresh Fig, Powder Pink, Soft Suede, Daffodil
Delight, Lemon Lime Twist.