Showing posts with label Winter Woods stamp set. Show all posts

Friday, December 20, 2019

Winter Woods - LICI-D-11


I first cut my 12 sheets of 6” x 6” Joyous Noel Specialty DSP Paper Share into 4” widths which left me with 12, 2” wide strips.  I left them as is and will cut them down as needed.  I cut the 4” wide pieces down to 5-1/4” high.  That left me with a small strip that just happens to fit across my insert.


Stamps: Winter Woods (Holiday 2018).

Cardstock: White, Myth’s and Magic Glimmer Paper, Joyous Noel Specialty DSP (Holiday 2018).

Ink: Versamark.

Tools: dimensionals, Tombow adhesive, snail adhesive, glue dots, sequins, Dazzling Diamonds Glitter, Copper embossing powder (inside).

Punches/Dies: In the Woods Framelits Dies.


The snowy piece was cut from Myth’s and Magic Glimmer Paper. I used the In The Woods Framelits to get the hill shape. Attached this to a full panel from my Love It Chop It pile (5-1/4” x 4”), leaving a small border of DSP showing at the bottom - don’t add glue to the curved edge.  Leave it open to add the trunks from the other two trees.  Adhere to card front.  Trim if necessary.


I die cut both evergreen trees, pushed up the scallop edges of the smaller evergreen, added a narrow bead of Tombow glue to the edges and then sprinkled with Dazzling Diamonds.  Added dimensionals to both trees.  Added sequins from my stash.


I added dots of glue to the other two trees and sprinkled them with Dazzling Diamonds too.


Adhere one of the strip wastes that we cut from our Love It Chop It stash to the inside of the card.


Friday, September 13, 2019

Winter Woods - LICI-B-22


Stamps: Winter Woods.

Cardstock: Very Vanilla, Everyday Enchantment DSP (SAB 2012).

Ink: Granny Apple Green, Soft Suede, Crumb Cake.

Tools: Stamparatus, bone folder, purchased envelope, sponge, dimensionals, Tombow adhesive, snail adhesive, glue dots, sequins, Natural Trim ribbon, Subtle embossing folder.

Punches/Dies: Lots of Labels dies, In the Woods Framelits.

Use a full panel from your Love It Chop It pile (5-1/4” x 4”).  Sponge edges with Soft Suede ink.  Set aside.


Cut Very Vanilla at 4” x 2-1/2”.  Set it and the phrase from the Winter Woods stamp set on the Stamparatus.  Stamp with Granny Apple Green.  Die cut from the Lots of Labels dies.  Sponge with Crumb Cake ink.  Run through the Subtle EF.  Set aside.


Die cut the two pine tress from the In the Woods dies from 3-3/4” x 4” Very Vanilla.  Pop the branches outwards.  Sponge branches and both trees with Crumb Cake ink.  Add mini dimensionals to the back of the top tree, avoiding the branches.  Set aside.

Measure up from the bottom of the DSP about 2-5/8” and adhere phrase at that mark.  Cut 5” of Natural Trim and tape to the back across the bottom of the phrase.  Adhere to a Very Vanilla card.  Add tree and gold sequins.


Cut 4” of Natural Trim and tie a knot around the trim on the card.  Add a glue dot behind the knot to hold in place.  Add glue dots to hold the tails in place.


Stamp a phrase and some images to the inside of the card.  Decorate the envelope.


I have loved and now chopped the entire package of my Everyday Enchantment DSP from 2012!  I chopped it in 5-1/4” strips then cut the strips into 4” pieces.  Kept the leftover strips too.  I cut the cardboard backing from the DSP to fit in a Full Wide Stamp case. I checked my ribbons to see what I had that matched and taped a small piece to the cardboard.  Stored all the chopped DSP in a Full Wide Stamp case.

Wednesday, December 12, 2018

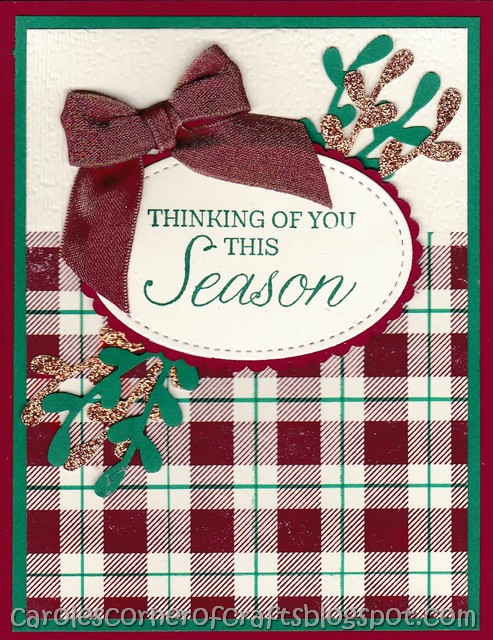
Buffalo Check Goes Plaid - One Hour Card Class 082 - OHCC082


Stamps: Winter Woods, Suite Seasons (2016 Holiday), Buffalo Check.

Cardstock: Shaded Spruce, Merry Merlot (Cherry Cobbler), Very Vanilla, Joyous Noel 6” x 6” Glimmer Paper in Copper (Holiday 2018).

Ink: Shaded Spruce marker, Shaded Spruce, Merry Merlot (Cherry Cobbler).

Tools: Ruler, Stamparatus, bone folder, purchased envelope, dimensionals, Tombow adhesive, snail adhesive, regular and mini glue dots, Merry Merlot and Copper 5/8” Reversible Ribbon (Holiday 2018), Subtle embossing folder, Silicone Craft Sheet.

Punches/Dies: Sprig Punch, Stitched Shapes Framelits, Layering Ovals Framelits, Thinlits Die.

Jodi’s card gave me a start for my card.  I really wanted to use the new Glimmer Paper in Copper and the Reversible Ribbon (both from the Holiday 2018) on my card. 

I cut a Very Vanilla panel at 5” x 4” and again at 3-1/4” x 4”.

Lightly spritz the back of the smaller Vanilla panel with water, then blot it with a paper towel. While it was still damp, run it through the Subtle embossing folder.

Used the Stamparatus to position and stamp the Buffalo Check on the bigger Vanilla panel.  Drew the lines with the marker as Jodi shows then I taped the Vanilla panels together and trimmed it to 3-3/4” x 4”.

Wednesday, December 5, 2018

White Winter Woods Christmas - One Hour Card Class 079 - OHCC079


Stamps: Winter Woods.

Cardstock: White, Gold Foil, Vellum Cardstock, Sparkle Glimmer Paper, Watercolor (for the snow).

Ink: Versamark.

Tools: Gold embossing powder, 1/8” Gold Metallic Edge Ribbon, Stamparatus, bone folder, purchased envelope, dimensionals, Fine Tip Glue, Tombow adhesive, snail adhesive, mini glue dots, sequins, Piercing Tool, Softly Falling embossing folder, Silicone Craft Sheet.

Run the snow piece through the Softly Falling embossing folder.  Apply Fine-Tip Glue or Tombow Glue to the bumps. Cover with Dazzling Diamonds. 


I ran the vellum piece through the Softly Falling embossing folder as well.  I used the ribbon to hold it to the gold foil – glue shows right through the vellum so it doesn’t work. 


Die cut the 2 spruce trees from white cardstock.  Colored the top spruce tree with Wink of Stella.  Adhered them together with mini dimensionals.  Added lots of sequins. 


Die cut these trees from Sparkle Glimmer Paper.  


Added a bow. 


For the inside of the card, I stamped the phrase from the Winter Woods stamp set with Versamark ink using the Stamparatus then heat emboss with Gold embossing powder.   Ran the flap of the envelope through the Softly Falling embossing folder. 

Friday, November 16, 2018

Buffalo Check Christmas - One Hour Card Class 076 - OHCC076


Fell in love with this card by Mary!  She has a great video on how she did it too! 

Stamps: Buffalo Check, Reason for the Season (Holiday 2015), Winter Woods.

Cardstock: Cherry Cobbler, Mossy Meadow, Crumb Cake, Gold Glitter paper. 

Ink: Mossy Meadow, Crumb Cake, Cherry Cobbler, Cherry Cobbler marker.

Tools: Stamparatus, bone folder, purchased envelope, sponge dauber, dimensionals, 5/8” Striped Burlap Trim (Holiday 2018), Tombow adhesive, snail adhesive, glue dots, rhinestones, Pinewood Planks embossing folder, Linen Thread, Gold Metallic Thread, Take Your Pick Tool, Mod Podge.

Punches/Dies: Pretty Pines Thinlits, Layering Squares Framelits, Sprig punch (Holiday 2018),

I don’t have the Cross-Stitched Christmas stamp set so I used what I had, which unfortunately, has retired. 


Sponging the edges of both panels really adds to the rustic look! 

Because I don’t have the Dark Cherry Cobbler Stampin’ Blend, I painted 3 large pearls with Mod Podge. Once dry, I colored them with my Stampin’ Write Cherry Cobbler marker. This is not necessary to do if you are using alcohol markers such as Sharpies or SU! Blends to color your pearls but it really makes the Stampin’ Write marker colors ‘cling’ to the pearl. 

I used my bow maker to make my bows. 

I stamped the envelope flap with the Buffalo Check background in Mossy Meadow using Mary’s cool trick in her video.  The inside phrase is from the same retired set as the outside phrase. 

Tuesday, November 13, 2018

Glittering Snowflake Blizzard - One Hour Card Class 078 - OHCC078


A very simple card to put together with lots of glitz!

Stamps: Winter Woods, Christmas Pines.

Cardstock: Coastal Cabana, White.

Ink: Coastal Cabana, Versamark.

Tools: Coastal Cabana Thick Baker’s Twine, Die brush, Stamparatus, bone folder, purchased envelope, dimensionals, Tombow adhesive, snail adhesive, mini glue dots, White embossing powder, Silicone Craft Sheet, Multipurpose Adhesive Sheet, Wink of Stella.

Punches/Dies: Stitched Shapes Framelits, Blizzard Thinlits Die (Holiday 2018).

Cut Multipurpose Adhesive Sheet and Coastal Cabana cardstock at 5-1/2” x 4-1/4”.  Adhere the Multipurpose Adhesive Sheet to the Coastal Cabana panel.
Cut a White panel at 5-1/2” x 4-1/4” and die cut with the Blizzard Thinlits Die then adhered that to the Multipurpose Adhesive Sheet. I trimmed to 5-1/4” x 4” before sprinkling with Dazzling Diamonds. 

I used the Stamparatus and Versamark ink to stamp the sentiment on Coastal Cabana cardstock and then embossed using white embossing powder. Die cut using the Stitched Shapes Framelits and added dimensionals.  I also added tiny pearls to the 3 snowflakes.

I happen to have some Coastal Cabana Thick Baker’s Twine left over from when it was an In Color a few years ago so I used that to make a bow!

Stamp a phrase from the Christmas Pines stamp set in Coastal Cabana ink using the Stamparatus for the inside of the card.  Color the word ‘sparkle’ with Wink of Stella.  Used the snowflakes from the same stamp set on the envelope.

Love all the glitz!

Related Posts Plugin for WordPress, Blogger...