Friday, August 30, 2013

MDS 129 Amazing and Fantastic Scrapbook Page

On this page, I was looking for a little splatter.  The Oh Splat stamp set had just what I was looking for.  All I had to do was hide the number behind the picture and flags!  Pretty simple with MDS!  My Digital Studio starts with nearly 2,000 unique elements--stamps, embellishments, templates, kits, punches, Designer Series papers, card stock, borders, and more.  PC and Mac compatible.  Click on the ‘Shop Now’ button at the top of my Blog for more info.


Page before adding photos.
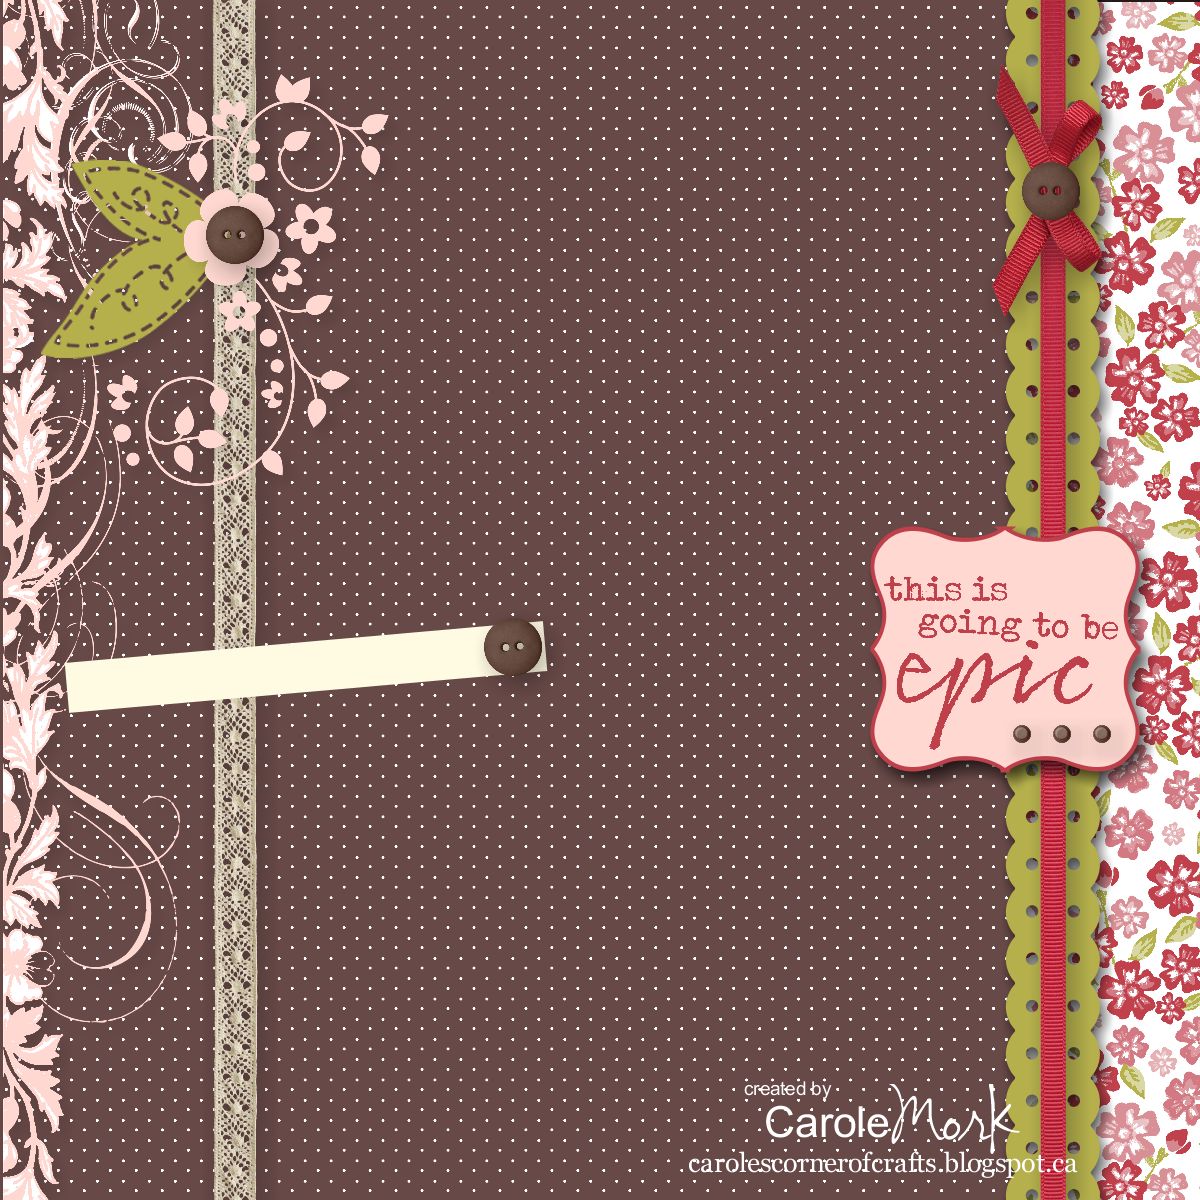
Background:  Designer Series Paper\_Designer Kits\Downtown Grunge - designer series paper\Downtown Grunge – 4.
Embellishments:  Knots and Ties Trim\Knots and Ties Trim - whisper white 7, Designer Kits\Downtown Grunge - embellishments\Downtown Grunge - frame4, Delightful Digital Tape\Delightful Digital Tape 3 - crumb cake (re-colored), Delightful Digital Tape\Delightful Digital Tape 1 - crumb cake (re-colored), Delightful Digital Tape\Delightful Digital Tape 4 - crumb cake (re-colored).
Stamps:  Natural Composition Overlays\Natural Composition Overlays - 1, Color = SOFT SUEDE, Oh Splat!\Oh Splat! - 1, Color = MELON MAMBO, Oh Splat!\Oh Splat! - 4, Color = MELON MAMBO, Seriously Awesome\Seriously Awesome - square frame, Color = NIGHT OF NAVY, Seriously Awesome\Seriously Awesome - so seriously, Color = MELON MAMBO.
Punches:  1.25 Square Punch,  Filled with: Designer Series Paper\_Designer Kits\One Great Year - designer series paper\One Great Year – 2, Extras\Flag Punch,  Filled with: Designer Series Paper\_Designer Kits\Christmas Cocoa II - designer series paper\Christmas Cocoa II - pattern 12, 1.25 Square Punch,  Filled with: Designer Series Paper\_Designer Kits\Strength & Hope - designer series papers\Strength & Hope - pattern 3, 1.25 Square Punch,  Filled with: Designer Series Paper\Small Polka Dot\Night of Navy Small Polka Dot, Extras\Flag Punch,  Filled with: Designer Series Paper\_Designer Kits\Island Oasis II - designer series paper\Island Oasis II – 8, Extras\Star Punch, Fill Color = NIGHT OF NAVY.

Tuesday, August 27, 2013

Craft - Shaving Cream Technique

 
Joanne's SU! Workshop was yesterday.  With so much going on at our reno's, I wasn't sure I could get to the computer to post them so I've decided to post this technique instead of the cards we did. I will post them at the end of next month instead.
This technique has been around for some time.  I had never tried it so thought it was about time.  It is a little bit messy, but has a great result! To do this technique, gather your supplies:

Cheap shaving cream - foam not gel - from the Drug Store.

Glossy photo card paper or Glossy cardstock cut into 4.25x5.5” or so.

Three different colored re-inkers.   I used Bashful Blue, Baja Breeze, and Marina Mist by Stampin Up!.

Something to put the foam into - paper plate, foam plate, ice cream lid or whatever else you have.

Skewer or plastic fork for swirling.

Popsicle stick or plastic knife for scrapping off the foam.

Fair chunk of wax paper.

Kleenex or paper towels.
 

Cover the bottom of your foam plate with shaving cream.

 
Use a stick to smooth the shaving cream out a bit.

 
Add several drops of each of your re-inker colors.

 
Mix shaving cream and re-inker in a swirling motion.  Don’t swirl it too much as you want contrast.

 
Lay out the wax paper so it is ready.  Press your card stock into the shaving cream. Make sure you are putting the glossy side down and cover the front completely.  Leave for a minute.

Pull your card stock out of the shaving cream and set on the wax paper.  Lay another piece of glossy card stock on top of the one covered in shaving cream.

 
Press together, leave for a minute and then pull apart giving you two shaving cream coated pieces of card stock.

 
Swipe off the shaving cream with a Popsicle stick or plastic knife.

I added a bit more Bashful Blue ink to my foam, swirled then added another piece of glossy cardstock, repeated as above.  Now I have 4 pieces of shaving cream cardstock.  The swirls are not quite as detailed (bottom picture) but it will do.

 
Polish with a Kleenex or paper towel until the shine returns to your cardstock.

 
Next, I added some Night of Navy ink drops to my foam.

 
Repeated as above so I had 4 more pieces of a different color cardstock.

 
My shaving cream is pretty darn muddy but thought I would try one more re-inker - Cherry Cobbler.  I was able to cover 4 more pieces of cardstock but that is it, it is done!

 
Now I have an assortment of colored papers to work with.  I will put my thinking cap on and come up with some cards using these papers.

Friday, August 23, 2013

MDS 128 Sweet Things Scrapbook Page

MDS.net site had a challenge the week of September 10, 2012 - it was a Sketch called Scrap Map 1. Here was my submission.  My Digital Studio is an easy-to-use design software featuring thousands of Stampin’ Up!’s award-winning images, colors, and accessories. Compatible with PC and Mac operating systems, My Digital Studio allows designers of all skill levels to create their own digital projects or use hundreds of templates to make professionally designed cards, photo albums, scrapbooks, and more.  You can download MDS (My Digital Studio) for a free 30 day trial period.  Click on the ‘Shop Now’ button at the top of my Blog for more info. 


Page before adding photos.
Paper: Twitterpated 9.

Stamps: Twitterpated, You’re My Sunshine, Razzleberry Splash.

Embellishments: Twitterpated, Taffeta Trimmings, various Buttons, Bakers Twine.

Punches: Hexagon filled with Twitterpated, Strength and Hope, Grad Party, Keep this Memory DSP.

Font: CK Alis Hand.
Here is the Sketch.
 

Tuesday, August 20, 2013

Craft - How to Make Korker Ribbon

While these bows look difficult to make, they are surprisingly simple. You can make korker ribbon from any type of ribbon - satin, grosgrain, jacquard etc. 1/4 inch or 3/8” widths seem to curl the best. 

 I bought a couple pieces of ¼” dowel – they were 4’ long.  I cut them into 12” lengths.  I then marked the 6” point on each of the 12” pieces of dowel.  I figured I could get two pieces of ribbon on each dowel this way.  You can see the scratch mark on the dowel that isn’t covered with ribbon.

Begin by taking one end of the ribbon and clothespin it to the dowel - I only have a couple of clothespins so I used sewing needles for the most of them, then proceed downward in a spiral pattern around the dowel until I reached the center mark on my dowel, cut it then finished covering the dowel with a second piece of ribbon.  Clothespin this end to the dowel too.

Once you have your dowels filled, soak your ribbon with water.  I have read where some people spray the wet ribbon with starch.  I have tried it both ways and do not see the need for starch.
 
 
Line your oven shelves with aluminum foil or use an aluminum tray to set the ribbon covered dowels on.  Place in a preheated oven at 225 degrees.  Allow to bake for 30 minutes.
 

After 30 minutes, carefully remove dowels from the oven.  Allow to cool. Using your hands to feel the length of the dowel, check for any remaining wetness.   If there is none, remove the clothespins/needles and, in a downward motion, slide the ribbons from the dowels without changing the corkscrew shape of the ribbons.  If the curl of the ribbon does not seem tight or any wetness remains, return to the oven and repeat the above step every ten minutes until ribbon has a dry, tight curl.  Now I have a selection of korker ribbons to choice from.
 

As I am not sure how many bows I am going to make, I cut a variety of ribbon at 3” – this means 3” of curled ribbon.  To make one full korker bow you will need approximately 30 3-inch pieces of korker ribbons.
 

Seal each end with a lighter.
 

Lay round elastic flat on a work surface – no need to cut it until it is tied. Group the korker ribbons on top of the elastic so that they are perpendicular and cross the elastic.
 

Lightly tie the elastic around the korker ribbons.  Adjust the korker ribbons that are uneven by pulling them from the opposite side of the bow.
 

 Tie the elastic very tightly in a double knot around the korker ribbons.
 

Tie the extending pieces of round elastic to a hair band or clip the round elastic off and hot glue the korker bow to a hair clip or barrette.


Friday, August 16, 2013

MDS 127 Epic Scrapbook Page

 
This layout was inspired by someone’s Blog layout that I seen.  I just knew I could turn it into a scrap page layout with the help of MDS!  You can download a FREE 30-day trial.  With that, you will get:
* Full access to the software at NO COST for 30 days
* Full access to design tools to create cards, photobooks, calendars, and more
* Full access to a sample of exclusive artwork
* The chance to buy additional downloads that you can keep after your trial expires
* Ability to order your projects from our professional print services
Click on the ‘Shop Now’ button at the top of my Blog for more info.


Page before adding photos.

Background:  Designer Series Paper\_Designer Kits\Bella Rose - designer series paper\Bella Rose – 11.
Embellishments:  Crochet Trim Ribbon\Chantilly, Grosgrain Ribbon\Riding Hood Red Grosgrain Ribbon, Grosgrain Ribbon - bow\Riding Hood Red Grosgrain Ribbon – bow, Round Buttons\Chocolate Chip – button, Brads\Chocolate Chip – brad.
Stamps:  Torn Edges\Torn Edges - swirl leaves, Color = PINK PIROUETTE, Designer Kits\My Sweet Pea - stamps\My Sweet Pea - leaf, Color = KIWI KISS, Cheerful Treat\Cheerful Treat - flower 8, Color = PINK PIROUETTE, Seriously Awesome\Seriously Awesome - epic, Color = RIDING HOOD RED.
Punches:  1.25 Square Punch, Dotted Scallop Ribbon Punch, Fill Color = KIWI KISS, Curly Label Punch, Fill Color = PINK PIROUETTE.
 

Tuesday, August 13, 2013

Craft - Shower Ring Scarf Holder

 
Boy oh boy … can a guy spend a lot of time on Pinterest eh?  So many smart and talented people!  I want to share this scarf holder I found.  So simple!  All you need is a package of Shower Curtain rings.


Hook the rings on to a hanger from your closet.  Now all my scarves can be stored in one place!


And there you have it!  A perfect solution for storing scarves!

Friday, August 9, 2013

MDS 126 All the Little Things Scrapbook Page

Talk about a quick page to put together!  I stretched out and paper filled the 1.25” square punch, added a few embellishments and it was done!  So very easy.  MDS Software is easy enough for beginners, but includes a variety of tools for advanced designers too. Anyone can try it FREE for 30 days! Click on the ‘Shop Now’ button at the top of my Blog and download it (item 130910) or you can order the MDS Trial Disc 10 Packs (item 132919) to get it into your hands!


Page before adding photos.
Background:  Designer Series Paper\_Designer Kits\Delight in the Day - designer series paper\Delight in the Day – 6.
Embellishments:  Designer Kits\Delight in the Day - embellishments\Ruffled Ribbon - Pool Party, Staple & Stitching\Vanilla - Simple Stitches zigzag, Digital Kits\Everyday Enchantment Brads\Everyday Enchantment - brad 2.
Stamps:  Designer Kits\Delight in the Day\Delight in the Day - all the little things, Color = POOL PARTY.
Punches:  1.25 Square Punch

Tuesday, August 6, 2013

Recipe - Single Serving Chocolate Chip Cookie


I found this on Pinterest some time ago so, I am going to try it.  Perfect for when you're craving something sweet as it makes one giant-size or two smaller cookies.

1 Tablespoon butter, melt in microwave

1 Tablespoon white sugar

1 Tablespoon brown sugar

¼ teaspoon vanilla

pinch of salt

1 egg yolk
 

Stir the above together then add:

1/4 cup flour

2 Tablespoon chocolate chips
 

Stir again.  Press dough onto a 6 to 7“ greased plate and flatten with a fork dipped in water.
 

Microwave 60-80 second.  You can bake this at 350*F for about 8 minutes, or until edges are golden brown rather than use the microwave.  I used the microwave for 80 seconds.
 

Awwww … enjoying my cookie with coffee in my Fairy Glen Co-op mug!  The cookie is big enough that I could even share with hubby if I wanted!!
 

Related Posts Plugin for WordPress, Blogger...