Friday, October 30, 2015

SU251 Your Special Day Card


Another Halloween theme card for my friends and family members that have October birthdays

Paper: Taken with Teal, Autumn Meadows (Sept – Jan 2010 mini) DSP, Cajun Craze, Vanilla.
Stamps: Tag Time (pumpkin), Circle of Friendship (Happy Birthday).
Ink: Chocolate Chip, Really Rust, Pacific Point,
Accessories: Spider web EF, Chocolate Chip grosgrain, mounts, sponge.
Punches: 1” circle, 1.25” scallop circle, 

Tuesday, October 27, 2015

Workshop Cards W130, W131, W132

Here are some more cards we made at Joanne’s October workshop.
Workshop Card W130
Paper: Sahara Sand, Wisteria Wonder, Vanilla, Wild Wasabi, Newsprint DSP, Neutrals DSP.
Stamps: Autumn Fest, Well Scripted.
Ink: Wisteria Wonder, Wild Wasabi, Crushed Curry.
Embellishments: Victorian Crochet, mount, sponge
Punches: Scallop label.
Workshop Card W131
Paper: White, Gold.
Stamps: Winter Post, For All Things, Lovely as a Tree.
Ink: Crumb Cake.
Embellishments: Neutrals candy dots, Woodland EF.
Punches: Snowflake.
We first embossed a separate piece of cardstock with the Woodland EF then inked the smear stamp from For All Things with Crumb Cake and gently swiped the raised part of the cardstock.
Workshop Card W132
This card does not scan as pretty as it looks.  It is full of glitter!  To make the snowflake, we smeared Versamark on a 2x2” piece of Island Indigo cardstock, covered it with Heat and Stick powder and melted that.  While it was still hot, we covered it with Dazzling Diamonds and heated it again then punched out the snowflake.  For the card front, we used the brayer to add ink to the flat side of the embossing folder then did the same technique as the snowflake to add glitter to it.  I hand cut the label for the Warm Wishes.
Paper: White, Island Indigo.
Stamps: Warm Wishes.
Ink: Island Indigo, Versamark.
Embellishments: Dazzling Diamonds, Heat and Stick powder, Woodland EF, Iced Rhinestones.
Punches: Snowflake.
Thank you for stopping by.  Both Joanne and I are SU! Demonstrators so if at any time you would like to purchase SU! products, give her a call or from my Blog, click on the Shop Now button.  Your order will be delivered right to you (you do have to give SU! a street address, not a box #).


Friday, October 23, 2015

SU250 Happy Birthday Halloween Card


I combined a couple ideas off Pinterest and ended up with this!  I cut the fence posts about 5/8” wide by 31/4” high.  The leaf on the pumpkin is from the bird builder punch.  I punched the moon then put it on a post it note so I could punch it again into a moon shape.  I did a bit of pumpkin punch art with the oval punch.  Again, I don’t send out Halloween cards but I love to make them so I decided to make birthday cards with a  Halloween theme for my friends and family members that have October birthdays.

Paper: Only Orange, Sahara Sand, Black, Gold, White, Always Artichoke.
Stamps: Teeny Tiny Wishes, Hardwood.
Ink: White, Crumb Cake, Black.
Accessories: 3mm google eyes, linen thread, mounts, post it note, Spider web EF.
Punches: wide oval, bird builder, 13/8” circle, owl builder, word window.

Tuesday, October 20, 2015

AG034 18" Doll Halloween Costume Tutorial


I used the Pumpkin and hat pattern from Joan Hinds book, Doll Costume Dress Up that I received as a gift from my sister.  I did do some changes of course.  I cut one front and two backs from orange broadcloth then I cut myself a partial lining for the front and back.

Sew shoulder seams.  Repeat for lining.  Place lining to main with right sides together. Sew around neck and armholes. Pink or clip.

 
Pull the backs to the front through the shoulders.  Press.  Set aside.

Trace face onto fusible web.  Adhere to black fabric.  Place face pieces to pumpkin front and press in place.  Straight stitch around each piece.

Open lining and sew side seams.  Serge to clean finish bottom of lining, center back seams and hem.

 
Topstitch around neck and armholes.  Hem bottom at ¼”.

 
Insert 11” of 1/8” elastic through hem.  Sew center back seam closed about 3.5” from hem.  Add Velcro.

 
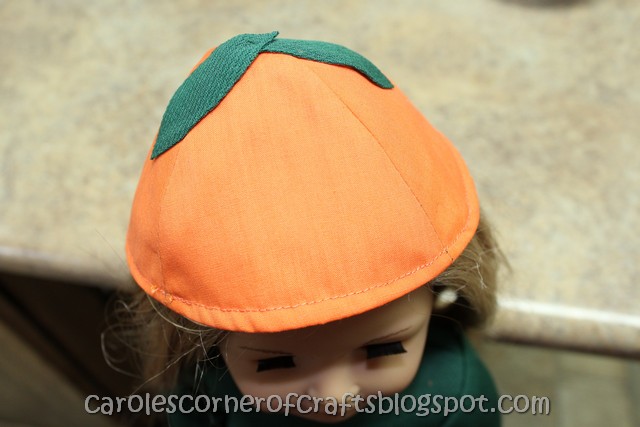
I followed Joan Hinds pattern for the cap.  I didn’t have a pipe cleaner to use as part of the leaf/stem so I just sewed two leaves at the center top.

 
I used the free pattern from TheScientific Seamstress Blog (called Tee Time from her February 7, 2011 post) for the top.  I love how she has hemmed everything before she cuts it out!  Very clever!

 
My fabric is a fairly firm knit so I was unable to stretch the sleeve in place so I eased it the Nancy Zieman Sleeve Easing Techniqueway.

Stitch inside the seam allowance.  Use a regular length stitch, start sewing about 1” from the end of your sleeve. Keep your index finger pressed against the back of the presser foot, catching the fabric you've just sewn and forcing it against the presser foot.

 
Hold tightly, causing the fabric to bunch up. Keep holding and stitching, until there's so much fabric it spills over your finger.

 
Release, and continue stitching and "bunching" until you're 1" from the other end of the sleeve cap.

 
This process eases in the excess length of the sleeve cap without any nasty little pleats.

Now, fit the sleeve into the armhole. The sleeve may even be a little too small. If so, just stretch it to fit.

As you can see, without even pressing, the sleeve fits perfect!

 
I cut the collar 1.75” x 11”, stretched as I sewed in place then cut off the excess.

I used the same pattern as the scrubs in AG013 since it is my favorite pants pattern (just type ‘scrubs’ in the search box at the top left corner of my blog to find it).

 
If you would like one, click "Like" on my American Girl Doll Creations by Carole Facebook page as the ordering info is there.

Stay tuned for more American Girl doll tutorials or better yet, sign up to my Blog so you won’t miss any of my AG posts!

Please leave a comment below to let me know if you enjoyed this!

Friday, October 16, 2015

SU249 Happy Birthday Spider Punch art card


I don’t send out Halloween cards but I love to make them so I decided to make birthday cards with a  Halloween theme for my friends and family members that have October birthdays.  Found this idea on Pinterest of course!  The card is a top fold; pumpkin pie piece is cut 1.5” x 4.25”; the DSP is cut at 1” x 4.25” and just butted up to each other.  I covered the join with ribbon.  I used the thick end of my marker to draw the webs joining the buttons as the thin end didn’t show up very good.  Remember to put enough glue on the buttons so that it squeezes up through the holes creating a good grasp.

Paper: Wild Wasabi, Jersey Shore DSP, Pumpkin Pie.
Stamps: Mixed Medley, Priority Mail.
Ink: Black.
Accessories: Spider Web EF, black ribbon, buttons, glue, black marker, mounts, sponge.
Punches: Curly Label, Scallop Border. 

Tuesday, October 13, 2015

Elf on the Shelf Idea Day 2 of 6

This granddaughter is not fond of a mess (unless she makes it, of course)!  She was not impressed with toilet paper strung down our stairs!

Here is more info I took from wikipedia.org about Elf:

The story describes how Santa's "scout elves" hide in people's homes to watch over events. Once everyone goes to bed, the scout elf flies back to the North Pole to report to Santa the activities, good and bad that have taken place throughout the day. Before the family wakes up each morning, the scout elf flies back from the North Pole and hides. By hiding in a new spot each morning around the house, the scout elf and the family play an on-going game of hide and seek.

Friday, October 9, 2015

SU248 Happy Birthday Halloween Card


Another Halloween theme card for my friends and family members that have October birthdays.  Found this bat template called Button Bats on (ribbonandglue.com).  I put him thro the Decorative Dots EF and swiped it with white ink.


Paper: Only Orange, Black, White.
Stamps: Happiest Birthday Wishes.
Ink: White, Black.
Accessories: Spider web EF, ribbon from my stash, white gel pen, Decorative Dots EF,  sizzix butterflies #5, orange thread.

Wednesday, October 7, 2015

Cleaning Oven Racks

This is probably the most fabulous find I have found on Pinterest!  It really does work!

Here are my grubby oven racks – the photo doesn’t even show how bad they are but they are really grimy!  They probably look like most peoples, right?  They are so hard to clean that you just leave them, like me – they are out of sight so no biggy, right?
 

Well, let me tell you how to get them to look like this with very little elbow grease! Yes, you read correctly!
 

You need one half cup of blue Dawn, 4 dryer sheets (Pinterest said to use 6 but I only had 4 left) and hot water.
 

I set my oven racks on a pillowcase in my bathtub, poured in the Dawn and covered them with hot water.

Place the dryer sheets on top.
 

Pinterest says to leave them overnight.  I had put mine in the tub at 11am and started cleaning them at 5pm.  Here is what they looked like when I lifted them from the water.
 

I can hear you saying ‘Woman, they haven’t changed one bit!’  Well, the magic begins when you start wiping them down with the dryer sheets!  See!  NO GREASE!
 

I took them to my kitchen sink because the bathtub is pretty darn low for this ole body to work at!  I continued wiping the grease off with the dryer sheets then I took my stainless steel scrubber to help remove the baked on goodies.
 

Simply unbelievable!


Tuesday, October 6, 2015

AG022 18" Doll Long Peasant Top and Leggings Tutorial


I started out using the Tunic /Dress pattern by WrenFeathers (Posted on her May 3, 2013 blog).  I made some alterations as the pictures show.


I have wrote out the instructions without using pictures.  My AG017 post has the picture tutorial so you can follow then follow the elastic waist instructions below.

Chalk mark hems for bottom and top of sleeves at ½”.

Chalk mark bottom hems at 1/4”.

Chalk mark tops of blouse at ½”.

Sew sleeves to front and back.

Pink seams to finish edges.

Serge neck opening, bottom of sleeves and back opening to clean finish.

Topstitch neck at ½”.

Hem sleeve at ½”.

Cut 11” of ¼” elastic and thread through the neck casing.

Cut two pieces of ¼” elastic each 4.5” long and thread through each sleeve.

Sew side seams.  Pink seams to finish edges.

Serge hem.

Add a bow at the neck.

 
Cut a piece of double fold bias tape 17” long for casing at the waist.

Start sewing bias casing at 2” from the bottom edge.

 
Cut 12” of ¼” elastic and feed it through the casing.  Stitch to secure both ends of the elastic.  Sew center back seam 3.5” from bottom edge with ½” seam then hem bottom.

Add Velcro and bartack.

The Tutorial for the Leggings can be found on my AG009post.

 
If you would like one, click "Like" on my American Girl Doll Creations by Carole Facebook page as the ordering info is there.

Stay tuned for more American Girl doll tutorials or better yet, sign up to my Blog so you won’t miss any of my AG posts!

Friday, October 2, 2015

Milestone Birthday – 8 years old – B08b


Decided to change my theme from Frogs to Lego for my 8 year old birthday cards.  I started out with an orange card and mounted it with Midnight Muse.  I cut a white piece at 3.75 inches by 5 inches then scalloped the bottom edge.  I cut each lego block at 2 x 1.25 inches.  I found this card on Pinterest.

Here is the poem I used for this 8 year old card.
Heads ,shoulders , knees and toes
This is how the story goes
First you tiptoe round and round
Sometimes falling to the ground.
You may be small but one day you'll be
Like a flower or a tree
Growing stronger everyday
Leaving your footprints along the way.
Happy 8th birthday!

 Cardstock: Only Orange, Midnight Muse, Yo Yo Yellow, white, Garden Green.
Ink: Only Orange, Midnight Muse, Basic Gray.
Stamp: Bring on the Cake, Memorable Moments.
Accessories: sponge, Only Orange marker, white gel pen.
Punches: ½ inch circle, scallop edge border, modern label.

Related Posts Plugin for WordPress, Blogger...