Thursday, April 29, 2010

SU126 Live with Passion

My attempt at a daffodil as shown by Connie B at Inkspired Treasures or type Spring Art Punch in her Search box. Instead of stamens, I just added some close to cocoa dots to my flower center.

Stamp Set: Inspired by Nature.

Cardstock: White, Mellow Moss, Cameo Coral, Barely.

Banana, Spring Flowers DSP from 06/07.

Ink: Mellow Moss, Cameo Coral.

Accessories: Wide oval punch, Boho Blossom punch, Top Note die, 5 petal flower punch, Very Vintage Wheel, sponge, mounts, Close to Cocoa marker.

Tuesday, April 27, 2010

SU159 Whimsical Words

Stamp Set: Whimsical Words (SAB 2010).

Cardstock: White, Bashful Blue, Close to Cocoa, Blush Blossom, Old Olive, Petal Patch DSP, unknown blue scrap for wing.

Ink: Bashful Blue, Close to Cocoa.

Accessories: Nesties scallop circle, coluzzle, 13/8” circle punch, scallop punch, Extra Large Two-Step Bird punch (Occasions Mini Jan – Apr 2010), Scallop Trim border punch (SAB 2010), Tri Flower Punch, sponges, 1/8” hole punch.

I realized after I had punched the Old Olive leaves that the color in the Petal Patch is actually Certainly Celery. Oh well….. Also, after I had scanned this card, I thought the bird needed an eye so I used the Close to Cocoa marker and gave him one.

Friday, April 23, 2010

SU094 Celebrate

Stamp Set - Friendships Journey, Celebrations.

Cardstock - Brilliant Blue, Rose Red, Barely Banana, White.

Ink - Brilliant Blue, Rose Red, Barely Banana

Accessories - ribbon, sponge, stamp aligner, Very Vintage wheel.


Wednesday, April 21, 2010

SU169 Brayered Debossing

I had never heard of the Brayered Debossing Technique so I had to give it a try.

Use a wet cloth and pat a fair bit of water to the smooth side of the Manhattan Flower Textured Impressions Die - too much water will make the ink run into the grooves and not enough water will do nothing so experiment. Brayer Cameo Coral ink over the wet surface.

Put glossy cardstock in the Manhattan Flower Textured Impressions Die and run thro the Cuttlebug.

I sprayed the rose with a glitter spray that I had in my stash, before trimming. Cut from the opposite side as you have the embossed edges to guide you.
Stamp Set - Birthday Wish.

Ink - Cameo Coral.

Paper - Cameo Coral, White Glossy.

Accessories - wide oval punch, Glitter spray (non SU!), Manhattan Flower Textured Impressions Die,1/4" circle punch and Crystal Effects to make Faux Brads.


Monday, April 19, 2010

SU144 One Layer Card

Marie K hosted a One Layer card swap. It was difficult to come up with an idea using only one piece of cardstock, however, I am pleased with the way this one turned out.

After I had stippled the top and bottom of my card with a shaving brush, I stamped the image on the white cs in brown ink, masked the sky area with a scrap of paper, stippled a horizon then removed the mask. I re-inked the stamp then stamped it on wax paper. I turned it upside down, with the ink towards the paper, and lined it up, so the image would be matching. I then brayered over it, to leave the reflection. It goes down a lot lighter, which is perfect for a reflection.  Known as the Reflection Technique or Mirror Image Technique.

Stamps - Upsy Daisy.

Ink - Tempting Turquoise, Close to Cocoa.

Paper - White, Tempting Turquoise.

Accessories - 11/4" circle punch for moon mask, wax paper, shaving brush for stippling, scrap paper for masking the horizon, stamp aligner.

Thursday, April 15, 2010

SU182 Thinking of You

Stamp Set - Kind and Caring Thoughts (hostess Level 3).

Ink - Regal Rose.

Cardstock - White, Regal Rose, Green Galore.

Accessories - 1/4" punch, Crystal Effects for Faux Brads.

Faux Brads.

Inspired from Mojo Sketch from March 16 2009.


Tuesday, April 13, 2010

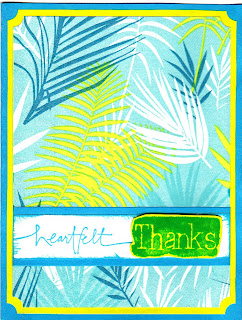
SU120 Decoupage Technique with Paper Napkins


Decoupage Technique for Paper Napkins

Start with a pretty napkin.  Most decorative party napkins are two-ply.  Separate the layers.  You only need the pretty layer so discard the other.  If you don’t separate the napkin, the Mod Podge will only adhere to the bottom layer (the one with no pretty on it).  Cut a scrap of cardstock ( I’ve even used just plain computer paper) bigger than what your finished card will be.  We will trim it up after it dries.  Paint the scrap with Mod Podge and quickly set the napkin on top of it.  Work fast as Mod Podge dries quickly.  Don’t worry if you have the odd wrinkle here and there – kinda gives it texture.  Let dry.

Once this has dried, you can now paint the top of the napkin with Mod Podge then add a pinch of glitter while it is wet.  It really doesn’t take much more than a pinch, honest!  If you intend to do this, paint from the center of the napkin out toward the edges.  Work slowly as not to tear the napkin.  Let dry. 

Use your napkin as a base for your card.  Just cut it to fit on whatever size card you are making.

Always clean your brush with water immediately after you have finished painting. 

Stamp - Heartfelt Thanks.

Cardstock - Tempting Turquoise, non SU! neon yellow, White.

Ink - Tempting Turquoise.

Accessories - napkin, mod podge, paintbrush, ticket punch, mounts.

I made this card for my cousin Doreen. She had brought all kinds of goodies as well as a package of these napkins to our place after my mom passed away a couple years ago.

Related Posts Plugin for WordPress, Blogger...