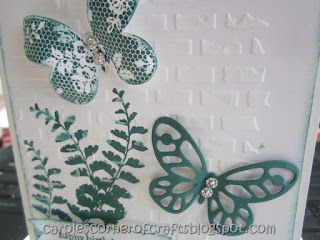
This is a total case off Pinterest! I am in love with this stamp set especially
when it is paired with the Butterfly Basics Photopolymer stamp set and the
Butterflies Thinlits Dies. This is a great set for birthday, sympathy,
congratulation or any card!
Splatter the small piece of Very Vanilla panel by dipping
a wet toothbrush into a dab of Crumb Cake re-inker.
Helps give that grunge look.
Stamp the fern stamp in Wild Wasabi to create a
dimensional effect, then stamp the honeycomb image in Hello Honey. I
stamped off the honeycomb on another piece of paper so it wasn’t so dark.
Stamp and die cut the butterfly using the butterfly
thinlit. Punch a small butterfly from vellum.
Add a flower then a pearl.
Stamp and punch a small butterfly in Hello Honey ink. Color
with Wink of Stella.
Stamp the sentiment in Hello Honey ink. Easy,
peasy and just gorgeous!
We used some DSP from my stash to make the envelope with
the envelope punch board.
Stamp:
Butterfly Basics.
Card Stock:
paper for envelope, Very Vanilla, Crumb Cake, So Saffron or Hello Honey, White
Vellum.
Ink: Calypso
Coral, Wild Wasabi, So Saffron or Hello Honey, Crumb Cake.
Accessories:
Snail Adhesive, Tombow Glue, glue dots, envelope punch board, Stampin’ Trimmer,
scissors, bone folder, pencil, Sponge, Dimensionals, silicone craft sheet,
clear Wink of Stella, Pearl Basic Jewels, Butterflies Thinlits, Pearls, Crumb
Cake re-inker, old toothbrush.
Punches:
Elegant Butterfly, Bitty Butterfly, Itty Bitty Shapes, Border Edge Scallop.
Are you just starting to find the joy of
rubber stamping? Or maybe you are
someone that loves to craft but find very little time to enjoy it? Well, join me for my One Hour Card Class workshops! Even if you have never made a card before,
you will love these simple and quick workshops!
I host card classes every Thursday, Friday and Saturday. You pick the day and the time that suits
you. Message me for more info. As a
Stampin’ Up! demonstrator, I would love to be your creative coach, help you get
started and teach you how to use SU! supplies.
From simple to advance, I’m here to give you fun ideas, share specials
& teach you about fabulous stampin products. Let's unleash your creativity!
You can order SU! products online and have them shipped directly to your
door. Simply click on the “Shop Now”
button in my banner (or I can order for you).
I would be most happy to be your Canadian demonstrator.


