Friday, November 13, 2015

Elf on the Shelf Idea Day 4 of 6


Brynn had a tough time finding Elf this morning.  Grandpa finally asked her to get him a spoon and look what she found!

 
Here is more info I took from wikipedia.org on Elf:

The book tells how the magic might disappear if the scout elf is touched, so the rule for The Elf on the Shelf states, "There's only one rule that you have to follow, so I will come back and be here tomorrow: Please do not touch me. My magic might go, and Santa won't hear all I've seen or I know." Although families are told not to touch their scout elf, they can talk to it and tell it all their Christmas wishes so that it can report back to Santa accurately.

Tuesday, November 10, 2015

Elf on the Shelf Idea Day 3 of 6


At only four years old, Brynn ‘respects’ any book so she was extremely upset to see that Elf had scribbled in Gramma’s coloring book!

Here is more info I took from wikipedia.org on how Elf got started:

The Elf on the Shelf explains that scout elves get their magic by being named. In the back of each book, families have an opportunity to write their elf's name and the date that they adopted it. Once the elf is named, the scout elf receives its special Christmas magic, which allows it to fly to and from the North Pole.

Friday, November 6, 2015

Milestone Birthday – 8 years old – B08c


Lynn Pratt’s Lego card gave me a great idea – instead of having the top Lego piece pull out, I attached it with a brad so that it would swing open!

I balled up a piece of wax paper and pounced with Pacific Point onto my card front.  I cut each block 3.25 inches by 1.5 inches.  The circles are from the large circle on the Owl Punch, edges are sponged and highlights added with the gel pen.  Like Lynn, I used the Word Window Punch, cut in half for the top bumps and lined them up evenly using the SU Grid paper.

Used the same poem as B08b.

Cardstock: White, Yo Yo Yellow, Real Red, Pacific Point.
Ink: Pacific Point, Soft Suede, black.
Stamp: Look Who’s Turning.
Accessories: sponge, wax paper, Square Lattice EF, white gel pen, brad,
Punches: Owl Builder, Word Window, ¾” circle, 1/16” hole.

Tuesday, November 3, 2015

AG038 18" Doll Santa Cape Tutorial

Grace is going to help me make this cape following Old Days Old Ways instructions called ‘Doll Cape--from Santa Hat’ from her December 22, 2009 Blog.

Open the seam of the purchased Santa Hat, remove the fur from the bottom and if it has a pompom, remove it.

Follow Old Days Old Ways instructions to make the darts.

Once I pinned the darts at the shoulders, I traced the fabric on to paper for a pattern as I wanted to make more capes than one.

Lay the pattern on to the hat as close to the bottom as possible.

To make the hat from the left over piece, measure 4” at the top and 5” at the bottom. Cut and set aside.

Turn center front seams of the cape to wrong side using 3/8” seams.  Create a tuck at one end of a 14” length of 7/8” wide ribbon.  Pin the ribbon under the 3/8” seam about ¼” from the top.  Topstitch down the center front seam.  Repeat for the other side.

Sew the fur to the bottom of the cape.  Clip and serge to clean finish.

Sew the darts at the shoulders and trim to about ¼”.  Set aside.

Sew center back seam of the hood.  Put it on the dolls head.

As you can see, the hood does not come to the front of the dolls head so, pin the fur so the fur is at the front of the dolls head.

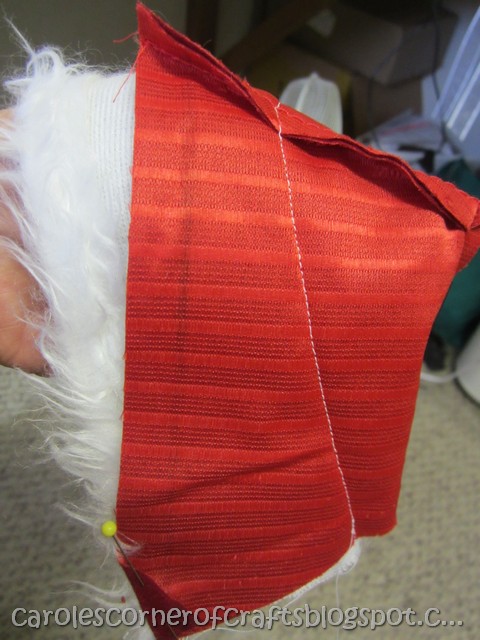
Sew at the back of the fur only.  It looks a little strange from the inside.

Sew another seam close to the first one then trim close to the seam.

Pin hood to cape with right sides together, being careful not to catch the ribbon.

Sew, clip the curves and serge to clean finish.  Bring the ribbon to the front and tack.

If you would like one, click "Like" on my American Girl Doll Creations by Carole Facebook page as the ordering info is there.

Stay tuned for more American Girl doll tutorials or better yet, sign up to my Blog so you won’t miss any of my AG posts!

Please leave a comment below to let me know if you enjoyed this!

Friday, October 30, 2015

SU251 Your Special Day Card


Another Halloween theme card for my friends and family members that have October birthdays

Paper: Taken with Teal, Autumn Meadows (Sept – Jan 2010 mini) DSP, Cajun Craze, Vanilla.
Stamps: Tag Time (pumpkin), Circle of Friendship (Happy Birthday).
Ink: Chocolate Chip, Really Rust, Pacific Point,
Accessories: Spider web EF, Chocolate Chip grosgrain, mounts, sponge.
Punches: 1” circle, 1.25” scallop circle, 

Tuesday, October 27, 2015

Workshop Cards W130, W131, W132

Here are some more cards we made at Joanne’s October workshop.
Workshop Card W130
Paper: Sahara Sand, Wisteria Wonder, Vanilla, Wild Wasabi, Newsprint DSP, Neutrals DSP.
Stamps: Autumn Fest, Well Scripted.
Ink: Wisteria Wonder, Wild Wasabi, Crushed Curry.
Embellishments: Victorian Crochet, mount, sponge
Punches: Scallop label.
Workshop Card W131
Paper: White, Gold.
Stamps: Winter Post, For All Things, Lovely as a Tree.
Ink: Crumb Cake.
Embellishments: Neutrals candy dots, Woodland EF.
Punches: Snowflake.
We first embossed a separate piece of cardstock with the Woodland EF then inked the smear stamp from For All Things with Crumb Cake and gently swiped the raised part of the cardstock.
Workshop Card W132
This card does not scan as pretty as it looks.  It is full of glitter!  To make the snowflake, we smeared Versamark on a 2x2” piece of Island Indigo cardstock, covered it with Heat and Stick powder and melted that.  While it was still hot, we covered it with Dazzling Diamonds and heated it again then punched out the snowflake.  For the card front, we used the brayer to add ink to the flat side of the embossing folder then did the same technique as the snowflake to add glitter to it.  I hand cut the label for the Warm Wishes.
Paper: White, Island Indigo.
Stamps: Warm Wishes.
Ink: Island Indigo, Versamark.
Embellishments: Dazzling Diamonds, Heat and Stick powder, Woodland EF, Iced Rhinestones.
Punches: Snowflake.
Thank you for stopping by.  Both Joanne and I are SU! Demonstrators so if at any time you would like to purchase SU! products, give her a call or from my Blog, click on the Shop Now button.  Your order will be delivered right to you (you do have to give SU! a street address, not a box #).


Friday, October 23, 2015

SU250 Happy Birthday Halloween Card


I combined a couple ideas off Pinterest and ended up with this!  I cut the fence posts about 5/8” wide by 31/4” high.  The leaf on the pumpkin is from the bird builder punch.  I punched the moon then put it on a post it note so I could punch it again into a moon shape.  I did a bit of pumpkin punch art with the oval punch.  Again, I don’t send out Halloween cards but I love to make them so I decided to make birthday cards with a  Halloween theme for my friends and family members that have October birthdays.

Paper: Only Orange, Sahara Sand, Black, Gold, White, Always Artichoke.
Stamps: Teeny Tiny Wishes, Hardwood.
Ink: White, Crumb Cake, Black.
Accessories: 3mm google eyes, linen thread, mounts, post it note, Spider web EF.
Punches: wide oval, bird builder, 13/8” circle, owl builder, word window.

Related Posts Plugin for WordPress, Blogger...