I host card classes every Thursday, Friday and
Saturday. You pick the day and the time
that suits you. Message me for more info. As a Canadian Stampin’
Up! demonstrator, I’m here to give you fun ideas, share specials and teach you
about fabulous stampin products. Paper Pumpkin is the perfect way to jump into
the world of paper crafting and get your creative “me-time” every month. You’ll
get all the stamps, ink, and paper you need to create a fun project, without
any stress. Everything is precut and ready to go so you can skip to the fun
part of crafting! Subscribers always have cards and cute gifts on hand for
every occasion. Subscribe before the 10th of the month to get started! Let's unleash your creativity!
Pay as you go $26.95, 3 months $79, 6 months $154, 12
months $295.
Includes shipping and you can cancel at any time.
Subscribers also have access to a selection of past kits
and refills (while supplies last).
June 2016 Banner Surprise
Kit contains supplies for 6 banner cards and envelopes. Kit includes:
• Banner Surprise Photopolymer Stamp Set • Mint Macaron Classic Stampin’ Spot
• Tip Top Taupe Classic Stampin’ Spot • 6 printed card bases
• 6 mint bags/envelopes • 35 triangular cello bags
• 3 sheets of die-cut circles • 2 sheets of gold foil stickers
• 2 bags of assorted sequins • 4 yds of washi tape
• 8 yds of white baker’s twine

Instead of making the
banners as suggested in June 2016 Paper Pumpkin, we will make a Graduation
card.

I’m really
not a fan of Shaker cards but I really liked the way my sister did this one –
the Shaker is sitting on top of the card so I had to give it a try.

Tip Top Taupe card 5-1/2” x 8-1/2”. Fold in half
for a side fold card – a bone folder
gives you a crisp fold. Stamp or sign
the back. Set aside.
The kit comes with white
baker’s twine. To re-color it, cut the white baker’s twine 16” long. Set the twine on the Peekaboo Peach ink pad. Set
a sponge on top and pull the twine
to recolor it. Pull it through until you
are happy with the color. Color the end
you were hanging on to. Set aside to dry.

Using the Misti or
Stamp-a-ma-jig, ink and stamp the dotted circle from the Banner Surprise stamp set with Mint
Macaron ink on to one of the die-cut white circles that come with this kit.
Repeat using the Misti to
add Happy from the Banner Surprise stamp set to the center of the circle using
Peekaboo Peach ink. Sponge edges of the circle with Tip Top Taupe ink. Set aside.

Stamp Graduation from the
Banner Surprise stamp set on a scrap of 1”
wide white cardstock with Tip Top Taupe ink. Die cut with the Bunch of Banners Framelits. Sponge
edges of the circle with Tip Top Taupe ink.
Add Dimensionals to each end. Set
aside.

Add a pinch of sequins (included
in the kit) to one of the triangular cello bags that also come in the kit. Insert the stamped circle.

Bend the top of the cello
bag to fit tight against the top of the circle.
Close with scotch tape.

Cut the ends off flush
with the triangle.

Apply snail across the top
of the cello bag and adhere to the inside of card. Secure with a piece of scotch tape at each
corner.

Cover with 1-1/2” of washi
tape (included in the kit) at the top of each corner – I like to add snail to
the sticky side of the washi tape to help hold it in place.

Add snail adhesive behind the cello bag to help hold in place.

Adhere Graduation just
under the word Happy. Set aside.

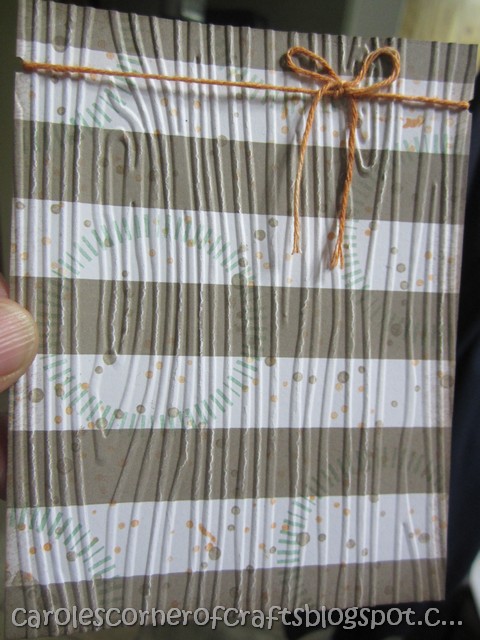
Cut the striped card from the kit to 3-3/4” x 5”. Sponge edges with Tip Top Taupe ink. Over
stamp the front with the Banner Surprise stamp set that comes with the kit:
striped circle in Mint Macaron ink, Dotted circle in Tip Top Taupe ink and the small
background dots in Peekaboo Peach ink.

Draw a line across the
back to match the existing punch bite.

Use the 1/8” circle punch to take a half a bite
at the opposite side of the panel at your pencil mark.

The Woodgrain embossing folder is etched fairly deep thus sometimes
breaking the cardstock. To prevent this,
cut regular computer weight paper to the size of the folder. Adhere it to the Logo side of the folder with
snail. Run it through the Big Shot.

Leave the paper in the
folder as it can be used many times.
Place the striped panel inside the embossing folder with the stripes
facing the Logo and run through the Big Shot.
No tears! Add twine around the
bites. Tie into a knot then tie into a
bow. Place glue dot behind the knot.
Die cut dragonfly using
the Detailed Dragonfly Thinlits Dies
(Occasions 2017) from gold foil. Set aside.
Before I carry on, please watch this video by Lisa Curciofor labeling your Layering Framelits. It
makes it so much easier to describe which die
you are using! I didn’t have a fine tip
Sharpie pen at the time I labeled mine so they are a little hard to read.
Cut Peekaboo Peach cardstock 1-3/4”.
Stamp a phrase from the Bunch of
Blossoms stamp set with Tip Top Taupe ink.
Die cut with Layering Circles
Framelits #2. Sponge edges in Tip
Top Taupe ink. Set aside.

Using a circle included in
the kit, die cut one with the Layering Circles Framelits #B. Adhere to the
Peekaboo Peach circle. Apply Dimensionals and set aside.

Cut Mint Macaron cardstock 5-1/4” x 4” for the outside of the card. Tape the Layering
Oval Framelits #E and #3 together so they cut at the same time. Cut from the center of the Mint Macaron panel.

Adhere Mint Macaron panel to card front. Adhere the striped panel to card front. Set aside.
Cut Window Sheet 2-1/2” x 3-1/2”.
Die cut with Layering Oval Framelits #E.

Adhere window sheet to the
Mint Macaron oval window with two-way tape or snail.

Rub the wrong side with an
Embossing Buddy to reduce static for
the sequins. Set aside.

Here is how to use fun
foam to make the shaker card. Tape the Layering Oval Framelits #5 and #3
together. Cut Fun Foam 2-1/4” x 3-1/4”.
Die cut the foam with Framelits.

Apply two-way tape or
snail to one side of the Fun Foam oval.
This needs to be filled in very solid to keep the sequins from sneaking
out! Adhere to the window sheet oval. Set aside.
Decide where you are going
to put the shaker on your card and make a visual of where the sequins will go.
Rub that area with the
embossing buddy to reduce static.

Place a pinch and a half of
sequins directly on the card.

Apply two-way tape or
snail to the bottom of the Fun Foam oval.
I like to add a narrow row of Tombow
glue to the foam as well. Adhere the
window over the sequins. Press firmly.

Add glue to the dragonfly’s
head and tail. Place his head on the
shaker and adhere in place. Add two
Peekaboo Peach sequins to the dragonfly’s body with snail.

Add phrase. Trim the baker’s twine if necessary.

Mint Macaron bag envelopes are included in the kit so that is what we will use.

Since posting this, I picked
up a package of fine tip Sharpie pens – I didn’t even know they existed! I will re-label my framelits with these. They really are fine. Label them on the non-cutting side as my ink
transferred to the cardstock when I cut it – I had used the regular Sharpie so
maybe the fine tip won’t transfer. I
haven’t tried it yet.

No comments:
Post a Comment