Friday, August 30, 2019

Best Birds - LICI-B-24


Stamps: Best Birds (2017/18).

Cardstock: Vellum, Very Vanilla, Calypso Coral, Soft Suede, Everyday Enchantment DSP (SAB 2012).

Ink: Calypso Coral, Soft Suede, Versamark, Crumb Cake marker, Old Olive marker.

Tools: Stamparatus, bone folder, purchased envelope, sponge, dimensionals, Tombow adhesive, snail adhesive, glue dots, sequins, Everyday Enchantment ribbon, Wink of Stella, Copper embossing powder, Copper metallic thread, burlap ribbon, lace.

Punches/Dies: Layering Circles Dies, Birds and Blooms Thinlits dies.


I’m still working on the Everyday Enchantment DSP that I have loved and now chopped.  I chopped it in 5-1/4” strips then cut the strips into 4” pieces.  Kept the leftover strips too.  I have them stored in a Full Wide Stamp case. Kylie Bertucci has given us permission to Love It Chop It!

Use a full panel from your Love It Chop It pile (5-1/4” x 4”).  Sponge edges with Soft Suede ink.  Adhere to a Soft Suede card.  Set aside.


Cut vellum 6” x 3-1/4”.  Rub one end with the embossing buddy.  Stamp the crosshatch from the Best Birds stamp set with Versamark.  Copper emboss.  Die cut the cross hatch with a circle (6) and die cut a scallop circle (F) from the other edge.  Adhere together with glue dots in the center.  Set aside.


Die cut one large and one small bird from Soft Suede cardstock with the Birds and Blooms dies.  Keep the pieces in tack with the birds.  Hold together with scotch tape.  Set aside. 


Die cut both birds again from Calypso Coral cardstock.  Remove the beaks and feet from the Calypso Coral birds. 


Color Calypso Coral birds with Wink of Stella then adhere to the Soft Suede birds.  Add dimensionals and set aside.


Its easy to have a long narrow stamp ‘go out of shape’ when sticking it to the Stamparatus.  Here is how to align your stamp with a die: lay Very Vanilla 4-1/4” x 2” cardstock on the Stamparatus.  Rub with the embossing buddy.  Lay the die cut side up on the cardstock. 


Set the stamp in the die – make sure it fits properly.  Pick the stamp with the other plate.  Remove the die and stamp the branch from the Best Birds stamp set with Versamark.  Copper emboss. 


Die cut with the Birds and Blooms dies.  You will notice the stamped image fits perfectly inside the die.

Color the branch with Crumb Cake and Old Olive markers.  Set aside.


Cut lace 4” long.  Glue dot about 1” from the bottom of the DSP.  Cut Burlap ribbon 4” and adhere just above the lace.  Set aside.

Wrap Copper Metallic thread around 3 fingers three times.  Tape to the card front to suit the vellum circle.


Tuck the vellum circle under the Burlap ribbon a bit.  Add glue dots to the bottom leaves and dimensionals to each end of the branch.  Add to card front.


Place birds in place.


Cut Calypso Coral ribbon 10” long.  Make a double bow using Wayne’s wooden bow maker.  Adhere to the card front with mini glue dots. Trim.


Stamp a phrase and some images to the inside of the card.  Decorate the envelope.

You can order SU! products online and have them shipped directly to your door. Simply click on the “Shop Now” button in my banner (or I can order for you). I would be most happy to be your Canadian demonstrator (since April 2006).

Tuesday, August 27, 2019

March 2019 Poppin' Birthday Paper Pumpkin


Took a few boxes of Paper Pumpkin to the cabin with me over the summer.  Managed to finish the March 2019 Poppin Birthday.  Was looking to make some birthday cards for 30 and 40 year old’s so this fit my plan. I didn’t even make alternatives, just made them according to the kit instructions.


Inside and envelope.

Inside and envelope.

Contained supplies for 8 cards and 8 envelopes.  It also included an additional stamp set, Counting the Years.
The kit included:
Poppin’ Birthday Photopolymer Stamp Set
Counting the Years Photopolymer Stamp Set
Poppy Parade Classic Stampin’ Spot
8 card bases
8 printed envelopes
9 printed die-cut sheets
6 die-cut white labels
8 pop-up inserts
6 die-cut pennants
144 dimensionals
50 adhesive dots
5-1/2 yds. adhesive roll

Coordinating Stampin' Up! Colors: Basic Black, Bermuda Bay, Daffodil Delight, Flirty Flamingo, and Poppy Parade.

Friday, August 23, 2019

Joy to the World - LICI-B-18


Stamps: Waterfront, Tin of Tags (Holiday 2016).

Cardstock: Poppy Parade, Old Olive, Very Vanilla, Everyday Enchantment DSP (SAB 2012).

Ink: Poppy Parade, Old Olive, Soft Suede.

Tools: Stamparatus, bone folder, purchased envelope, sponge, dimensionals, Tombow adhesive, snail adhesive, regular and mini glue dots, sequins, Softly Falling embossing folder, Old Olive ribbon.

Punches/Dies: Pretty Pines Thinlits dies, 5-Petal Flower punch, Stitched Shapes Framelits, Layering Circle Dies.

Use a full panel from your Love It Chop It pile (5-1/4” x 4”).  Sponge edges with Soft Suede ink.  Flip to the wrong side and pencil mark at 1-1/8” from the bottom of the panel.  Cut Old Olive ribbon at 5-1/2” and tape to the pencil mark.  Adhere to an Old Olive card.  Set aside.


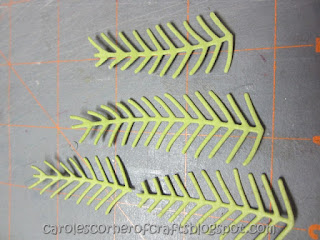
Die cut all three pine branches from Old Olive using the Pretty Pines Thinlits dies.  Cut the largest one in half.  Taper the branch to look like the rest.


Cut a Very Vanilla panel at 2-3/4” x 1-1/2”.  Sponge edges with Soft Suede ink.  Over stamp with the speckle image from the Waterfront stamp set in Old Olive ink.  Adhere to a 3” x 1-3/4” Old Olive panel.  Adhere branches to the Very Vanilla panel.  Set aside.


Punch 4 Poppy Parade flowers and 2 Old Olive flowers with the 5-Petal Flower punch.  Sponge edges with Soft Suede ink.  Run the Poppy Parade flowers through the Softly Falling EF.  Adhere two Poppy Parade flowers together, altering the petals.  Repeat for a second poinsettia. Adhere the Old Olive flowers to the bottom of each poinsettia, altering the petals.  Set aside.


Stamp a phrase in the center of a 2-3/4” scrap of Very Vanilla cardstock with Poppy Parade ink.  Die cut with the Stitched Shapes die (#2).  Sponge edges with Soft Suede ink.  Adhere to a Poppy Parade scalloped circle die (D).  Add dimensionals and set aside.


Adhere the Very Vanilla panel and phrase to the card front. 


Add poinsettias.  Add 3 gold sequins to the center of each poinsettia and 3 more to the bottom of the card.


Add a phrase to the inside and decorate an envelope.


I’m still working on the Everyday Enchantment DSP that I have loved and now chopped.  I chopped it in 5-1/4” strips then cut the strips into 4” pieces.  Kept the leftover strips too.  I have stored them in a Full Wide Stamp case. Kylie Bertucci has given us permission to Love It Chop It! 

Friday, August 16, 2019

The Good Things in Life - LICI-B-17


Stamps: Butterfly Gala, Suite Sayings (Occasions 2016, inside).

Cardstock: Ruby Red, Gumball Green, Very Vanilla, Everyday Enchantment DSP (SAB 2012).

Ink: Poppy Parade, Granny Apple Green (inside), Soft Suede.

Tools: Stamparatus, bone folder, purchased envelope, sponge, dimensionals, Tombow adhesive, snail adhesive, regular and mini glue dots, metallic thread, sequins, Gumball Green ribbon.

Punches/Dies: Stitched Shapes Framelits, Layering Circles Framelits.

Cut DSP 5-1/4” x 4”.  Sponge Soft Suede.  Set aside.

From the wrong side of the DSP, pencil mark at 1-1/2” from the bottom.  Cut Gumball Green ribbon at 5-1/2” and tape at the pencil marks.  Adhere to a Ruby Red card.  Set aside.

Cut a scrap of Very Vanilla 2-1/2” square for the phrase.  Set on the Stamparatus and stamp with Poppy Parade ink.  Die cut with the circle (2nd smallest) from the Stitched Shapes Framelits.  Sponge Soft Suede.  Set aside.

Die cut a scallop circle (D) from Gumball Green cardstock and a Ruby Red circle (5) using the Layering Circles Framelits.  Adhere circles together. 

Cut metallic thread 28”.  Wrap around 4 fingers two times then 3 fingers three times.  Adhere to the back of the phrase.  Add dimensionals.  Adhere to card front. 


Add sequins.


Cut ribbon 4-1/2”.  Tie around the existing ribbon.


Stamp phrase for inside and decorate an envelope.


I’m still working on the Everyday Enchantment DSP that I have loved and now chopped.  I chopped it in 5-1/4” strips then cut the strips into 4” pieces.  Kept the leftover strips too.  I have stored them in a Full Wide Stamp case. Kylie Bertucci has given us permission to Love It Chop It. 


Friday, August 9, 2019

Colorful Seasons - LICI-B-16


Stamps: Colorful Seasons.

Cardstock: Soft Suede, Pool Party, Very Vanilla, Everyday Enchantment DSP (SAB 2012).

Ink: Calypso Coral (inside and envelope), Soft Suede.

Tools: Stamparatus, bone folder, purchased envelope, sponge, dimensionals, Tombow adhesive, snail adhesive, regular and mini glue dots, pearls, Calypso Coral organdy ribbon, Layered Leaves embossing folder.

Punches/Dies: ½” circle punch, 5/16” circle punch, ¼” hole punch, Seasonal Layers Thinlits Die.


Die cut the chair and branch in Soft Suede and the three flowers in Very Vanilla from the Seasonal Layers dies.  Sponge the flowers with Soft Suede ink.  Punch circles to adhere behind the flowers.  Add dimensionals and set all dies aside.

Cut a 5-1/4” x 4” Pool Party panel, sponge with Soft Suede ink and run through the Layered Leaves EF.  Pencil mark at 2-3/4” from the bottom of the panel on the wrong side.  Set aside.

Use a strip from your Love It Chop It DSP stash.  Sponge with Soft Suede ink and adhere to the right edge of the Pool Party panel leaving a little border.

Cut 5-1/2” of Calypso Coral ribbon and tape at the pencil marks of the Pool Party panel.

Adhere the branch and trim even with edges of panel.  Adhere to a Soft Suede card.  Add the chair and flowers.  Set aside.

Cut Calypso Coral ribbon 10”.  Make a double bow using Wayne’s wooden bow maker.  Adhere to the ribbon on the card front with mini glue dots. Trim.

Stamp a phrase for the inside and decorate an envelope.

I have loved and now chopped the entire package of my Everyday Enchantment DSP from 2012!  I chopped it in 5-1/4” strips then cut the strips into 4” pieces.  Kept the leftover strips too.  I cut the cardboard backing from the DSP to fit in the front of a Full Wide Stamp case. I checked my ribbons to see what I had that matched and taped a small piece to the cardboard.  Stored all the chopped DSP in a Full Wide Stamp case.

Related Posts Plugin for WordPress, Blogger...