Showing posts with label Softly Falling embossing folder. Show all posts

Friday, August 23, 2019

Joy to the World - LICI-B-18


Stamps: Waterfront, Tin of Tags (Holiday 2016).

Cardstock: Poppy Parade, Old Olive, Very Vanilla, Everyday Enchantment DSP (SAB 2012).

Ink: Poppy Parade, Old Olive, Soft Suede.

Tools: Stamparatus, bone folder, purchased envelope, sponge, dimensionals, Tombow adhesive, snail adhesive, regular and mini glue dots, sequins, Softly Falling embossing folder, Old Olive ribbon.

Punches/Dies: Pretty Pines Thinlits dies, 5-Petal Flower punch, Stitched Shapes Framelits, Layering Circle Dies.

Use a full panel from your Love It Chop It pile (5-1/4” x 4”).  Sponge edges with Soft Suede ink.  Flip to the wrong side and pencil mark at 1-1/8” from the bottom of the panel.  Cut Old Olive ribbon at 5-1/2” and tape to the pencil mark.  Adhere to an Old Olive card.  Set aside.


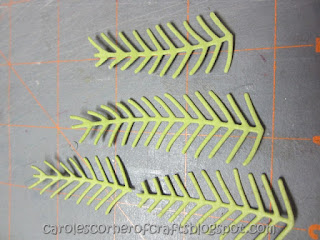
Die cut all three pine branches from Old Olive using the Pretty Pines Thinlits dies.  Cut the largest one in half.  Taper the branch to look like the rest.


Cut a Very Vanilla panel at 2-3/4” x 1-1/2”.  Sponge edges with Soft Suede ink.  Over stamp with the speckle image from the Waterfront stamp set in Old Olive ink.  Adhere to a 3” x 1-3/4” Old Olive panel.  Adhere branches to the Very Vanilla panel.  Set aside.


Punch 4 Poppy Parade flowers and 2 Old Olive flowers with the 5-Petal Flower punch.  Sponge edges with Soft Suede ink.  Run the Poppy Parade flowers through the Softly Falling EF.  Adhere two Poppy Parade flowers together, altering the petals.  Repeat for a second poinsettia. Adhere the Old Olive flowers to the bottom of each poinsettia, altering the petals.  Set aside.


Stamp a phrase in the center of a 2-3/4” scrap of Very Vanilla cardstock with Poppy Parade ink.  Die cut with the Stitched Shapes die (#2).  Sponge edges with Soft Suede ink.  Adhere to a Poppy Parade scalloped circle die (D).  Add dimensionals and set aside.


Adhere the Very Vanilla panel and phrase to the card front. 


Add poinsettias.  Add 3 gold sequins to the center of each poinsettia and 3 more to the bottom of the card.


Add a phrase to the inside and decorate an envelope.


I’m still working on the Everyday Enchantment DSP that I have loved and now chopped.  I chopped it in 5-1/4” strips then cut the strips into 4” pieces.  Kept the leftover strips too.  I have stored them in a Full Wide Stamp case. Kylie Bertucci has given us permission to Love It Chop It! 

Friday, May 3, 2019

Using the Negative of a Punch – LICI-B-03


Using the negative of the Punch allows the DSP to be the center of attention!


Stamps: Best Yet, High Tide (inside), Punch Potpourri (Hostess 2010/11).

Cardstock: Very Vanilla, Pool Party, Lucky Lemonade, Everyday Enchanted DSP (SAB 2012).

Ink: Calypso Coral (inside and envelope), Pool Party, Soft Suede, Lemon Lime Twist.

Tools: Very Vintage button, Stamparatus, bone folder, purchased envelope, sponge, dimensionals, Tombow adhesive, snail adhesive, regular and mini glue dots, pearls, Everyday Enchantment Calypso Coral ribbon, Softly Falling embossing folder, Flower Shaper tool, spritzer.

Punches/Dies: corner rounder punch, Layering Oval dies, Blossom Punch, Blossom Bunch punch (2016/17), Trio Flower punch, Bird Builder punch.

Cut DSP 5-1/4” x 4”.  Sponge edges with Soft Suede ink.  Punch flowers at the bottom with the Trio flower punch before adhering panel to card front.


Spritz the flowers then press centers with the Flower Shaper tool.  Set aside to dry.


Stamp phrase on Vanilla cardstock.  Die cut using the Layering ovals die.  Sponge the flowers with Soft Suede ink.  Arrange flowers and leaves around the phrase.  Add tiny pearls to the flower centers.


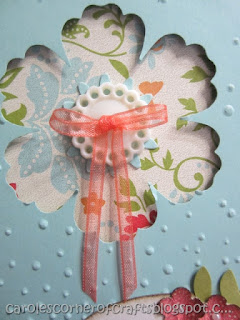
Punch the large flower from the Blossom Bunch punch in Pool Party cardstock.  Glue to center of the negative flower.  Add a Very Vintage button – I like to use enough glue that it squeezes up through the button holes.


Cut Everyday Enchantment Calypso Coral ribbon 8” long.  Make a bow then adhere to the button with mini glue dots. Trim.


Add a phrase from the High Tide stamp set.in Pool Party ink and the flower image from Punch Potpourri stamp set with Calypso Coral ink.  Stamp an envelope with the same flower image from Punch Potpourri stamp set with Calypso Coral ink.


I’m still working on the Everyday Enchantment DSP that I have loved and now chopped.  I chopped it in 5-1/4” strips then cut the strips into 4” pieces.  Kept the leftover strips too.  I have stored them in a Full Wide Stamp case. Kylie Bertucci has given us permission to Love It Chop It. 

You can order SU! products online and have them shipped directly to your door. Simply click on the “Shop Now” button in my banner (or I can order for you). I would be most happy to be your Canadian demonstrator (since April 2006).

Wednesday, December 5, 2018

White Winter Woods Christmas - One Hour Card Class 079 - OHCC079


Stamps: Winter Woods.

Cardstock: White, Gold Foil, Vellum Cardstock, Sparkle Glimmer Paper, Watercolor (for the snow).

Ink: Versamark.

Tools: Gold embossing powder, 1/8” Gold Metallic Edge Ribbon, Stamparatus, bone folder, purchased envelope, dimensionals, Fine Tip Glue, Tombow adhesive, snail adhesive, mini glue dots, sequins, Piercing Tool, Softly Falling embossing folder, Silicone Craft Sheet.

Run the snow piece through the Softly Falling embossing folder.  Apply Fine-Tip Glue or Tombow Glue to the bumps. Cover with Dazzling Diamonds. 


I ran the vellum piece through the Softly Falling embossing folder as well.  I used the ribbon to hold it to the gold foil – glue shows right through the vellum so it doesn’t work. 


Die cut the 2 spruce trees from white cardstock.  Colored the top spruce tree with Wink of Stella.  Adhered them together with mini dimensionals.  Added lots of sequins. 


Die cut these trees from Sparkle Glimmer Paper.  


Added a bow. 


For the inside of the card, I stamped the phrase from the Winter Woods stamp set with Versamark ink using the Stamparatus then heat emboss with Gold embossing powder.   Ran the flap of the envelope through the Softly Falling embossing folder. 

Tuesday, May 22, 2018

Daisy Delight - One Hour Card Class 057 - OHCC057


Stamps: Daisy Delight.

Cardstock: Very Vanilla, Cajun Craze, Tangerine Tango, Crushed Curry.

Ink: Black, Cajun Craze, Tangerine Tango, Crushed Curry.

Tools: bone folder, purchased envelope, Tombow adhesive, snail adhesive, glue dots, Softly Falling EF, black Sharpie marker, Faceted Gems.

Punches: Daisy.

This was a total copy of Connie’s card!  Just love it!  Follow her video for the instructions.

Love that the Faceted Gems can be colored with a black Sharpie marker!


Add a phrase and some flowers to the inside of the card.  


Decorate an envelope with the daisy image. 


If you have never made a card before, you will love these One Hour Card Class workshops!  We will complete a card with a matching envelope – ready for the mail!  I host card classes every Thursday, Friday and Saturday.  You pick the day and the time that suits you.  Message or email me for more info.  As a Stampin’ Up! demonstrator, I’m here to give you fun ideas, share specials & teach you about fabulous stampin products. Let's unleash your creativity!  You can order SU! products online and have them shipped directly to your door. Simply click on the “Shop Now” button in my banner (or I can order for you). I would be most happy to be your Canadian demonstrator.

Friday, April 6, 2018

Cricut Daisy - One Hour Card Class 067 - OHCC067


Stamps: Bunch of Blossoms, Whimsical Words (SAB 2010) or One Big Meaning (2017/2018).

Cardstock: Basic Grey, White, Melon Mambo, Blushing Bride.

Ink: Basic Grey, Melon Mambo.

Tools: bone folder, purchased envelope, sponge, dimensionals, Tombow adhesive, snail adhesive, glue dots, Softly Falling EF, Pinewood Planks EF, clear Faceted Gems, mini sequins trim, silver sequins

Punches: Banner, large oval.

Did a little bit of cheating here!  Found a daisy online and let my Cricut Explore Air cut it out!  How simple is that!  I also totally cheated and used Claire Daly’s card layout!

Stamp the sentiment from the Bunch of Blossoms stamp set on to white cardstock with Basic Grey ink.  Punch with the large oval punch.  Add dimensionals. 


Spong the petals with Blushing Bride ink and the centers with Melon Mambo ink.  Add a dimensional.  Add three silver sequins to the card front with glue dots.  Add a clear Faceted Gem to the daisy center.


Stamp a phrase from the Whimsical Words or One Big Meaning stamp set in Melon Mambo ink and adhere to the inside of the card.


Open the flap of a purchased envelope and run through the Pinewood Planks EF.  Lightly sponge with Basic Grey ink.


If you have never made a card before, you will love these One Hour Card Class workshops!  We will complete a card with a matching envelope – ready for the mail!  I host card classes every Thursday, Friday and Saturday.  You pick the day and the time that suits you.  Message or email me for more info.  As a Stampin’ Up! demonstrator, I’m here to give you fun ideas, share specials & teach you about fabulous stampin products. Let's unleash your creativity!  You can order SU! products online and have them shipped directly to your door. Simply click on the “Shop Now” button in my banner (or I can order for you). I would be most happy to be your Canadian demonstrator.


Tuesday, April 18, 2017

A Little Kindness - One Hour Card Class 029 OHCC029

So many pretty cards on Pinterest using this stamp set!  The small flower was colored with the Wink of Stella. 

We made a matching envelope.  Colored the centers of the flowers with Wink of Stella also. 

Stamps: Kinda Eclectic, Flower Shop, Petite Petals, Suite Sayings for inside. 

Ink: So Saffron, Wild Wasabi, Calypso Coral, Marina Mist.

Cardstock: paper for envelope, Very Vanilla, Marina Mist.

Accessories: Snail Adhesive, Tombow Glue, envelope punch board, Stampin’ Trimmer, scissors, bone folder, pencil, Sponge, Dimensionals, clear Wink of Stella, Rhinestone, silver sequins, Softly Falling embossing folder.

Punches: Pansy, Petite Petals.

If you have never made a card before, you will love these One Hour Card Class workshops!  We will complete a card with a matching envelope – ready for the mail!  I host card classes every Thursday, Friday and Saturday.  You pick the day and the time that suits you.  Message or email me for more info. I hope you will consider joining me as we learn how to get the very best from the products that we buy.  You can order SU! products online and have them shipped directly to your door. Simply click on the “Shop Now” button in my banner (or I can order for you). I would be most happy to be your Canadian demonstrator.


Tuesday, December 20, 2016

Merry Christmas Wishes - One Hour Card Class 035 OHCC035


If you have never made a card before, you will love these One Hour Card Class workshops!  We will complete a card with a matching envelope – ready for the mail!  I host card classes every Thursday, Friday and Saturday.  You pick the day and the time that suits you.  Message or email me for more info. I hope you will consider joining me as we learn how to get the very best from the products that we buy.  You can order SU! products online and have them shipped directly to your door. Simply click on the “Shop Now” button in my banner (or I can order for you). I would be most happy to be your Canadian demonstrator.

Smoky Slate cardSponge edges of card with Smoky Slate ink.  Sign the back.  Set aside.

White panel 5-1/4” x 4”.  Sponge edges in Soft Sky ink in a circular motion, having the outer edges dark and fading towards the center.  Run through the Softly Falling embossing folder with the most dots on the sky – lay the sponged part of the panel towards the logo.  Sandwich is: Standard platform – cutting pad – cardstock in the folder - cutting pad. 

Add 3-1/2” of silver Metallics Glitter tape (SAB 2016) about 7/8” from the top of the panel, wrapping a bit behind panel.  Adhere panel to card front.  Set aside.

Stamp phrase on 1-1/4” white cardstock using Smoky Slate ink.  Trace my flag template around it and cut out.  Set aside.

Stamp tree from Santa’s Sleigh stamp set on white cardstock 2-1/2” x 4-1/2” with Smoky Slate ink.  Lay the corresponding banner die on it from Santa’s Sleigh Thinlits Dies

Cut Smoky Slate cardstock 2-1/2” x 3-3/4” for the sleigh and Silver Foil sheet 1-3/4” x 3-1/4” for the sleigh topper.  Use corresponding dies to cut to cut all at the same time, using the Santa’s Sleigh Thinlits Dies.  Sandwich is: Magnetic platform – cutting pad - cardstock – wax paper - die with cutting blade down – cutting pad. 

Punch three stars using the Itty Bitty Accents punch from the scraps of Silver Foil.  Set aside.

Use the Press ‘n Seal wrap technique to adhere the intricate die.  These pictures are taken from my OHCC041 post.  You can use this technique to glue any intricate die.  Lay right side of the intricate sleigh on Press ‘n Seal wrap.  Press lightly to make the image cling.  Apply Fine Tip glue to the die.  

Pick up the Press ‘n Seal wrap and transfer the intricate sleigh to the main sleigh.  Press in place.  

Discard Press ‘n Seal wrap.

Add tree to the card front.  Add the sleigh using the Fine Tip Glue Pen.  Set aside.

Sponge edges of phrase in Soft Sky ink.  Add Dimensionals and adhere to card front.

Add stars to best suit the card.

Fold a piece of writing tablet paper in half. Stamp with a phrase and an image if desired.  Adhere to inside of the card.

Over stamp an envelope with the tree from the Santa’s Sleigh stamp set.


Related Posts Plugin for WordPress, Blogger...