Stamps: Bunch of Blossoms, Whimsical Words (SAB 2010) or One Big Meaning
(2017/2018).
Cardstock: Basic Grey, White, Melon Mambo, Blushing Bride.
Ink: Basic Grey, Melon Mambo.
Tools: bone folder, purchased envelope, sponge, dimensionals, Tombow
adhesive, snail adhesive, glue dots, Softly Falling EF, Pinewood Planks EF,
clear Faceted Gems, mini sequins trim, silver sequins
Punches: Banner, large oval.
Did a little bit of cheating here!
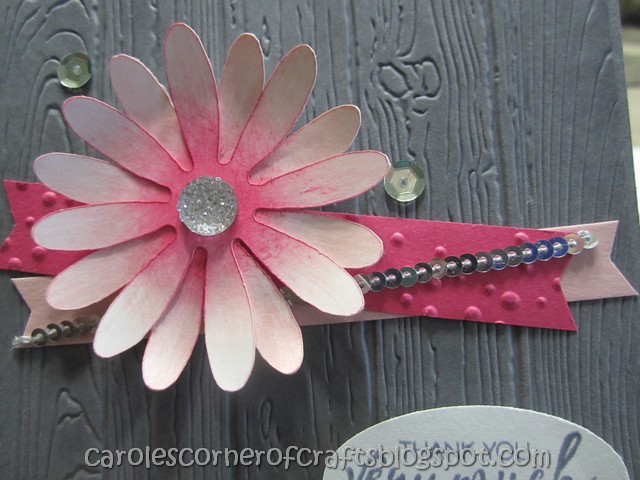
Found a daisy online and let my Cricut Explore Air cut it out! How simple is that! I also totally cheated and used Claire Daly’s card layout!
Stamp the sentiment from the Bunch of Blossoms stamp set on to white
cardstock with Basic Grey ink. Punch
with the large oval punch. Add
dimensionals.
Spong the petals with Blushing Bride ink and the centers with
Melon Mambo ink. Add a dimensional. Add three silver sequins to the card front with glue dots. Add a clear Faceted Gem to the daisy center.
Stamp a phrase from the Whimsical Words or One Big Meaning stamp set
in Melon Mambo ink and adhere to the inside of the card.
Open the flap of a purchased envelope
and run through the Pinewood Planks EF.
Lightly sponge with Basic Grey ink.
If you have never made a card before,
you will love these One Hour Card Class workshops! We will complete a
card with a matching envelope – ready for the mail! I host card classes every Thursday, Friday
and Saturday. You pick the day and the
time that suits you. Message or email me for more info. As a
Stampin’ Up! demonstrator, I’m here to give you fun ideas, share specials &
teach you about fabulous stampin products. Let's unleash your creativity! You can order SU! products online and have
them shipped directly to your door. Simply click on the “Shop Now” button in my
banner (or I can order for you). I would be most happy to be your Canadian demonstrator.
Stamps: Bunch of Blossoms, Whimsical Words (SAB 2010) or One Big Meaning
(2017/2018).
Cardstock: Basic Grey, White, Melon Mambo, Blushing Bride.
Ink: Basic Grey, Melon Mambo.
Tools: bone folder, purchased envelope, sponge, dimensionals, Tombow
adhesive, snail adhesive, glue dots, Softly Falling EF, Pinewood Planks EF,
clear Faceted Gems, mini sequins trim, silver sequins
Punches: Banner, large oval.
Did a little bit of cheating here!
Found a daisy online and let my Cricut Explore Air cut it out! How simple is that! I also totally cheated and used Claire Daly’s card layout!
Stamp the sentiment from the Bunch of Blossoms stamp set on to white
cardstock with Basic Grey ink. Punch
with the large oval punch. Add
dimensionals.
Spong the petals with Blushing Bride ink and the centers with
Melon Mambo ink. Add a dimensional. Add three silver sequins to the card front with glue dots. Add a clear Faceted Gem to the daisy center.
Stamp a phrase from the Whimsical Words or One Big Meaning stamp set
in Melon Mambo ink and adhere to the inside of the card.
Open the flap of a purchased envelope
and run through the Pinewood Planks EF.
Lightly sponge with Basic Grey ink.
If you have never made a card before,
you will love these One Hour Card Class workshops! We will complete a
card with a matching envelope – ready for the mail! I host card classes every Thursday, Friday
and Saturday. You pick the day and the
time that suits you. Message or email me for more info. As a
Stampin’ Up! demonstrator, I’m here to give you fun ideas, share specials &
teach you about fabulous stampin products. Let's unleash your creativity! You can order SU! products online and have
them shipped directly to your door. Simply click on the “Shop Now” button in my
banner (or I can order for you). I would be most happy to be your Canadian demonstrator.