Friday, October 7, 2016

One Sheet Wonder Cards – Card B - One Hour Card Class 032 OHCC032


If you have never made a card before, you will love these One Hour Card Class workshops!  Because we are making 5 cards in this class, it may take longer than one hour.  However, we will complete all the cards, inside and out, with a matching envelope – ready for the mail!  I host card classes every Thursday, Friday and Saturday.  You pick the day and the time that suits you.  Message or email me for more info. I hope you will consider joining me as we learn how to get the very best from the products that we buy.  You can order SU! products online and have them shipped directly to your door. Simply click on the “Shop Now” button in my banner (or I can order for you). I would be most happy to be your Canadian demonstrator.

Please refer to my Card A for the One Sheet Wonder pattern and cutting instructions following Rebecca’s pattern.  For some reason, I can’t get to Rebecca’s page.  Here are her cards on Pinterest – maybe you will have better luck!  Now on to Card B or the 2nd card of 5.

One Sheet Wonder Card B – Tidings: 


Prepare card by cutting white cardstock at 5-1/2” x 8-1/2”.  Fold in half to create a top fold card – a bone folder gives you a crisp fold.  Ink and stamp off with the snowflake stamp using Crumb Cake ink.  Use the thicker branch stamp and stamp at the top left corner using Mossy Meadow ink.  Stamp and sign the back.  Set aside. 


Remember the writing tablet?  Perfect for the inside of cards.  Fold a piece in half.  


Stamp a phrase and over stamp with an image.  Adhere to inside of the card.


Cut a flag on one end of each of the ½” wide DSP strips with the Banner punch. 


Starting at the right side of the card, adhere strip at 3/8” away from edge.  Glue second strip 3/8” away from the first strip.  Finish the other two strips the same distance apart. 


Ink the holly and berries stamp with Mossy Meadow ink.  Apply under each flag as shown above.  Set aside.

Stamp phrase on white cardstock using Cherry Cobbler ink.  Use the template to cut to the right size.  Adhere to Mossy Meadow panel cut ¼” bigger than the phrase or at least 2” x 2-3/4”.  Trim if necessary.  Adhere to the card front.  Set aside. 


Die cut 2 small pine branches from Mossy Meadow cardstock and one berries from Crumb Cake cardstock. Die cut two pine cone fronts and two pine cone backs from Crumb Cake cardstock.  Sandwich is: Magnetic platform – cutting pad - cardstock – wax paper - die with cutting blade down – cutting pad.  Ink half of the fronts of the pine cones with Versamark.  Heat emboss with white embossing powder - quit embossing the minute it is melted to avoid burning.  Repeat for the other half.  By doing it this way, you have something to hold on to when heat embossing.  I re-inked and heat embossed a second time so that the embossing powder was nice and thick.  Adhere the backs of the cones to the fronts using the fine tip glue pen. 


Adhere pine cones and branches to the card front in a pleasing manner. 


Cut Cherry Cobbler Bakers Twine at 7”.  Tie into a bow with my bow maker that hubby made for me. 


Trim ends.  Thread two green bells with 6” of gold metallic thread and tie on to the bow.  Glue bow to the top of the pine cones.  Tuck the stem of the berries under the pine cones – you may need to rip some of the stem and berries off to make it fit.  Add Cherry Cobbler Dazzling Details to each of the berries under the flags and to the berries under the pine cones – may need to re-apply once it dries. 


Make an envelope using the envelope punch board.  Decorate with stamp images. 


Stamps: Christmas Pines (Holiday 2016), signature stamp or an address label.

Ink: Cherry Cobbler, Mossy Meadow, Crumb Cake, Versamark.

Cardstock: paper for envelopes, Merry Meadow DSP (2015 Holiday), Mossy Meadow, Crumb Cake, White.

Accessories: Snail Adhesive, Tombow Glue, glue dots, envelope punch board, Stampin’ Trimmer, scissors, bone folder, pencil, Dimensionals, silicone craft sheet, Cherry Cobbler Bakers Twine, Pretty Pines Thinlits dies, gold thread, Christmas bell charms, Cherry Cobbler Dazzling Details, wax paper for die cutting cut into 1” strips, paper piercer, 5” x 8” writing tablet paper for inside of cards or cut computer paper to this size, fine tip glue pen, white embossing powder.

Punch: Banner.

Stay tuned for Card C coming soon.

Tuesday, October 4, 2016

One Sheet Wonder Cards – Card A - One Hour Card Class 032 OHCC032


The above picture shows the cards we will make using one sheet of 6” x 6” DSP (designer series paper).  The first thing we need to do is cut our 6” x 6” DSP following Rebecca’s One Sheet Wonder pattern(101projectswithrebecca.com). We will get 5 cards from just this one piece of DSP (Cards A to E).  
I am using Merry Moments from the Holiday 2015 catalogue but any DSP will work, this is just what I had at the 
time I was working on these cards.  Make the long cuts first then the crosswise cuts.  

Be sure to mark each piece with the corresponding letter using a post it note or write directly on each piece lightly with a pencil. 

One Sheet Wonder Card A - Joy: 

Let us start making Card A.

Prepare card by cutting Old Olive cardstock at 5-1/2” x 8-1/2”.  Fold in half for a side fold card – a bone folder gives you a crisp fold.  Stamp and sign the back or apply an address label.  Set aside.

Remember the writing tablet?  Perfect for the inside of cards.  Fold a piece in half.

Stamp a phrase and over stamp with an image.  

Adhere tablet paper to inside of the card.

Cut a Mossy Meadow panel at 5-14” x 4”.  Run through the Framed Tulips embossing folder.  Adhere to card front.

The DSP panel for Card A measures 2” x 3”.  The Cherry Cobbler layer is cut ¼” bigger, the Old Olive is cut ½” bigger and the white layer is cut ¾” bigger than the DSP piece.  This is just a guideline – you can cut each layer a bit smaller if you want.  Set aside. 

Punch the scallop circle from the center of the Cherry Cobbler layer.  Set aside.

Use the Mossy Meadow marker to color the word ‘Joy’.  

Huff on it then stamp in the center of the white panel.  Punch out with the circle punch.  Use the markers to ink the holly and berries stamp.  Huff on it before stamping under ‘Joy’.  Adhere to the scallop circle. 

Cut gold cord at 20”.  Wrap around two fingers twice or so. 

Then wrap around 3 fingers a couple of times or so.  

Pinch together and tape or glue dot to the back of the circle. 

Trim off any tails.  Apply mounts towards the bottom - I used a mat board.  Set aside.

Mount layers together.

Adhere towards the top left side of the card.

Die cut 2 small pine branches from Mossy Meadow cardstock and one medium branch from Old Olive cardstock.  Sandwich is: Magnetic platform – cutting pad - cardstock – wax paper - die with cutting blade down – cutting pad. 

Adhere the branches to the card front in a pleasing manner.  

Cover the ends of the branches with the circle. 

Add three pearls.  Here's a little trick to space your pearls or rhinestones evenly - use your mat pack if you are lucky enough to have one as it retired 4 or 5 years ago.  The pearls and rhinestones fit perfectly inside the largest holes, helping you line them perfectly straight on your card. 

Make an envelope using the envelope punch board.  Decorate with stamp images.

Stay tuned for Card B coming soon.

Stamps: Christmas Pines (Holiday 2016), signature stamp or an address label.

Ink: Cherry Cobbler, Mossy Meadow, Cherry Cobbler marker, Mossy Meadow marker.
Cardstock: paper for envelopes, Merry Meadow DSP (2015 Holiday), Cherry Cobbler, Mossy Meadow, White.

Accessories: Snail Adhesive, Tombow Glue, glue dots, envelope punch board, Stampin’ Trimmer, scissors, bone folder, pencil, Dimensionals, silicone craft sheet, Framed Tulips (retired) embossing folder, Pearl Basic Jewels, Pretty Pines Thinlits dies, gold cord, wax paper for die cutting cut into 1” strips, paper piercer, 5” x 8” writing tablet paper for inside of cards or cut computer paper to this size, fine tip glue pen, mat pack (optional).

Punches:  scalloped circle, 1-3/8” circle.

Friday, September 30, 2016

SU Workshop Cards W151, W152, W153

Here are some cards we made at Joanne’s workshop.  She always has a lot of choices for us but these are the ones I chose.

Workshop Card W151

Paper: Basic Black, Melon Mambo, Whisper White, Soft Sky.
Stamps: Bloomin’ Love.
Ink: Soft Sky, Melon Mambo, black marker for eyes,
Accessories: Sponges, Dimensionals, Woodlands EF, black scalloped dotted black ribbon, Melon Mambo twine, pearl, Expressions thinlits dies, brayer, Bitty banners Framelits.
Punches: fox builder, Itty Bitty Accents pack

Workshop Card W152

Paper: Candy Cane Lane DSP, Early Espresso, Real Red, Crumb Cake.
Stamps:  Cookie Cutter Christmas, Sincere Salutations.
Ink: Early Espresso.
Accessories: Stripes EF, Pearl, Lots of Tags Sizzlit, red gingham ribbon, snowflake embellishment, sewing machine.
Punches: Cookie Cutter Builder.

Workshop Card W153

Paper: Blushing Bride, White.
Stamps: Wild About You, Banner Blast, Itty Bitty Banners.
Ink: Blushing Bride, Smoky Slate.
Accessories: Blushing Bride twine, Bitty Banners Thinlits, Lucky Star EF.
Punches: Banner, Star.

Thank you for stopping by.  Both Joanne and I are SU! Demonstrators so if at any time you would like to purchase SU! products, give her a call or from my Blog, click on the Shop Now button.  Your order will be delivered right to you (you do have to give SU! a street address, not a box #).

Friday, September 23, 2016

Pleated Skirt Fold Technique - One Hour Card Class 014 OHCC014

Stamps: Flower Shop, Suite Sayings.

Cardstock: Whisper White, Calypso Coral, Lost Lagoon, Hello Honey, Wildflower Fields DSP (SAB 2016).

Ink: Calypso Coral, Versamark. Hello Honey, Lost Lagoon.

Accessories: Iridescent Ice EP, button, Crisp Cantaloupe thick bakers twine, elegant dots embossing folder, Snail Adhesive, pencil, Sponge, Multipurpose Liquid Glue, glue dots, envelope punch board, Stampin’ Trimmer, scissors, bone folder, Banners framelit, heat gun, Stylish Stripes embossing folder.

Punches: Pansy.

I have seen the Pleated Skirt Fold technique also called the Curtain Fold or Drape Fold Technique.  The fun thing about this card is you can use any DSP without much waste since it is cut at 3” x 6”.  I am using SU Wildflower Fields DSP (2016 SAB) - the colors that match it are Basic Black, Blackberry Bliss, Calypso Coral, Hello Honey, Lost Lagoon, Old Olive, White.  I did find that the more color the skirt has, the nicer the card looks.

Prepare card by cutting white cardstock at 4-1/4” x 8-1/2”.  Fold in half to create a top fold card – a bone folder gives you a crisp fold.  Stamp and sign the back.  Set aside.

Cut coral cardstock 4 x 5-1/4”.  Run through the dots embossing folder.  Set aside.

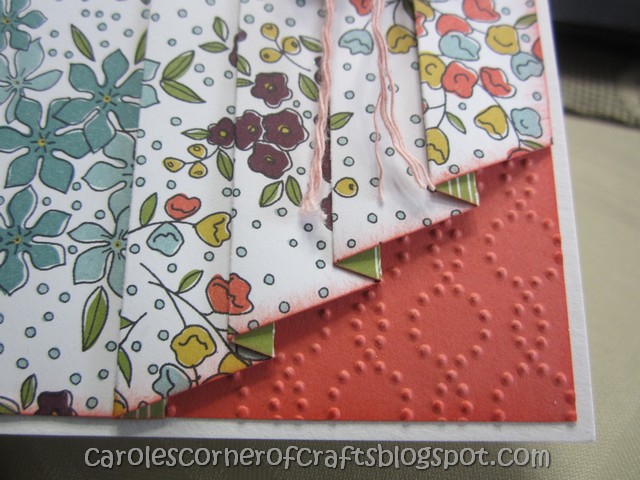
Frenchie has a wonderful video on how to score the paper so do watch it as she explains it really good.  Cut a panel of DSP at 3” x 6”.  Starting from the left and with wrong side of paper facing you, score at 3/4”, 1”, 1-3/4”, 2”, 2-3/4”, 3”, 3-3/4” and 4”.  Turn DSP to the right side with the non scored side to your left.  Put a pencil mark at the second score line to the left and at 1-1/2” on the 3” side to your right.  Join the pencil marks and cut.  Sponge bottom edge on both front and back in coral.  Set aside.

Mountain and valley fold on the score lines.  Crease the pleats with a bone folder.  Put a touch of adhesive at the top only of each pleat to hold the pleats in place.  Adhere skirt to the coral panel but do not apply adhesive to the pleats.  Set aside.

Cut a strip 5/8” x 4-1/8” from Lost Lagoon.  Sponge the long edges with coral and run the strip through the stripes embossing folder.  Adhere to coral panel just covering the pleats a bit (measure down about 1-3/4” from top).  Trim even with coral panel if necessary.  Sponge all edges with coral.  Adhere to card front.  Set aside. 

Cut a panel 5-1/4” x 4” from white cardstock for the inside of card.  Adhere the triangle piece that was cut off the pleats to any corner.  Sponge edges of panel in coral.  Use Snail Adhesive to adhere to the inside of the card.  Set aside. 

Cut a scrap of white cardstock 2 x 3”.   Here is how you can emboss with dye inks: Ink the phrase using Versamark ink.  Lightly tap some lagoon ink on top of that and stamp on the scrap.  Emboss with Iridescent Ice EP.  Cut with Banners framelit.   Sponge edges with lagoon. Apply mounts – I forgot to add them to mine! Adhere to top of card. 

Pansy Punch Tips here (scroll down on her blog) or if you look closely, all of the petals are kind of heart-shaped with rounded tops.  But, there is one petal that has a flat, almost indented spot, and I use that as my marking point.  It's actually the petal that points toward the bottom of the punch, so that makes it easier, too!

Ink a flower using Versamark ink.  Lightly tap some lagoon ink on top of that and stamp on a white cardstock scrap. Emboss with Iridescent Ice EP.  Punch out.  Clean the stamp and repeat for another flower on a scrap of honey cardstock.  Curl the petals on both flowers.  Stack on top of each other and glue together.  Adhere to the lagoon band on the card front.  Set aside.

Cut twine 8” long.  Pull apart so you only have 4 strands.  Thread through a button and tie a bow.  Adhere to center of flower with a glue dot. Trim twine just above the pleats.  Add a dab of liquid glue to the knot to keep in place. 


Make an envelope from a calendar page using the envelope punch board.

Tuesday, September 20, 2016

SU273 Birthday Wishes Card


Paper: Perfect Plum DSP, Garden Green, Perfect Plum, Crushed Curry, White.

Stamps: For a Friend.

Ink: Perfect Plum.

Accessories: Crushed Curry marker, Garden Green marker, Square Lattice EF, Flower Frenzy Bigz L Die (for leaf and flower), mounts, sponge, Crystal Effects.


Punches: ½” circle, ¼” circle, scallop edge border, dotted ribbon border.

Friday, September 16, 2016

Milestone Birthday – 11 years old – B11e


I saw a video by Brenda Keenan at keenankreations done using this Flower Shop stamp set and the Pansy punch so I copied it.  I added a dab of Crystal effects to the center of the flowers then sprinkled with Dazzling Diamonds.  I used my Coluzzle to cut a 2.75” circle.  It is put together the same as Brenda’s.  The "11" was done on the computer because I don't have any number stamps that would fit.

Cardstock: Crushed Curry, Garden Green, white, Rich Razzleberry, Razzleberry Lemonade DSP (09/10).

Ink: Rich Razzleberry.

Stamp: Flower Shop, Sincere Salutations.

Accessories: sponge, 3/8” taffeta ribbon, crystal effects, Dazzling Diamonds, mounts.

Punches: Bird Builder, Pansy, ¾” circle, 1” circle, Coluzzle.

Tuesday, September 6, 2016

SU258 Happy Birthday card


Another Happy Birthday wish!  I wonder what this jolly chap is serving!

Paper: Black, White, Mellow Moss, Spring Flowers DSP (2006/07)

Stamps: Viola, Looks Like Spring, See You Around jumbo wheel.

Ink: Black, Mellow Moss.

Accessories: Mellow Moss marker, sponge.

Punches: modern label, Scallop oval, wide oval, ¼” circle.

I punched the scallop oval and cut it in half to fit under the wide oval.  I masked my Chef then stamped over his pants


Related Posts Plugin for WordPress, Blogger...