Showing posts with label tea towel apron. Show all posts

Tuesday, March 4, 2014

Sewing – Child’s Tea Towel Apron with D-ring neck closure

This apron fits approximately a 7 to 9 year old child.  The tea towel measures 25” long by 16” wide.

Fold the tea towel in half.  Measure from the center fold and place a pin at 3.5” across the top.  Measure down at the side and place another pin at 10”.

Place your ruler to join these pin marks.

And cut.

Serge arm openings on the apron.  Chalk a line at ½” from edges, press under and edge stitch.  If you don’t have a serger, just press under at ¼” twice.  Set aside.

Cut two strips of fabric 3” wide by the width of the fabric – the gingham I am using is 45” wide.

Sew the strip together to make a 90” long piece.  Press in half.

Bring raw edges to middle fold line and press.

Edge stitch both long sides of the strip.

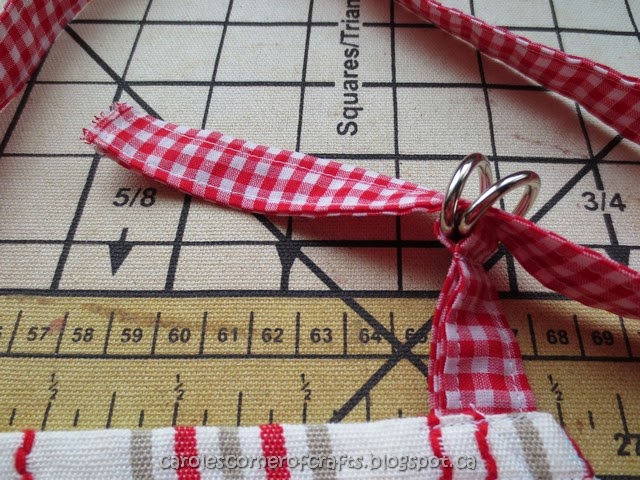
Cut 5” off one end and slide two ¾” D-rings on to the 5” strip.

Bring the cut ends of the strap together, pin and stitch close to D-rings with your zipper foot.

Stitch strip with D-Rings to top right of the apron. Stitch a strip, about 18” to 22" to top left of the apron.  Finish raw edges with a zigzag stitch.

Cut the remaining strip in half and sew to each side of the apron for ties.

To close the D-ring, slip your strip into both rings.

Bring the tail over the top of the first D-ring and under the second one.

You can adjust the strip of fabric to make the strap adjustable.

Monday, February 3, 2014

Sewing – Elastic Neck Child’s Tea Towel Apron

This apron with elastic around the neck is so much easier for little ones to “do it themselves”!  I needed to cut my towel to about 17” long for my 3 year old cook.   I cut it off the top to leave the hemmed piece at the bottom.  Then, fold the towel in half.  From the center fold, measure out 2.5”.  From the sides, measure down 6”.  Join the two pins with your ruler and cut off.  Although this is not the apron I used, you want it to end up looking like this – just follow the above measurements if you are making one for a 3 year old.


Follow these instructions for making your own binding tape.  Let us now apply it to this apron. I attached a piece across the top using a zigzag stitch.


I stitched together 14” for one tie, encased one edge of the apron until I got to the neck piece.  I measured out 21” of binding to go around the neck, left a small opening to thread elastic at each end, and continued sewing the other side of the apron and tie.


I used 10” of one eighth wide elastic to thread through the opening.


I sewed the hole closed; catching the elastic in the seam, then trimmed the elastic.


My 3 year old is ready to bake!

Friday, December 30, 2011

Sewing - Simple Tea Towel Apron to Sew

I save Fridays for posting my scrap pages on this Blog.  I guess I didn’t realize there was a Friday that landed on December 30th for this year as I don’t have a scrap page prepared!  Instead, I want to share a tea towel apron that I sewed.  I’ll get back on track for next week.  I am posting this on both my SU! and Magenta Blogs so if you are a Follower of both my Blogs, you will see this post again.  It is just too neat not to share.
Anyways, if you have 20 minutes to spare, you must try this apron.  I am not the originator of this idea – it has been around for some time.  I had never tried it before and it sure is simple.

Supplies
1 tea towel 19”x 28“ or so.
3 m of 1” wide ribbon or you sure could sew a tube by joining lightweight fabric together.

You need to wash and dry the tea towel to shrink it before beginning.  Now press it.  Check the seams and re-sew if needed.
I found two spots that needed re-sewing on my towel.
Press the tea towel in half lengthwise with right sides together. Find the center of your ribbon and align it with the center of the towel's folded edge. I know, I know – this doesn’t seem right that you are pinning the ribbon on the wrong side of the tea towel but trust me, that is what you have to do.  Pin ribbon along folded edge, through both layers of the towel.  Sew along the top and bottom of the ribbon, through  all layers.
Mark the center of your ribbon and the center of the towel's folded edge with pins.
Sew through all thicknesses.
Fold the top layer of the tea towel up to meet the ribbon. Pin just the folded top layer, along the edges.  Now sew through the edges only.  Bar tack at the top if possible.  There is quite a thickness there so be careful – don’t break a needle as I did.
Pin just the folded top layer, along the edges.
Sew along the edges only.
Find the center of this flap and mark.  My apron had a line that I followed while sewing so it was pretty simple.  Now you have two healthy size pockets on your apron.  Again, bar tack at the top for security.  Finish the ends of your ribbon.  Since I am giving this as a gift, I added a label to the inside, bottom edge.  I’ve had these labels forever, I don’t even know where they came from.
Find the center of this flap and mark.
Finish the ends of your ribbon.
I added a label to the inside, bottom edge.
Wrap the ties back around to the front and tie them under the pocket.  That way, the apron will not move around while you are wearing it.  If I sew another apron, I might just use enough ribbon so that it ties at the back only – about 2 meters.  It takes a lot of ribbon to go around a guy twice!

Please leave me a comment if you enjoyed this.

Related Posts Plugin for WordPress, Blogger...