Now
that we have all these fancy hair bows and headbands done, we need a place to
store them. I also noticed that my
granddaughters were quite often digging through cluttered, unorganized drawers
in search of the right hair accessory so thought I would help out! Pinterest has several ideas for these but
most of them don’t give the instructions on how they did them. This is what I
did:
I
disassembled a picture frame, saving all pieces as I might need them later. For those of you that know her, Porter gave
me this frame as well as many others.
Can’t believe she parted with a farm picture!!
Measure
where to place the hooks. I started at ½ inch from each end then 2
inches apart. I knew that the
measurements would be off because I was using only 8 hooks so I did four hook
measurements from each side that way they would be perfectly even. That just
meant the space in between the 4th and 5th hook would be a tad bigger (3″) –
that’s ok as I want to make loops to hold some hard headbands.
I started each hole with a nail which made it
easy to screw the cup hooks in place. These hooks hold pony tail elastics, soft
headbands, poofy pony tail holders etc.
I
used pliers to help tighten the hooks.
Then
I took my frame to the garage to spray paint.
I set it on wax paper so that I wouldn’t have trouble with it
sticking.
I
only painted the front and sides as I didn’t see the point of painting the
back.
I
also spray painted the cardboard part of the frame backing - the one that came
with the frame.
I
saw these loops to hold the hard headbands on the SaiFou Image blog. I wanted to make a few of these. I am working at both ends of the ribbon so
remove the spool. I will be making a
third one too. Seal the ends with a
lighter.
Put
a pin at 1.5” from bottom.
Make
a fold at the pin.
From
the edge that has been sealed, put another pin at 1.5” away from it.
Fold
on that pin to meet the sealed end.
From
that fold, put another pin at 1.5”, fold on it etc until you have however many
hard headband holders you want.
Sew
the top folds down.
And
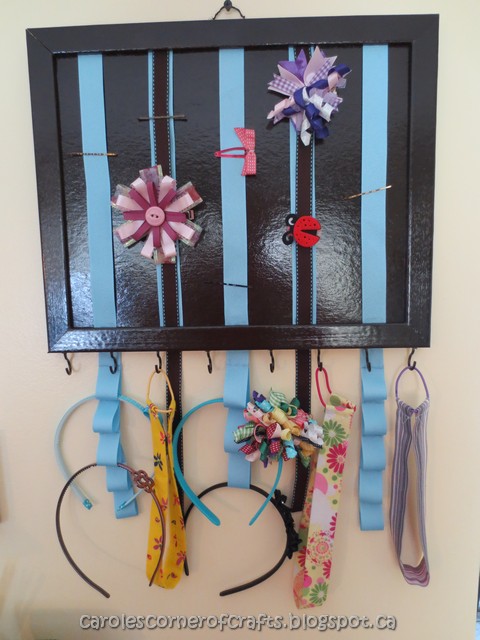
here they are finished.
The
long ends of your frame are the top – run your ribbons from top to bottom and
space them out the way you want them. My board is 14” wide so I marked a center
line, a line from each side at 1.5” and two more lines at 2.75” from each end
line. I stuck pins on each line in case
my marks didn’t show up for you.
Measure
up from the top loop at about 2”.
Match
those pins with the bottom of the board.
Tack in place with pins.
Remove
pins from the bottom of the board and set the board in the frame. Use scotch tape to hold the top tails in
place. Don’t pull the ribbons too tight
as you need a little give so you can clip your hair bows on.
Remove
from frame. Flip the bottom ribbons out
of your way. Add a touch of glue. Replace the ribbon and let dry.
I
placed a 5/8” piece of grosgrain ribbon on top of two pieces of the blue for
the reminder of the holder. Just
remember to seal all cut ends of the ribbon.
Scotch
tape the tops of these to the board.
Tape the bottom of the blue pieces to the back of the board too. I am going to leave the smaller ribbons dandling
for extra clips.
Add
a dab of glue on the frame where each ribbon touches it at the bottom and let
dry.
Because
we no longer have the thickness of the mirror, I cut strips of 1” packaging
cardstock to take up the slack. I had to
use a double thickness. I glued the
pieces together as well as to the back then pushed the pins back in place.
Now
you can remove the scotch tape from the back.
Trim and seal your ribbons then glue them securely to the back.
If
desired, simply cut out a piece of cardboard or cardstock and place into the
back of the frame to hide your high tech finishing method! I left mine as is – if it is hanging on the
wall, no one will see the back I figure.


Now
that we have all these fancy hair bows and headbands done, we need a place to
store them. I also noticed that my
granddaughters were quite often digging through cluttered, unorganized drawers
in search of the right hair accessory so thought I would help out! Pinterest has several ideas for these but
most of them don’t give the instructions on how they did them. This is what I
did:
I
disassembled a picture frame, saving all pieces as I might need them later. For those of you that know her, Porter gave
me this frame as well as many others.
Can’t believe she parted with a farm picture!!
Measure
where to place the hooks. I started at ½ inch from each end then 2
inches apart. I knew that the
measurements would be off because I was using only 8 hooks so I did four hook
measurements from each side that way they would be perfectly even. That just
meant the space in between the 4th and 5th hook would be a tad bigger (3″) –
that’s ok as I want to make loops to hold some hard headbands.
I started each hole with a nail which made it
easy to screw the cup hooks in place. These hooks hold pony tail elastics, soft
headbands, poofy pony tail holders etc.
I
used pliers to help tighten the hooks.
Then
I took my frame to the garage to spray paint.
I set it on wax paper so that I wouldn’t have trouble with it
sticking.
I
only painted the front and sides as I didn’t see the point of painting the
back.
I
also spray painted the cardboard part of the frame backing - the one that came
with the frame.
I
saw these loops to hold the hard headbands on the SaiFou Image blog. I wanted to make a few of these. I am working at both ends of the ribbon so
remove the spool. I will be making a
third one too. Seal the ends with a
lighter.
Put
a pin at 1.5” from bottom.
Make
a fold at the pin.
From
the edge that has been sealed, put another pin at 1.5” away from it.
Fold
on that pin to meet the sealed end.
From
that fold, put another pin at 1.5”, fold on it etc until you have however many
hard headband holders you want.
Sew
the top folds down.
And
here they are finished.
The
long ends of your frame are the top – run your ribbons from top to bottom and
space them out the way you want them. My board is 14” wide so I marked a center
line, a line from each side at 1.5” and two more lines at 2.75” from each end
line. I stuck pins on each line in case
my marks didn’t show up for you.
Measure
up from the top loop at about 2”.
Match
those pins with the bottom of the board.
Tack in place with pins.
Remove
pins from the bottom of the board and set the board in the frame. Use scotch tape to hold the top tails in
place. Don’t pull the ribbons too tight
as you need a little give so you can clip your hair bows on.
Remove
from frame. Flip the bottom ribbons out
of your way. Add a touch of glue. Replace the ribbon and let dry.
I
placed a 5/8” piece of grosgrain ribbon on top of two pieces of the blue for
the reminder of the holder. Just
remember to seal all cut ends of the ribbon.
Scotch
tape the tops of these to the board.
Tape the bottom of the blue pieces to the back of the board too. I am going to leave the smaller ribbons dandling
for extra clips.
Add
a dab of glue on the frame where each ribbon touches it at the bottom and let
dry.
Because
we no longer have the thickness of the mirror, I cut strips of 1” packaging
cardstock to take up the slack. I had to
use a double thickness. I glued the
pieces together as well as to the back then pushed the pins back in place.
Now
you can remove the scotch tape from the back.
Trim and seal your ribbons then glue them securely to the back.
If
desired, simply cut out a piece of cardboard or cardstock and place into the
back of the frame to hide your high tech finishing method! I left mine as is – if it is hanging on the
wall, no one will see the back I figure.